QT
QT是一个跨平台的应用程序和用户界面框架,用于开发图形用户界面(GUI)应用程序以及命令行工具。https://www.qt.io/zh-cn/
部署空项目流程
macos系统
1)启动qt creator,并创建新项目
2) build:这是项目的构建目录,所有构建输出文件都会存放在这里。
.cmake:CMake 生成的内部配置文件目录,包含一些缓存和临时文件。
CMakeFiles:CMake 生成的辅助文件目录,包含构建过程中使用的中间文件和配置文件。
project1_autogen:自动生成的文件目录,通常包含由 CMake 自动生成的代码文件。
project1.app:macOS 应用程序包目录,包含构建生成的 macOS 应用程序。
Contents:应用程序包的内容目录,包含应用程序的所有资源和可执行文件。
MacOS:应用程序的可执行文件目录,包含实际的可执行文件。
cmake_install.cmake:CMake 生成的安装脚本文件,用于安装构建生成的文件。
CMakeCache.txt:CMake 缓存文件,包含项目配置的缓存信息。
compile_commands.json:CMake 生成的编译命令文件,包含编译每个源文件时使用的编译命令,供 C/C++ 扩展使用以提供代码提示。
Makefile:CMake 生成的 Makefile 文件,用于使用 make 工具进行构建。
3)vscode配置文件
1 2 3 4 5 6 7 8 9 10 11 12 13 14 15 16 17 18 19 20 21 22 23 24 25 { "configurations" : [ { "name" : "Mac" , "defines" : [ ] , "macFrameworkPath" : [ "/Library/Developer/CommandLineTools/SDKs/MacOSX.sdk/System/Library/Frameworks" ] , "compilerPath" : "/usr/bin/clang" , "cStandard" : "c17" , "cppStandard" : "c++17" , "intelliSenseMode" : "macos-clang-arm64" , "compileCommands" : "${workspaceFolder}/build/compile_commands.json" } ] , "version" : 4 }
cppdbg调试
1 2 3 4 5 6 7 8 9 10 11 12 13 14 15 16 17 18 19 20 21 22 23 24 25 26 27 28 29 30 31 32 33 34 35 36 37 38 { "version" : "0.2.0" , "configurations" : [ { "name" : "Launch Debug" , "type" : "cppdbg" , "request" : "launch" , "program" : "${workspaceFolder}/build/${workspaceFolderBasename}.app/Contents/MacOS/${workspaceFolderBasename}" , "args" : [ ] , "stopAtEntry" : false , "cwd" : "${workspaceFolder}" , "preLaunchTask" : "Build" , "environment" : [ ] , "externalConsole" : false , "osx" : { "MIMode" : "lldb" } , "linux" : { "MIMode" : "gdb" , "setupCommands" : [ { "description" : "Enable pretty-printing for gdb" , "text" : "-enable-pretty-printing" , "ignoreFailures" : true } ] } , "windows" : { "program" : "${workspaceFolder}/build/${workspaceFolderBasename}" } , "visualizerFile" : "/Users/liuchuanxi/Library/Application Support/Code/User/workspaceStorage/c1a684b63ca8c4024c16455bcff0c27c/tonka3000.qtvsctools/qt.natvis.xml" } ] }
lldb调试
1
2
3
4
5
6
7
8
9
10
11
12
13
14
15
16
17
18
19
20
21
22
23
24
25
26
27
28
29
30
31
32
33
34
35
36
37
38
{ "version" : "0.2.0" , "configurations" : [ { "name" : "Launch Debug" , "type" : "lldb" , "request" : "launch" , "program" : "${workspaceFolder}/build/${workspaceFolderBasename}.app/Contents/MacOS/${workspaceFolderBasename}" , "args" : [ ] , "cwd" : "${workspaceFolder}" , "preLaunchTask" : "Build" , "terminal" : "console" , "windows" : { "program" : "${workspaceFolder}/build/${workspaceFolderBasename}" } , } ] }
1 2 3 4 5 6 { "cmake.sourceDirectory" : "${workspaceFolder}/CMakeLists.txt" , "qt-ui.customWidgetsDesignerExePath" : "/opt/homebrew/Cellar/qt/6.8.2/bin/Designer" }
编译
1 2 3 4 5 6 7 8 9 10 11 12 13 14 15 16 17 18 19 20 21 22 23 24 25 26 27 28 29 30 31 32 33 34 35 36 37 38 39 40 41 42 43 44 45 46 47 48 49 50 51 52 53 54 55 56 57 58 59 60 61 62 63 64 65 66 67 68 69 70 71 72 73 74 75 76 77 78 79 80 81 82 83 84 85 86 87 88 89 90 91 92 93 94 95 96 97 98 99 100 101 102 103 104 105 106 107 108 109 110 111 112 113 114 115 { "version" : "2.0.0" , "tasks" : [ { "label" : "Build_dir" , "command" : "mkdir" , "type" : "shell" , "args" : [ "-p" , "build" ] , } , { "label" : "Cmake" , "type" : "shell" , "command" : "cmake" , "args" : [ "-DCMAKE_BUILD_TYPE=${input:CMAKE_BUILD_TYPE}" , "-DCMAKE_EXPORT_COMPILE_COMMANDS=ON" , "../" ] , "options" : { "cwd" : "${workspaceFolder}/build" , } , "dependsOn" : [ "Build_dir" ] } , { "label" : "Build" , "group" : "test" , "type" : "shell" , "command" : "cmake" , "args" : [ "--build" , "./" , "--target" , "all" , "--" ] , "options" : { "cwd" : "${workspaceFolder}/build" , } , "problemMatcher" : "$gcc" , "dependsOn" : [ "Cmake" ] } , { "label" : "Run" , "type" : "shell" , "group" : "build" , "command" : "./${workspaceFolderBasename}" , "options" : { "cwd" : "${workspaceFolder}/build" , } , "dependsOn" : [ "Build" ] } , ] , "inputs" : [ { "id" : "CMAKE_BUILD_TYPE" , "type" : "pickString" , "description" : "What CMAKE_BUILD_TYPE do you want to create?" , "options" : [ "Debug" , "Release" , "RelWithDebInfo" , "MinSizeRel" , ] , "default" : "Debug" } , { "id" : "PLATFORM" , "type" : "pickString" , "description" : "What PLATFORM do you want to create?" , "options" : [ "x86" , "amd64" , "arm" , "x86_arm" , "x86_amd64" , "amd64_x86" , "amd64_arm" , ] , "default" : "amd64" } , { "id" : "vcvars_ver" , "type" : "pickString" , "description" : "What vcvars_ver do you want to create?" , "options" : [ "14.2" , "14.1" , "14.0" , ] , "default" : "14.2" } ] }
4)cmake:
1
2
3
4
5
6
7
8
9
10
11
12
13
14
15
16
17
18
19
20
21
22
23
24
25
26
27
28
29
30
31
32
33
34
35
36
37
38
39
40
41
42
43
44
45
46
47
48
49
50
51
52
53
54
55
56
57
58
59
60
61
62
63
64
65
66
67
68
69
70
71
72
73
74
75
76
77
78
79
80
81
82
83
84
85
86
87
88
89
90
91
92
93
94
95
96
97
98
99
cmake_minimum_required(VERSION 3.16) #项目名称 project(project1 VERSION 0.1 LANGUAGES CXX) set(CMAKE_AUTOUIC ON) #用户界面编译器,将根据.ui文件生成相应的.h文件,例如根据mainwindow.ui生成ui_mainwindow.h。 set(CMAKE_AUTOMOC ON)#元对象编译器,用于处理QT拓展的C++语法。 set(CMAKE_AUTORCC ON)#rcc工具用于在构建过程中将资源嵌入到Qt应用程序中 set(CMAKE_INCLUDE_CURRENT_DIR ON) set(CMAKE_CXX_STANDARD 17) set(CMAKE_CXX_STANDARD_REQUIRED ON) find_package(QT NAMES Qt6 Qt5 REQUIRED COMPONENTS Widgets) find_package(Qt${QT_VERSION_MAJOR} REQUIRED COMPONENTS Widgets) # set(HEADER_DIR ${CMAKE_SOURCE_DIR}/include) # set(SOURCE_DIR ${CMAKE_SOURCE_DIR}/src) # set(FORM_DIR ${CMAKE_SOURCE_DIR}/form) # 查找某个路径下的所有源文件,此处将src目录下的所有文件名赋给SRC变量 aux_source_directory(src SRC) # file(GLOB/GLOB_RECURSE 变量名 要搜索的文件路径和文件类型) #GLOB: 将指定目录下搜索到的满足条件的所有文件名生成一个列表,并将其存储到变量中。 #GLOB_RECURSE:递归搜索指定目录,将搜索到的满足条件的文件名生成一个列表,并将其存储到变量中。 #CMAKE_CURRENT_SOURCE_DIR 宏表示当前访问的 CMakeLists.txt 文件所在的路径。 FILE(GLOB INC "include/*.h") #CMAKE_AUTOUIC_SEARCH_PATHS告诉 CMake 哪些目录下的 .ui 文件应该被 AutoUic 处理。设置了这个变量后,CMake 将会在这些指定的目录下搜索 .ui 文件,并将它们转换为相应的头文件.h。 list(APPEND CMAKE_AUTOUIC_SEARCH_PATHS "form") # qt6_wrap_ui(MOC_ ${FORM_DIR}/mainwindow.ui) # qt6_wrap_ui(UI_HEADERS ${FORM_DIR}/mainwindow.ui) # include_directories( # ${CMAKE_SOURCE_DIR}/include # ${UI_HEADERS} # ) set(PROJECT_SOURCES # ${SOURCE_DIR}/main.cpp # ${SOURCE_DIR}/mainwindow.cpp # ${UI_HEADERS} # ${HEADER_DIR} ${SRC} ${INC} ) if(${QT_VERSION_MAJOR} GREATER_EQUAL 6) qt_add_executable(project1 MANUAL_FINALIZATION ${PROJECT_SOURCES} ) # Define target properties for Android with Qt 6 as: # set_property(TARGET project1 APPEND PROPERTY QT_ANDROID_PACKAGE_SOURCE_DIR # ${CMAKE_CURRENT_SOURCE_DIR}/android) # For more information, see https://doc.qt.io/qt-6/qt-add-executable.html#target-creation else() if(ANDROID) add_library(project1 SHARED ${PROJECT_SOURCES} ) # Define properties for Android with Qt 5 after find_package() calls as: # set(ANDROID_PACKAGE_SOURCE_DIR "${CMAKE_CURRENT_SOURCE_DIR}/android") else() # 定义工程会生成一个可执行程序 add_executable(可执行程序名 源文件名称) add_executable(project1 ${PROJECT_SOURCES} ) endif() endif() target_include_directories(project1 PRIVATE include) target_link_libraries(project1 PRIVATE Qt${QT_VERSION_MAJOR}::Widgets) # Qt for iOS sets MACOSX_BUNDLE_GUI_IDENTIFIER automatically since Qt 6.1. # If you are developing for iOS or macOS you should consider setting an # explicit, fixed bundle identifier manually though. if(${QT_VERSION} VERSION_LESS 6.1.0) set(BUNDLE_ID_OPTION MACOSX_BUNDLE_GUI_IDENTIFIER com.example.project1) endif() set_target_properties(project1 PROPERTIES ${BUNDLE_ID_OPTION} MACOSX_BUNDLE_BUNDLE_VERSION ${PROJECT_VERSION} MACOSX_BUNDLE_SHORT_VERSION_STRING ${PROJECT_VERSION_MAJOR}.${PROJECT_VERSION_MINOR} MACOSX_BUNDLE TRUE WIN32_EXECUTABLE TRUE ) include(GNUInstallDirs) install(TARGETS project1 BUNDLE DESTINATION . LIBRARY DESTINATION ${CMAKE_INSTALL_LIBDIR} RUNTIME DESTINATION ${CMAKE_INSTALL_BINDIR} ) if(QT_VERSION_MAJOR EQUAL 6) qt_finalize_executable(project1) endif()
多项目嵌套cmake样例
每个项目下有自己的CMakeLists.txt。
app目录用于项目的入口,父项目即使用add_subdirectory的项目中的变量例如project3可以用在子项目中,兄弟级项目间同名变量例如SRC相互独立。
Windows系统
windows中qt项目路径中不能有中文名,否则报错:moc process failed to compile
C++知识点
命名空间
命名空间为了解决名字冲突。
1 2 3 4 5 6 7 8 9 10 11 12 13 14 15 16 17 18 namespace Cir { const double PI = 3.14 ; double areaOfCircle (double radius) return PI*radius*radius; } double length; class student { String name; int age; void behavior (String name) } } class Cir ::student::behavior (String name){ std::cout << name << std::endl; } using namespace std;using Cir::PI;using MyType = int ;
内联函数
内联函数直接在每个调用点(使用点)展开,即函数调用替换为函数代码,减少调用开销(调度栈)
1 2 3 4 5 6 7 8 9 inline int max (int x, int y) return x>y?x:y; } int main () int result = add (5 ,3 ); std::cout << "Result: " << result << std::endl; return 0 ; }
匿名函数 lambda表达式
匿名函数可以在需要调用的地方直接定义函数,无需单独定义
1 2 3 4 5 6 7 8 9 10 [cature clause](parameters) -> return_type { return expression; } auto add = [](int a, int b){ return a+b; } int sum = add (10 ,20 );
C++中Lambda表达式的两种形式解析
在C++中,[=](){}和[&](){}是Lambda表达式的两种主要捕获方式,它们决定了Lambda函数体如何访问外部变量。
1. [=](){} - 值捕获(Capture by Value)
作用
以值拷贝 的方式捕获所有外部变量
在Lambda内部使用的是外部变量的副本
Lambda内部对变量的修改不会影响外部变量
示例
1 2 3 4 5 6 7 8 int x = 10 ;auto lambda = [=]() { std::cout << x << std::endl; }; x = 30 ; lambda ();
特点
安全:不会意外修改外部变量
独立:Lambda可以使用变量的快照
性能:对于大型对象可能有拷贝开销
2. [&](){} - 引用捕获(Capture by Reference)
作用
以引用 的方式捕获所有外部变量
在Lambda内部使用的是外部变量的别名
Lambda内部对变量的修改会影响外部变量
示例
1 2 3 4 5 6 7 int x = 10 ;auto lambda = [&]() { std::cout << x << std::endl; x = 20 ; }; lambda ();std::cout << x << std::endl;
特点
高效:没有拷贝开销
危险:可能导致悬垂引用(如果Lambda生命周期长于捕获的变量)
可变:可以修改外部变量
关键区别对比
特性
[=] 值捕获[&] 引用捕获
捕获方式
拷贝值
创建引用
外部变量影响
不影响原变量
直接影响原变量
默认const
是
否
性能
可能有拷贝开销
无拷贝开销
安全性
高(无悬垂引用风险)
低(可能悬垂引用)
适用场景
需要变量快照、并行编程
需要修改外部变量、短生命周期使用
更灵活的捕获方式
C++还支持更精确的捕获控制:
混合捕获 :
1 2 3 int a = 1 , b = 2 , c = 3 ;[=, &b]() { }; [&, a]() { };
显式捕获 :
1 2 int x = 10 , y = 20 ;[x, &y]() { };
初始化捕获 (C++14+):
1 2 auto p = std::make_unique <int >(10 );[ptr = std::move (p)]() { };
使用建议
优先使用值捕获 :除非确实需要修改外部变量或避免拷贝开销注意生命周期 :引用捕获时要确保Lambda不会比捕获的变量活得久简单场景用[=]/[&],复杂场景显式指定 :提高代码可读性在Qt信号槽中 :注意Lambda捕获可能导致的对象生命周期问题
Qt中的特殊考虑
在Qt信号槽连接中使用Lambda时:
1 2 3 4 5 6 7 8 9 10 11 connect (button, &QPushButton::clicked, [=]() { this ->doSomething (); }); SomeObject *obj = new SomeObject; connect (button, &QPushButton::clicked, [&]() { obj->doSomething (); });
理解这两种捕获方式的区别对于编写正确、高效的C++代码非常重要,特别是在异步编程和事件驱动编程(如Qt)中。
数组(静态)
声明:int myArray[10];
初始化: int myArray[5] = {5,4,5,4,2};
访问: int value = myArray[2]
引用
引用是变量别名或标签,只能用在已有的变量上。
不存在空引用,引用必须连接到一个合法的内存上
引用只能在初始化时连接到对象,一旦引用被连接到一个对象上,就不能连接到其他对象上,指针是可以随时指向另一个对象的。
引用和指针不能跨作用域使用,只能在对象的生命周期内(为销毁之前)使用。
1 2 3 4 5 6 7 8 9 10 11 12 13 14 15 16 17 #include <iostream> using namespace std;int i=17 ;int *p = &i;*p = 20 ; int & r = i;double vals[] = {10.1 ,12.6 ,33.1 ,24.1 ,50.0 };double & setValue (int i) double & ref = vals[i]; return ref; } int main () setValue (3 ) = 88.9 ; cout << vals[3 ]; return 0 ; }
结构体/类
结构体
1 2 3 4 5 6 7 8 9 10 11 12 13 14 15 struct Car { char * color; int year; void (*printCarInfo)(); }; struct Car car;car.color = "white" ; car.printCarInfo = []()->void {printf ("this is a Car\n" )}; car.pirntCarInfo (); struct Car *AodiA6;AodiA6 = (struct Car*)malloc (size (struct Car)); AodiA6->color = "black" ; AodiA6->printCarInfo = []()->void {printf ("this is a AodiA6\n" ); AodiA6->printCarInfo ();
类包含
1 2 3 4 5 6 7 8 9 10 11 12 13 14 15 16 17 18 19 20 21 22 23 24 class Car {public : string color; string brand; string type; int year; void (*printCarIfo)(string color, string brand, string type, int year); void (*carRun)(string type); void (*carStop)(string type); void carRun () cout << type << endl; } void carStop () } void bwmThreePringCarInfo (string color, string brand, string type, int year) string str = "xxx" ; cout << str <<endl; }; void Car::carStop () cout << type << endl; }
拥有关系:
1 2 3 4 5 6 7 8 9 10 11 12 13 14 15 16 17 18 19 20 21 22 23 24 25 26 27 28 29 30 31 32 33 34 35 36 37 38 39 40 41 42 43 44 45 46 #include <stdio.h> #include <stdlib.h> #include <string> #include <iostream> using namespace std;class Wheel {public : string brand; string year; void wheelPrintInfo () }; void Wheel::wheelPrintInfo () cout << brand << endl; } class Car {public string color; string brand; string type; string year; Wheel wl; wheel *wlp; void realPrintInfo () }; void Car realPrintInfo () cout << type << endl; } int main () Car *Aodi = new Car (); Aodi->color = "black" ; Aodi->wl = Wheel (); Aodi->wl.color = "black" ; Aodi->wlp = new Wheel () Aodi->wlp->brand = "miqi" ; Car BMW = Car (); BMW.color = "white" ; BMW.wl = Wheel (); BMW.wl.color = "black" ; BMW.wlp = new Wheel (); BMW.wlp->brand = "beinaili" ; Aodi.realPrintInfo (); BMW.realPrintInfo (); }
重载
函数重载
同一个作用域内可以声明几个同名函数,但是函数的形参(参数个数,参数类型和参数顺序)必须不同,对函数的返回类型没有要求
1 2 3 4 5 6 7 8 9 10 11 12 13 14 15 16 17 18 19 20 21 22 #include <iostream> using namespace std;class printData {public : void print (int i) cout << "整数: " << i << endl; } void print (double f) cout << "浮点:" << f << endl; } void print (char c[]) cout << "字符数组:" << c <<endl; } }; int main () printData pd; pd.print (5 ); pd.print (500.263 ); char c[] = "hello c++" ; pd.print (c); return 0 ; }
运算符重载
自定义各种运算符在自定义类上的行为特性。
不可以创建新的运算符
至少有一个操作数是用户定义的类型,不能重载两个操作数是两个基本类型的运算符
不能更改运算符的优先级和结合性
1 2 3 4 5 6 7 8 9 10 11 12 13 14 15 16 17 18 19 20 21 22 23 24 25 26 27 28 #include <iostream> #include <string> using namespace std;class Person {public : string name; int age; static int number; bool operator ==(Person pTmp); int operator +(Person pTmp); }; bool Person::operator ==(Person pTmp){ return pTmp.name == name && pTmp.age == age; } int Person::operator +(Person pTmp){ this ->number += pTmp.number; } int main () Person p1 = Person (); p1.age = 12 ; p1.name = "wl" ; Person p2 = Person (); p2.age = 12 ; p2.name = "lw" ; bool ret = p1==p2; return 0 ; }
构造函数
类的构造函数是特殊成员函数,每次创建类的对象时执行,用于构造成员变量的初始化值,分配内存空间等,构造函数没有返回值。
1 2 3 4 5 6 7 8 9 10 11 12 13 14 15 16 17 18 19 20 21 #include <iostream> #include <string> using namespace std;class Car {public : string brand; int year; Car (){ brand = "未知" ; year = 0 ; cout << "无参构造" << endl; } void display () cout << "brand:" << brand << ", year: " << year << endl; } }; int main () Car car = Car (); car.display (); return 0 ; }
初始化列表
直接在对象的构造过程中初始化成员变量,而不是先创建成员变量后再赋值。
1 2 3 4 5 6 7 8 9 10 class MyClass {private : int a; double b; std::string c; public : MyClass (int x, double y, const std::string& z): a (x), b (y), c (z){ std::cout << "a: " << a << "b: " << b <<"c:" << c <<endl; } };
成员变量初始化顺序是按照他们声明的顺序,而不是初始化列表中的顺序赋值。
this指针
this 指针指向调用对象的指针,在类的作用域中使用,可以明确指出类的成员变量和成员函数。
1 2 3 4 5 6 7 8 9 10 11 12 13 14 15 16 17 18 19 20 21 22 23 24 25 26 27 #include <iostream> #include <string> using namespace std;class Car {public : string brand; int year; Car (){ brand = "未知" ; year = 0 ; cout << "无参构造" << endl; } void display () cout << "brand:" << brand << ", year: " << year << endl; } Car& setYear (int year) { this ->year = year; return *this ; } }; int main () Car car = Car (); car.display (); car.setYear (2023 ).display () return 0 ; }
new和delete关键字
new用于动态分配内存。
分配单个对象
分配对象数组10); arr = new int[10]{1,2,3,4,5}
释放单个对象
释放数组
拷贝构造函数
拷贝构造函数用于创建一个新对象作为现有对象的副本。被调用的情况:
当一个新对象被创建为另一个同类型的现有对象的副本时:
将对象作为参数传递给函数时(按值传递):
从函数返回对象时(按值返回):
初始化数组或容器中的元素时:
1 2 3 4 class MyClass {public : MyClass (const MyClass& other){}; };
深拷贝和浅拷贝是处理对象拷贝时的两种方法,尤其是在对象包含指针或者动态分配内存时。
浅拷贝
浅拷贝只复制对象的成员变量的值。如果成员变量是指针,则复制指针的值(即内存地址),而不是指针所指向的实际数据。这会导致多个对象共享相同的内存地址。
1 2 3 4 5 6 7 8 9 10 11 12 13 14 15 16 17 18 19 20 21 22 23 24 25 26 27 28 29 #include <iostream> using namespace std;class Shallow {public : int * data; Shallow (int d){ data = new int (d); cout << "观察数据:" <<endl; cout << d << endl; cout << *data << endl; cout << "观察内存在构造函数中:" << endl; cout << data <<endl; } Shallow (const Shallow& obj){ data = obj.data } ~Shallow (){ delete data; } }; int main () Shallow obj1 (20 ) ; Shallow obj2 = obj1; cout << "观察内存在main函数obj2的data地址:" <<endl; cout << obj2.data << endl; cout <<"*obj1.data:" <<*obj1.data<<", *obj2.data:" << *obj2.data << endl; return 0 ; }
深拷贝
深拷贝复制对象成员变量的值以及指针所指向的实际数据。这意味着创建新的独立副本,避免了共享内存地址的问题。
1 2 3 4 5 6 7 8 9 10 11 12 13 14 15 16 17 18 19 20 21 22 23 24 25 26 27 28 29 30 31 #include <iostream> using namespace std;class Deep {public : int * data; Shallow (int d){ data = new int (d); cout << "观察数据:" <<endl; cout << d << endl; cout << *data << endl; cout << "观察内存在构造函数中:" << endl; cout << data <<endl; } Deep (const Deep& source){ data = new int (*source.data); cout << "深拷贝构造函数" <<endl; } ~Deep (){ delete data; } }; int main () Deep obj1 (20 ) ; Deep obj2 = obj1; cout << "观察内存在main函数obj2的data地址:" <<endl; cout << obj2.data << endl; cout <<"*obj1.data:" <<*obj1.data<<", *obj2.data:" << *obj2.data << endl; return 0 ; }
规则三则
规则三则(rule of three)是一个面向对象编程原则,涉及到类的拷贝控制。规则三则指出,如果你需要显式地定义或重载类的任何一个拷贝控制操作(拷贝构造函数、拷贝赋值运算符、析构函数),那么你几乎肯定需要显示地定义或重载所有三个。这是因为这三个功能通常都是用于管理动态分配的资源,比如在堆上分配的内存。确保了动态分配资源正确管理,避免了内存泄漏和浅拷贝问题
1 2 3 4 5 6 7 8 9 10 11 12 13 14 15 16 17 18 19 20 21 22 23 24 25 26 27 28 29 30 31 32 33 34 35 36 37 38 39 40 #include <iostream> #include <cstring> class MyClass {private : char * buffer; public : MyClass (const char * str){ if (str){ buffer = new char [strlen (str)+1 ]; strcpy (buffer,str); }else { buffer = nullptr ; } } ~MyClass (){ delete [] buffer; } MyClass (const MyClass& other){ if (other.buffer){ buffer = new char [strlen (other.buffer)+1 ]; strcpy (buffer, other.buffer); }else { buffer = nullptr ; } } MyClass& operator =(const MyClass& other){ if (this == &other) return *this ; delete [] buffer; buffer = new char [strlen (other.buffer)+1 ]; strcpy (buffer, other.buffer); return *this ; } }
避免不必要的拷贝
避免不必要的拷贝是C++设计的重要原则,尤其是在处理大型对象或资源密集型对象时。使用引用(包括常量引用)和移动语义是实现这个目标的两种常见方法。
使用引用传递对象
1 2 3 4 5 6 7 8 9 10 11 12 13 14 15 #include <iostream> #include <vector> using namespace std;class LargeObject { }; void processLargeObject (const LargeObject& obj) cout << "Processing object..." <<endl; } int main () LargeObject myLargeObject; processingLargeObject (myLargeObject); return 0 ; }
使用移动语义
1 2 3 4 5 6 7 8 9 10 11 12 13 14 15 16 17 18 19 20 21 22 23 24 25 26 27 28 29 30 31 32 33 34 #include <iostream> #include <utility> using namespace std;class MovableObject {private : char * buffer; public : MovableObject (){ } MovableObject (const MovableObject& other){ } MovableOject& operator =(const MovableObject& other){ return *this ; } MovableObject (Movable&& other) noexcept { buffer = other.buffer; other.buffer = nullptr ; } MovableOject& operator =(MovableObject&& other){ if (this == &other) return *this ; delete [] buffer; buffer = other.buffer; other.buffer = nullptr ; return *this ; } ~MovableObject (){ delete [] buffer; } };
禁用拷贝构造函数
1 2 3 4 5 6 7 8 9 10 11 12 13 class NonCopyable {public : NonCopyable () = default ; NonCopyable (const NonCopyable& ) = delete ; NonCopyable& operator =(const NonCopyalbe&) = delete ; }; int main () NonCopyable obj1; return 0 ; }
private声明拷贝构造和拷贝赋值+不提供它们具体实现:
1 2 3 4 5 6 7 8 9 10 11 12 13 14 class NonCopyable {public : NonCopyable () = default ; private : NonCopyable (const NonCopyable& ); NonCopyable& operator =(const NonCopyalbe&); }; int main () NonCopyable obj1; return 0 ; }
要点
描述
定义和作用
拷贝构造函数在创建对象作为另一个现有对象副本时调用,通常有一个对同类型对象的常量引用参数。
语法
典型声明ClassName(const ClassName& other)
深拷贝和浅拷贝
浅拷贝复制值,深拷贝创建资源的独立副本。对于包含指针的类,深拷贝通常必要。
规则三则
如果实现拷贝构造函数、拷贝赋值运算符或析构函数中的任何一个,通常应该实现所有三个。
避免不必要的拷贝
对大型对象,使用移动语义避免不必要的拷贝,并在传递对象时使用引用或者指针。
拷贝构造函数的隐式调用
不仅在显式复制时调用,也可能在将对象作为函数参数传递、从函数返回对象时隐式调用。
禁用拷贝构造函数
对某些类,可以通过将拷贝构造函数声明为私有或使用delete关键字禁用拷贝。
析构函数
析构函数在对象生命周期结束时被自动调用,用于执行对象销毁前的清理工作。析构函数对于涉及动态分配资源(内存、文件句柄、网络连接等)情况特别重要。
语法:~MyClass()
无返回值和参数
自动调用:当对象生命周期结束时(例如,一个局部对象的作用域结束,或者使用delete删除动态分配的对象),析构函数会被自动调用。
不可重载:每个类只能有一个析构函数。
继承和多态:如果一个类是多态基类,其析构函数应该是虚的。
静态成员
静态成员包括静态成员变量和静态成员函数。特点如下
静态成员变量
定义:静态成员变量是类的所有对象共享的变量。与普通成员变量相比,无论创建多少个类实例,静态成员变量只有一份拷贝。
初始化:静态成员变量需要在类外进行初始化,通常在类的实现文件中。
访问:静态成员变量可以通过类型直接访问,不要创建类的对象。也可以通过类的对象访问。
用途:常用于存储类级别的信息(例如,计数类的实例数量)或全局数据需要被类的所有实例共享。
静态成员函数
定义:静态成员函数是可以不依赖于类的实例而被调用的函数。它不能访问类的非静态成员变量和非静态成员函数。
访问:可以通过类名直接调用,也可以通过类的实例调用。
用途:通常用于实现与具体对象无关的功能,或访问静态成员变量。
1 2 3 4 5 6 7 8 9 10 11 12 13 14 15 16 17 18 19 20 21 class MyClass {public : static int staticValue; MyClass (){ staticValue++; } ~MyClass (){ staticValue--; } static int getStaticValue () return staticValue; } }; int MyClass::staticValue = 0 ;int main () MyClass obj1, obj2; std::cout << MyClass::staticValue << std::endl; std::cout << MyClass::getStaticValue () << std::endl; std::cout << obj1.getStaticValue () << std::endl; }
继承
继承允许一个类(称为派生类或子类)继承另一个类(称为基类或父类)的属性和方法。继承的主要目的是实现代码的重用 ,以及建立一种类型之间的层次关系 。其特点如下:
代码重用:子类继承了父类的属性和方法,减少代码的重复编写。
扩展性:子类可以扩展父类的功能,添加新的属性和方法,或者重写(覆盖)现有的方法。
多态性:通过继承和虚函数,允许在运行时 决定调用哪个函数(某个子类的函数或者父类的函数)
继承访问权限:public,protect,private
1 2 3 4 5 6 7 8 9 10 11 12 13 14 15 16 class Base {public : void show () std::cout << "Base show" << std::endl; } }; class Derived : public Base{ void run () }; int main () Derived d; d.show (); return 0 ; }
分文件方式实现继承
animal.h
1 2 3 4 5 6 7 8 9 10 11 12 13 14 15 16 17 18 19 #ifndef ANIMAL_H #define ANIMAL_H #include <string> #include <iostream> using namespace std;class Animal {public : string name; int age; protected : int protectAnimal; private : int wildOrHome; Animal (); void makeSound () void eatFood () }; #endif
animal.cpp
1 2 3 4 5 6 7 8 9 10 11 12 #include "animal.h" Animal::Animal (){ } void Animal::makeSound () cout << "动物叫" << endl; } void Animal::eatFood () cout << "动物吃" << endl; }
lion.h
1 2 3 4 5 6 7 8 9 10 11 #ifndef LION_H #define LION_H #include "animal.h" class Lion : protected Animal{public : int sleepingTime; Lion (); void hunting () void testFun () }; #endif
lion.cpp
1 2 3 4 5 6 7 8 9 10 11 #include "lion.h" Lion::Lion (){ } void testFunc () name = "狮子" ; protectAnimal = 1 ; } void Lion::hunting () cout << "狮子捕猎" << endl; }
cat.h
1 2 3 4 5 6 7 8 9 10 #ifndef CAT_H #define CAT_H #include "animal.h" class Cat : public Animal{public : Lion (); void eatFish () void digAHole () }; #endif
cat.cpp
1 2 3 4 5 6 7 8 9 10 #include "cat.h" Cat::Cat (){ } void Cat::eatFish () cout << "猫吃鱼" << endl; } void Cat::digAHole () cout << "猫挖洞,要干啥" << endl; }
main.cpp
1 2 3 4 5 6 7 8 9 10 11 12 13 14 15 #include <iostream> #include "animal.h" #include "lion.h" using namespace std;int main () Animal a; a.makeSound (); Lion l; l.makeSound (); l.hunting (); Cat c; c.eatFood (); c.eatFish (); return 0 ; }
基类构造函数
派生类可以通过其构造函数的初始化列表来调用基类的构造函数。创建派生类对象时,基类的构造函数总是在派生类的构造函数之前被调用。没有指定基类构造函数时调用默认构造函数。
1 2 3 4 5 6 7 8 9 10 11 12 13 14 15 16 17 18 class Base {public : int data; Base (int x){ std::cout << "Base constructor with x=" << x << std::endl; } }; class Derived : public Base{public : double ydata; Derived (int x, double y): Base (x){ std::cout << "Derived constructor with y = " << y << std::endl; } }; int main () Derive obj (10 ,3.14 ) ; return 0 ; }
虚函数
virtual和override关键字用于支持涉及类继承和方法重载的多态。virtual
使用场景:在基类中声明虚函数
目的:允许派生类重写该函数,实现多态
行为:通过基类的指针或引用调用一个虚函数时,调用的是对象实际类型的函数模版
1 2 3 4 5 6 7 class Base {public : virtual void func () std::cout << "Function in Base" << std::endl; } virtual ~Base (){}; };
override
使用场景:在派生类中重写虚函数
目的:明确指示派生类中的函数意图重写基类的虚函数
行为:确保派生类的函数确实重写了基类中的一个虚函数(参数,函数名,返回值要匹配)。如果没有匹配的虚函数,编译器会报错。
1 2 3 4 5 6 7 8 9 10 11 class Derived : public Base {public : void func () override std::cout << "Function in Derived" << std::endl; } }; int main () Base& b = Derived (); b.func (); return 0 ; }
注意
override只在派生类中使用,而且在派生类中重写基类的虚函数
虚析构函数:如果类中有虚函数,通常应该将析构函数也声明为虚函数
继承中的虚函数:一旦在基类中声明为虚函数,该函数在所有派生类中自动成为虚函数,无论是否使用virtual关键字
多重继承
多重继承是一种允许一个类同时继承多个基类的特性。多重继承增加语言灵活性同时增加了额外复杂性,特别是当多个基类具有相同的成员时。如果不同的基类有相同名称的成员,则必须明确指出所引用的是哪个基类的成员。
1 2 3 4 5 6 7 8 9 10 11 12 13 14 15 16 17 18 19 20 21 22 23 24 25 26 27 28 29 30 31 32 33 class ClassA {public : void displayA () std::cout << "Displaying ClassA" << std::endl; } }; class ClassB {public : void displayB () std::cout << "Displaying ClassB" << std::endl; } }; class ClassC {public : void displayA () std::cout << "Displaying ClassC" << std::endl; } }; class Derived : public ClassA, public ClassB, public ClassC{public : void display () ClassA::displayA (); displayB (); ClassC::displayA (); } }; int main () Derived obj; obj.ClassA::displayA (); obj.display (); obj.displayB (); obj.ClassC::displayA (); }
注意
菱形继承问题:如果两个基类继承自同一个更高层的基类,这可能导致派生类中存在两份基类的副本,可以通过虚继承解决
复杂性:多重继承可能会使类的结构变得复杂,尤其是当继承层次较深或类中有多个基类时。
设计考虑:使用组合或接口(纯虚类)
虚继承
虚继承解决多重继承中的菱形问题,即一个类继承自两个具有共同基类的类时,会导致共同基类的成员在派生类中存在两份拷贝,这会导致资源浪费和引起数据不一致问题。虚继承通过确保共同基类的单一实例存在于继承层次中,来解决这一问题。
1 2 3 4 5 6 7 8 9 10 11 12 13 14 15 16 class Base {public : int data; }; class Derived1 : public Base{}; class Derived2 : public Base{}; class FinalDerived : public Derived1, public Derived2{}; int main () FinalDerived final ; final .data = 10 ; return 0 ; }
虚继承, 最终的派生类只含一份基类
1 2 3 4 5 6 7 8 9 10 11 12 13 14 15 16 17 18 19 20 21 22 23 24 25 26 27 28 29 30 class Base {public : int data; Base (int data){ this ->data = data; } }; class Derived1 : virtual public Base{public : Derived1 (int data): Base (data){ } }; class Derived2 : virtual public Base{public : Derived2 (int data): Base (data){ } }; class FinalDerived : public Derived1, public Derived2{public : FinalDerived (int data): Derived1 (data){} FinalDerived (int data): Derived1 (data), Derived2 (data), Base (data){} FinalDerived (int data): Base (data), Derived1 (data), Derived2 (data) {} }; int main () FinalDerived final (11 ) ; final .data = 10 ; return 0 ; }
通过将Derived1和Derived2对Base的继承声明为虚继承,FinalDerived类中只会有一份Base类的成员。无论通过Derived1还是Derived2的路径,访问的都是同一个Base类的成员。注意
初始化虚基类:在使用虚继承时,虚基类(如上Base基类)只能由最派生类(如FinalDerived)初始化。
内存布局:虚继承可能会改变类的内存布局,会增加额外的开销,比如虚基类指针。
设计考虑:设计使用组合或接口(纯虚类)
多态
你有一个遥控器(就像基类指针),该遥控器可以控制不同的电子设备(就像许多派生类),无论电视、音响还是灯光,遥控器的开关按钮(就像虚函数)都能控制他们,但具体的操作那个设备取决于遥控器指向的设备。
使用虚函数:
在基类中定义一个虚函数,该函数可以在任何派生类中被重写
基类使用关键字virtual声明,派生类可以使用override显示声明重写
创建派生类并重写虚函数:
通过基类的引用或指针调用虚函数
当使用基类的指针或者引用来调用虚函数时,实际调用的是对象的实际类型(派生类)中的函数版本, 注 :基类指针和引用指向的派生对象调用的只能是基类的虚函数,不能是派生类中非虚函数。
1 2 3 4 5 6 7 8 9 10 11 12 13 14 15 16 17 18 19 20 21 22 23 24 25 26 27 28 29 30 using namespace std;class RemoteCon {public : virtual void openUtils () }; class TvRemoteCon : public RemoteCon{public : void openUtils () override cout << "电视遥控器被打开" << endl; } void testFunc () }; class RoundspeakerCon : public RemoteCon{public : void openUtils () override cout << "音响遥控器被打开" << endl; } }; class LightCon : public RemoteCon{public : void openUtils () override cout << "灯光遥控器被打开" << endl; } }; int main () RemoteCon* remoteCon = new TvRemoteCon; remoteCon->openUtils (); remoteCon->testFunc (); return 0 ; }
为什么使用多态:
灵活性:允许我们可以处理不确定类型的对象代码
可扩展性:可以添加新的派生类而不必修改使用基类的引用或指针代码。
接口与实现分离:设计一个稳定接口,而将具体实现留给派生类去处理。
抽象类
抽象类定义了一组方法,但是这些方法没有具体实现,意味着抽象类定义了派生类应该具有的功能,但不完全实现这些功能。
包含至少一个纯虚函数:
抽象类至少有一个纯虚函数,它是一种特殊虚函数,在抽象类中没有具体实现,而是留给派生类去实现。
纯虚函数的声明方式是在虚函数声明的末尾加上= 0。
不能直接实例化:
由于抽象类不完整,所以不能直接创建他的对象。就像你不能直接使用交通工具概念去任何地方,你需要具体的交通工具去。
用于提供基础结构:
抽象类的主要目的是为派生类提供一个共同的基础结构,确保所有派生类都有一致的接口和行为。
派生类必须实现全部的基类纯虚函数,否则派生类还是抽象类也不能实例化。
1 2 3 4 5 6 7 8 9 10 11 12 13 14 15 16 17 18 19 20 21 22 23 24 25 26 27 28 29 30 #include <iostream> using namespace std;class Teacher {public : string name; string school; string major; virtual void goInClass () 0 ; virtual void startTeaching () 0 ; virtual void afterTeaching () 0 ; }; class EnglishTeacher : public Teacher{public : void goInClass () override cout << "英语老师开始进入教室" << endl; } void startTeaching () override cout << "英语老师开始教学" << endl; } void afterTeaching () override } }; int main () Teacher t; EnglishTeacher e; e.goInClass (); Teacher* t1 = new EnglishTeacher; t1->startTeaching (); return 0 ; }
纯虚函数-接口
C++不像java有接口关键字interface来定义接口,但可以通过抽象类和纯虚函数的方式来实现接口的概念。
1 2 3 4 5 6 7 8 9 10 11 12 13 14 15 16 17 18 19 20 21 22 23 24 25 26 27 28 29 30 31 32 33 #include <iostream> using namespace std;class BasketBallMove {public : virtual void passTheBall () 0 ; }; class LiveMove {public : virtual void eat () 0 ; virtual void bite () 0 ; virtual void drink () 0 ; virtual void la () 0 ; }; class Human : public LiveMove, public BasketBallMove{public : void eat () override void bite () override void drink () override void la () override void passTheBall () override }; class Dog : public LiveMove{public : void eat () override void bite () override void drink () override void la () override }; int main () Human h; Dog g; return 0 ; }
模版
模版(template)是一种通用的编程工具,允许程序员编写泛型代码 ,使得类或者函数能够适用于多种不同的数据类型 而不需要重复编写相似的代码。
类模版
类模版能够定义通用的类,其中某些类型可以作为参数。这样的类可以处理不同类型的数据,而不需要为每个数据类型编写单独的类。注 :模版类的成员函数定义不能在类定义外,只能在类内
1 2 3 4 5 6 7 8 9 10 11 12 13 14 15 16 17 18 19 20 21 22 template <typename T>class MyTemplate {private : T data; public : MyTemplate (T d): data (d) {} T getData () { return data; } }; int main () MyTemplate<int > intObject (5 ) ; MyTemplate<std::string> stringObject = MyTemplate <std::string>("Hello" ) std::cout << intObject.getData () << std::endl; std::cout << stringObject.getData () << std::endl; }
函数模版
函数模版允许编写通用函数,可以处理多种不同类型的数据。
1 2 3 4 5 6 7 8 9 10 11 12 13 14 template <typename T>T add (T a, T b) { return a+b; } int main () int result1 = add (5 , 10 ); double result2 = add (3.5 , 2.7 ) std::cout << "Result 1:" << result1 << std::endl; std::cout << "Result 2:" << result2 << std::endl; return 0 ; }
模版提高了代码的重用性和可维护性
模版特化
模版特化允许针对特定的数据类型或特定的模版参数提供定制化的实现。允许您为模版提供一个特殊的实现,以覆盖或扩展默认的模版行为。注 :模版特化需要再写一遍主模版,但是类型参数那个确定了类型就省略那个参数
有两种类型的模版特化:完全特化和部分特化。
1 2 3 4 5 6 7 8 9 10 template <typename T, typename N>void func (T a, N b) template <> void func (int a, double b) template <typename N>void func (int a, N b)
模版声明
1 2 3 4 5 6 7 8 9 10 11 12 13 14 15 16 17 18 19 20 21 22 template <typename T, typename A>void swap (T& a, A& b) T tmp = a; a = b; b = tmp; } template void swap <int , int >(int & a, int & b);swap <int , int >(1 ,3 );swap (2 ,4 );template <typename T>void swap <T, double >(T& a, double b){ T tmp = a; a = b; b = tmp; }
强制转换
在C++中,强制类型转换是一种将变量从一种类型转换成另一种类型的方法。C++提供了四种强制转换运算符,每种都有其特定的用途和使用场景:
static_cast :
static_cast是最常用的类型转换运算符,用于无风险的转换,如整数到浮点数,字符到整数等。
它在编译时执行,不执行运行时类型检查(RTTI)。
示例:int x = static_cast<int>(y); 其中y可能是float类型。
dynamic_cast :
专门用于处理对象的多态性,只能用于指针和引用,且涉及对象类必须有虚函数。
它在运行时检查类型的安全性,如果类型转换失败,对于指针类型返回nullptr,对于引用类型抛出异常。
示例:Derived* dp = dynamic_cast<Derived*>(bp);其中bp是基类指针,Derived是派生类。
const_cast :
用于修改类型的const或volatile属性。
通常用于去除对象的const性质,允许修改原本被声明为const的变量。
示例:const int a = 10; int* b = const_cast<int*>(&a);
reinterpret_cast :
用于进行低级别的重新解释转换,几乎无限制,但也是最危险的。
它可以将一种完全不相关的类型转换为另一种类型,比如将指针类型转换为整数类型。
示例:long p = reinterpret_cast<long>(&object);其中object是某个类的对象。
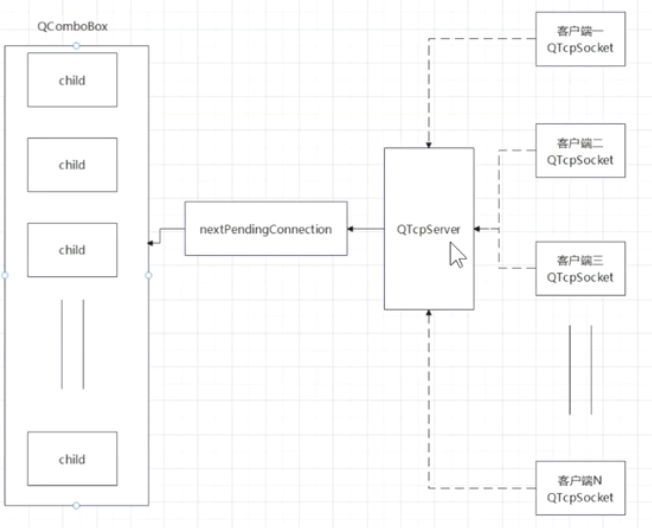
软件开发网络通信架构
BS架构/CS架构
CS架构(客户-服务器架构)
CS架构是典型的两层结构,包括客户端和服务器两个部分。客户端和服务器通过网络进行通信,每一部分有明确的职责。
客户端
用户界面通常在客户端呈现。
可以是桌面应用程序、移动应用或专用软件。
负责向服务器发送请求,接收和处理服务响应。
服务器
管理数据和业务逻辑。
处理来自客户端的请求,并发送响应。
通常承载在远程系统上,如数据库服务器、应用服务器等。
特点
需要为每种操作系统或平台单独开发客户端。
高效的数据处理和响应能力。
在客户端设备上占用资源(内存、cpu)。
BS架构(浏览器-服务器架构)
BS架构是一种基于Web的三层或多层架构,主要通过Web浏览器作为客户端访问服务器上的应用程序。
浏览器(客户端)
使用标准Web浏览器(如Chrome, Firefox)作为客户端。
无需安装额外的软件,使用HTML, CSS和JavaScript显示内容。
服务器
和CS架构中的服务器类似,处理业务逻辑和数据存储。
通过Web服务(HTTP服务器)提供页面和数据。
特点
跨平台兼容性强,可以在任何支持Web浏览器的设备上运行。
客户端无需安装专用软件,容易维护和更新。
可能依赖网络性能,所有操作都在服务器上进行。
对比
部署和维护:BS架构易于部署和维护,而CS架构通常需要在每个客户端单独安装和更新。
性能:CS架构可以更有效的利用客户端的计算资源,适合高性能要求的应用。BS架构依赖于服务器的性能和网络延迟。
安全性:CS架构中数据经常在客户端和服务器之间传输,可能需要更复杂的安全措施。BS架构中敏感数据主要存储在服务器端。
用户体验:CS架构通常能提供更丰富的用户界面和交互功能。BS架构的用户体验受限于Web技术的能力。
HTTP
HTTP(超文本传输协议)是一种用于分布式、协作式和超媒体信息系统的应用协议。他是万维网(www)的数据通信基础。
请求和响应
HTTP是基于请求-响应模式的协议。客户端(通常是Web浏览器)向服务器发送一个HTTP请求,然后服务器返回一个HTTP响应。请求包含请求的资源(如网页),而响应包含请求的资源的内容。
HTTP方法
GET:用于请求资源。
POST: 用于提交数据给服务器。
PUT:用于上传文件或内容。
DELETE:用于请求删除资源。
HEAD:用于获取资源的元信息,而不是资源本身。
状态码
200 OK:请求成功
404 Not Found:请求的资源未找到
500 Internal Server Error:服务器内部错误
301 Moved Permanently:请求的资源已永久移动到新位置
URL(统一资源定位符)
URL是Web上的资源地址。它指定了资源的位置以及用于访问资源的协议。
HTTP头
HTTP请求和响应包含头部信息,包括元数据,例如内容类型,内容长度,服务器信息,客户端信息等。Content-Type头部指示响应中的媒体类型(如text/html, application/json)
无状态协议
HTTP是一个无状态协议,即服务器不会保留任何请求的数据状态。而使用Cookies这样的机制可以在多个请求之间维持状态。
安全性
HTTPS是HTTP的安全版本,它在HTTP和TCP之间增加了一个加密层(通常是SSL/TLS)。这提供了数据传输的加密和更好的安全性。
RESTful API
RESTful是一种使用HTTP协议的Web服务设计风格,它利用HTTP的方法来实现API的不同操作。在RESTful架构中,每个URL代表一个资源,并使用HTTP的方法(GET/POST)来处理这些资源。
Session和Cookies
由于HTTP本身是无状态的,Cookies和会话(Session)被用来在多个请求之间存储用户数据,从而为用户提供连贯的体验。
JSON数据
JSON(javascript object notation)是一种轻量级的数据交换格式。优点:
原因
描述
易于阅读和编写
JSON结构简单、清晰,对人类来说易于阅读和编写。
轻量级数据格式
相较于XML标记语言,JSON更轻量,使用更少的符号,数据体积更小。
易于解析和生成
大多数编程语言都提供了解析和生成JSON的内置支持库。
跨语言支持
JSON是独立于语言的,被广泛支持和使用在多种编程语言中。
网络友好
JSON格式适合WEB环境,易于通过网络传输,是WEB API的常用格式。
数据互操作性
作为一种标准化格式,JSON提高了不同系统间的数据互操作性。
不同语言处理JSON的库
语言/平台
Json处理库/接口
特点/描述
C
Jansson
提供JSON的编码、解码和处理功能
C++
nlohmann/json
json库,易于使用
Java
Jackson
强大JSON处理库,支持JSON序列化和反序列化
Gson
Google提供的JSON序列化和反序列化库
Python
json
Python标准库中的JSON处理模块
Qt
QJsonDocument
Qt框架中用于JSON处理类
QJsonObject
用于表示JSON对象的Qt类
QJsonArray
用于表示JSON数组的Qt类
Android
org.json
Android SDK自带的JSON处理类,提供基础JSON操作功能
iOS
JSONSerialization
Apple提供的用于JSON处理的类,Swift和Objective-C标准库中的模块
Qt生成JSON数据
1 2 3 4 5 6 7 8 9 10 11 12 13 14 15 16 17 18 19 20 21 22 23 24 25 26 27 28 29 30 31 32 33 34 35 36 37 38 39 40 41 42 43 44 #include <QJsonDocument> #include <QJsonObject> #include <QJsonArray> #include <QFile> void createJsonFile () QJsonObject jsonObj; jsonObj["name" ] = "Jonh Doe" ; jsonObj["age" ] = 30 ; jsonObj["email" ] = "john.doe@example.com" ; QJsonArray jsonArr; jsonArr.append ("C++" ); jsonArr.append ("python" ); jsonArr.append ("javascript" ); jsonArr.append (13 ); jsonObj["languages" ] = jsonArr; QJsonObject jsonSon; jsonSon["sonId" ] = 244 ; jsonObj["son" ] = jsonSon; QJsonDocument jsonDoc (jsonObj) ; QByteArray jsonData = jsonDoc.toJson (QJsonDocument::Indented); QFile file ("output.json" ) ; if (!file.open (QIODevice::WriteOnly)){ qDebug () << "Failed to open file for writing" ; return ; } file.write (jsonData); file.close (); qDebug () << "JSON data saved to output.json" ; } int main () createJsonFile (); return 0 ; }
QT解析JSON数据
假设有一个json字符串
1 2 3 4 5 6 7 8 9 { "name" : "John Doe" , "age" : 30 , "email" : "john.doe@example.com" , "skill" : [ "c++" , "python" , "java" ] , "sonId" : { "id" : 123 } }
1 2 3 4 5 6 7 8 9 10 11 12 13 14 15 16 17 18 19 20 21 22 23 24 25 26 27 28 29 30 31 32 33 34 35 36 37 38 39 40 41 42 43 44 45 46 47 #include <QJsonDocument> #include <QJsonObject> #include <QJsonArray> #include <QFile> void parseJson () QString jsonString = R"( { "name": "John Doe", "age": 30, "email":"john.doe@example.com", "skill": ["c++", "python", "java"], "sonId": { "id": 123 } } )" ; QJsonDocument jsonDoc = QJsonDocument::fromJson (jsonString.toUtf8 ()); if (!jsonDoc.isNull () && jsonDoc.isObject ()){ QJsonObject jsonObj = jsonDoc.object (); QString name = jsonObj["name" ].toString (); int age = jsonObj["age" ].toInt (); QString email = jsonObj["email" ].toString (); if (jsonObj.contains ("skills" ) && jsonObj["skills" ].isArray ()){ QJsonArray skillsArray = jsonObj["skills" ].toArray (); for (const QJsonValue& value: skillsArray){ qDebug () << "Skills:" << value.toString (); } }else { qDebug () << "Invalid JSON..." ; } } } int main () parseJson (); return 0 ; }
Model/View结构
数据:如数据库的一个数据表或SQL查询结果,内存中的一个StringList,或磁盘文件结构等。
Model: 与数据通信,并为视图组件提供数据接口。
View(组件): 屏幕上的界面组件,视图从数据模型获得每个数据项的模型索引(model index),通过模型索引获取数据。
delegate/proxy: 控制model如何编辑数据和view如何显示模型(在界面上行为/功能)。在标准的视图组件中,代理功能显示一个数据,当数据被编辑时,提供一个编辑器,一般是QLineEdit.
数据和Model一对一,model和View是多对多。
数据模型种类
Model类
用途
QStringListModel
用于处理字符串列表数据的数据模型类
QStandardItemModel
标准的基于项数据的数据模型类,每个项数据可以是任何数据类型
QFileSystemModel
计算机上文件系统的数据模型类
QSortFilterProxyModel
与其他数据模型结合,提供排序和过滤功能的数据模型类
QSqlQueryModel
用于数据库SQL查询结果的数据模型类
QSqlTableModel
用于数据库的一个数据表的数据模型类
QSqlRelationalTableModel
用于关系型数据表的数据模型类
view组件
代理
当我们有通过模型编辑数据的需求时可以使用代理
当我们想展示非LineEdit类型组件时可以使用代理
派生类必须实现三个代理抽象类的虚函数。
数据项
项的三要素:父项、行号、列号
QModelIndex()是根项Root item, 查找不同模型的各项。
数据项角色
一个项可以配置多种角色和数据,项可以根据角色过滤出数据。
文件系统模型
可以让文件系统模型对应多种视图treeView, listView, tableView。
标准项模型
窗体
Qt对话框模态和非模态
在Qt中,对话框可以分为模态(Modal)和非模态(Modeless)两种类型。
模态对话框(Modal Dialog)
模态对话框会阻止用户与应用程序的其他部分交互,直到对话框被关闭。这意味着在模态对话框打开时,用户无法访问或操作应用程序的其余部分,直到模态对话框被关闭。
在Qt中,可以通过QDialog类创建一个模态对话框,并通过调用exec()方法来显示它。
非模态对话框(Modeless Dialog)
非模态对话框允许用户在与对话框交互的同时,仍然可以与应用程序的其他部分交互。这意味着用户可以在打开非模态对话框的同时,继续使用应用程序的其他功能。
在Qt中,非模态对话框通过调用show()方法而不是exec()方法来显示。
多窗体
MDI模式(Multi Document Interface)
QT记事本项目
功能介绍
文本创建、打开、保存、关闭
UI样式美化
添加打开、保存快捷键
底部显示行列号及文本字符编码
Ctrl加鼠标滚轮支持字体放缩工程概述
Qt中MainWindow与Widget项目区别:
MainWindow包含完整的菜单栏,工具栏和状态栏的主窗口应用程序框架,适合复杂应用程序,需要复杂用户组件。
Widget是一个简单窗体,没有菜单栏,工具栏和状态栏,适合简单或专用应用程序,不用复杂的用户界面组件。
QApplication: QApplication a(argc,argv);这行代码的作用是创建一个QApplication类的实例。Qt应用必须做的第一步,它负责管理应用程序的许多核心功能。
1 2 3 4 5 6 7 8 9 10 #include "widget.h" #include <QApplication> int main (int argc, char * argv[]) QApplication a (argc, argv) ; Widget w; w.show (); return a.exec (); }
QApplication类在Qt框架中的主要功能和职责:
功能 说明
事件循环
维护事件循环,负责接收和分发各种事件,如鼠标点击、键盘输入等
全局设置
处理应用程序的全局设置,包括字体,颜色和其他用户界面元素
GUI的初始化
在没有创建QApplication情况下,无法使用Qt的任何GUI组件,因此它负责初始化GUI环境
命令行参数处理
可以处理命令行参数,这对于需要命令行交互的应用程序来说是必要的
return a.exec()
1 2 3 4 5 6 7 8 9 10 11 12 13 14 15 16 17 18 19 20 21 22 23 24 25 26 #ifndef WIDGET_H #define WIDGET_H #include <QWidget> QT_BEGIN_NAMESPACE namespace Ui {class Widget ;} QT_END_NAMESPACE class Widget : public QWidget{ Q_OBJECT public : Widget (QWidget *parent = nullptr ); ~Widget (); private : Ui::Widget *ui; }; #endif
namespace Ui {class Widget;}
QT_BEGIN_NAMESPACE
Q_OBJECT
Widget::Widget(QWidget* parent): QWidget(parent), ui(new Ui::Widget)
从UI Designer中个性化窗口样式
Qt creator中左边栏找帮助
加载资源的配置
添加resources文件夹
配置res.qrc文件
增加资源文件路径到cmakeList.txt文件, 注 :QRC变量必须在qt_add_executable被调用才能被加载,如果在add_library里使用资源不会被加载出来。
1 2 3 4 5 6 7 8 9 10 11 # 添加qrc文件 file(GLOB QRC "resources/*.qrc") set(PROJECT_SOURCES # ${SOURCE_DIR}/main.cpp # ${SOURCE_DIR}/mainwindow.cpp # ${UI_HEADERS} # ${HEADER_DIR} ${SRC} ${INC} ${QRC} )
也可以在UI Designer界面配置资源
UI组件与窗体联动
在mainWindow.cpp文件中显性的设置ui查组件的布局layout和widget窗体关联,使窗体变化时layout也跟着变化。
1 2 3 4 5 6 7 8 9 10 11 12 13 14 15 16 17 18 19 #include "mainwindow.h" #include "ui_mainwindow.h" MainWindow::MainWindow (QWidget *parent) : QMainWindow (parent) , ui (new Ui::MainWindow) { ui->setupUi (this ); ui->centralwidget->setLayout (ui->verticalLayout); ui->statWidget->setLayout (ui->bottomHLayout); } MainWindow::~MainWindow () { delete ui; }
在 Qt 中,ui(new Ui::MainWindow) 和 ui->setupUi(this) 是与 Qt Designer 生成的 UI 文件相关的关键初始化代码
ui(new Ui::MainWindow)
创建 UI 类的实例 :Ui::MainWindow 是 Qt Designer 生成的界面类(对应 mainwindow.ui 文件编译后生成的 ui_mainwindow.h),该实例是一个空白对象。分配内存 :通过 new 操作符在堆上创建界面对象
ui->setupUi(this)
构建用户界面 :将 .ui 文件中设计的界面实例化到当前窗口,该实例不在是一个空白对象。完成以下操作 :
创建所有子控件(按钮、文本框等)
设置控件层级关系(父子关系)
应用布局(Layout)
连接信号槽(如果 Designer 中已设置)
应用样式表(如果 Designer 中已设置)
信号与槽
怎样让按键按下后后操作上的反应?信号与槽机制是一种事件通信机制。
信号signal:是由对象在特定事件发生时发出的消息。例如,QPushButton有一个clicked()信号,当用户点击按钮时发出。
槽slot: 是用来响应信号的方法。一个槽可以是任意函数,当其关联的信号被发出时,该槽函数将被调用。
连接信号和槽:使用QObject::connect()方法将信号连接到槽。当信号发出时,关联的槽函数会自动执行。
按键QPushButton设置信号与槽
连接方式
描述
示例
使用QObject::connect
最常用的方式,直接通过QObject::connect函数连接信号与槽
QObject::connect(senderPointer, SIGNAL(signal()), receiverPointer, SLOT(slot()));
使用C++11 Lambda表达式
利用C++11引入的Lambda表达式进行信号与槽的连接。这种方式可以直接在连接点使用匿名函数,使代码更加简洁
QObject::connect(senderPointer, &SenderClass::signal, [=](){/*lambda body*/});
使用函数指针
允许使用函数指针(&func)直接连接信号与槽,这种方式类型安全,且可以利用IDE的代码补全和错误检查
QObject::connect(senderPointer, &SenderClass::signal, receiverPointer, &ReceiverClass::slot);
自动连接(使用UI文件)
在使用Qt Designer时,可以通过命名约定自动连接信号和槽。当UI文件加载时,以on__命名的槽会自动连接到相应的信号。
在Qt Designer中命名按钮为pushButton,然后在代码中定义on_pushButton_clicked()
各自特点:
QObject::connect使用普遍,这种方式使用字符串 来指定信号和槽,因此编译器无法检查信号和槽是否匹配,也无法检测连接是否成功。如果信号和槽的签名不匹配,或者槽函数的访问权限不允许连接,连接仍然会“成功”,但实际上并不会生效。这就导致了连接成功但槽函数没有触发的情况 。在构造函数中调用信号与槽连接,需在头文件中声明。。
Lambda表达式可以在同一位置编写信号处理逻辑,提高代码可读性,在构造函数中调用与槽连接,无需在头文件中声明。
使用函数指针在编译时提供更好的类型检查,在构造函数中调用信号与槽连接,需在头文件中声明。
自动连接通常在使用Qt Designer设计UI时比较方便,无需调用信号与槽连接,需在头文件中声明。。
非代码方式
代码方式
使用Qt creator的转到槽实现自动化生成槽声明和实现模版
vscode仿照转到槽,自己生成槽声明和实现模版
1 2 3 4 5 6 7 8 9 10 11 12 13 14 15 16 17 18 19 20 21 22 23 24 25 26 27 28 29 30 #ifndef MAINWINDOW_H #define MAINWINDOW_H #include <QMainWindow> #include <iostream> QT_BEGIN_NAMESPACE namespace Ui {class MainWindow ;} QT_END_NAMESPACE class MainWindow : public QMainWindow{ Q_OBJECT public : MainWindow (QWidget *parent = nullptr ); ~MainWindow (); private slots: void on_btnCloseIcon_clicked () void btnOldConnectFunc () void btnNewConnectFunc () private : Ui::MainWindow *ui; }; #endif
1 2 3 4 5 6 7 8 9 10 11 12 13 14 15 16 17 18 19 20 21 22 23 24 25 26 27 28 29 30 31 32 33 34 35 36 37 38 39 40 41 42 43 44 45 46 47 #include "mainwindow.h" #include "ui_mainwindow.h" MainWindow::MainWindow (QWidget *parent) : QMainWindow (parent) , ui (new Ui::MainWindow) { ui->setupUi (this ); ui->centralwidget->setLayout (ui->verticalLayout); ui->statWidget->setLayout (ui->bottomHLayout); QObject::connect (ui->btnOldConnect, SIGNAL (clicked ()), this , SLOT (btnOldConnectFunc ())); QObject::connect (ui->btnLambda, &QPushButton::clicked, [=](){ std::cout << "Lambda Button Clicked: QObject::connect(sender, &SenderClass::signal, [=](){/* lambda body */})" << std::endl; }); QObject::connect (ui->btnNewConnect, &QPushButton::clicked, this , &MainWindow::btnNewConnectFunc); } MainWindow::~MainWindow () { delete ui; } void MainWindow::on_btnCloseIcon_clicked () std::cout << "Close Icon Clicked: on_objectName_signalName format" << std::endl; this ->close (); } void MainWindow::btnOldConnectFunc () std::cout << "Old Connect Button Clicked: QObject::connect(sender, SIGNAL(signal), receiver, SLOT(slot));" << std::endl; } void MainWindow::btnNewConnectFunc () std::cout << "New Connect Button Clicked: QObject::connect(sender, &Sender::signal, receiver, &Receiver::slot);" << std::endl; }
private: 和 private slots: 的区别1. private: 访问修饰符
private: 是 C++ 中的一个访问控制符,用来指定类的成员只能在类的内部访问。它的作用是确保类的实现细节对外部不可见。即使我们将槽函数放在 private: 中,Qt 的信号槽机制不会自动识别它为槽函数 ,因此信号无法正确连接。
2. private slots: 访问修饰符
private slots: 是 Qt 的一种特有的语法,它不仅表示这些槽函数是 private 访问权限 的,而且告诉 Qt 这个函数是一个 槽函数 。Qt 会根据元对象系统(Meta-Object System)自动识别和连接这些函数。因此,private slots: 中的槽函数可以被正确识别并响应信号private。
Qt 的信号槽机制与 C++ 的普通成员函数指针有所不同。Qt 使用 元对象系统(Meta-Object System) 来识别信号和槽的连接。这个系统能够识别并正确连接通过 private slots: 声明的槽函数,但它并不会识别 private: 中的普通成员函数。因此,信号与 private: 中的函数无法正常连接 。
为什么 private slots: 中的槽函数可以正常使用?
当我们使用 private slots: 来声明槽函数时,Qt 的元对象系统会确保这些函数可以作为槽进行连接。虽然这些函数的访问权限是 private,但是 Qt 会自动处理这个限制并正确连接信号和槽。因此,槽函数放在 private slots: 中是推荐的做法 。
QDebug
1 2 3 qDebug () << "This is a debug message" ;int value = 10 ;qDebug () << "The value is " << value;
qDebug()可以输出自定义类型,只要为这些类型提供输出操作符重载。Qt还提供了qInfo(),QWarning(), qCritical()和qFatal()函数,用于输出不同级别的信息,分别用于普通信息,警告,关键错误和致命错误。有助于日志的分级控制输出内容。
自定义信号与槽
信号与槽是Qt对象通信的核心,使得一个对象能够在发生某种事件时通知其他对象。自定义信号与槽的实现步骤如下:
定义信号 :在Qt中信号是由signals关键字声明的类成员函数。他们不需要实现只需要声明。
1 2 3 4 5 6 7 class MyClass : public QObject{ Q_OBJECT public : MyClass (); signals: void mySignal (int value) };
定义槽 :槽可以是任何普通的成员函数,但通常在类定义中用slots关键字标识。槽可以有返回类型,也可以接受参数,但他们的参数类型需要与发出信号的参数类型匹配。
1 2 3 4 5 6 7 8 9 10 class MyClass : public QObject{ Q_OBJECT public slots: void mySlot (int value) }; void MyClass::mySlot (int value) std::cout << "自定义信号与槽" << std::endl; }
连接信号与槽 :使用QObject::connect函数将信号与槽连接。当信号被发射时,连接到这个信号的槽将被调用。
1 2 3 MyClass* myObject = new MyClass (); QObject::connect (myObject, SIGNAL (mySignal (int )), myObject, SLOT (mySlot (int ))); emit mySignal (123 ) ;
该行代码连接了myObject对象的mySignal信号到同一对象的mySlot槽。发射信号 :使用emit关键自发射信号。当信号被发射时,所有连接到这个信号的槽都会被调用 。
自定义信号和槽使得组件之间的通信变得灵活而松耦合(不用has-a组合,而是传惨),实现复杂的事件驱动逻辑。
参数处理规则 参数数量可以不同 :
2). 参数类型必须兼容 :
完全匹配或Qt隐式转换支持的类型
文件操作类QFile
QFile用于处理文件的类,继承自QIODevice,可以像IO设备一样使用。主要功能
文件读写:打开文件读写
文件信息:检索信息如:大小,修改日期
文件操作:文件重命名,移动,删除,保存等
错误处理:在文件操作时提供错误处理机制,可以通过相应的函数检查和获取错误信息。常用方法
open():打开一个文件,模式:只读,只写,读写
close():关闭文件
read()和write():读取和写入数据
exists():检查文件是否存在
remove():删除文件
copy():复制文件
1 2 3 4 5 6 7 8 9 10 11 12 13 14 15 16 17 18 19 20 21 22 23 24 25 26 27 28 29 30 31 32 33 34 35 36 37 38 39 40 41 42 43 44 45 46 47 #include <QFile> void MainWindow::on_btnOpenIcon_clicked () QFile file ("./test.txt" ) ; bool open_flag = file.open (QIODevice::ReadOnly | QIODevice::Text); if (!open_flag){ qDebug () << "Open File Failed!" ; return ; } int size = file.size (); char * context = new char [size]; qint64 read_flag = file.read (context, size); if (read_flag == -1 ){ qDebug () << "Read File Failed!" ; return ; } qDebug () << "File Content: " << context; file.close (); delete [] context; context = nullptr ; } void MainWindow::on_btnSaveIcon_clicked () QFile file = QFile ("./test1.txt" ); bool open_flag = file.open (QIODevice::WriteOnly | QIODevice::Text); if (!open_flag){ qDebug () << "Open File Failed!" ; return ; } qint64 write_flag = file.write ("Program 45-QFile001 write something to this File, 我是传玺" ); if (write_flag==-1 ){ qDebug () << "Write File Failed!" ; return ; } file.close (); }
QTextStream
QTextStream用于处理文本数据,特别是在需要考虑字符编码和文本格式的情况。
特性类别
说明
字符编码
支持Unicode,可以处理如UTF-8,UTF-16等不同编码,通过set Encoding(QStringConverter::Utf8)方法设置特定编码
读写文本
用于读写文件,字符串或者任何继承自QIODevice的对象
格式化
提供文本格式化功能,如数字精度,基数(十进制,十六进制)调整
流操作符
支持使用<<和>>操作符,类似于iostream
换行处理
自动处理不同操作系统见的换行符差异(Linux的\n和windows的\r\n)
缓冲机制
提供缓冲机制,提高读写效率
字符串操作
可以方便地处理和解析字符串数据
错误处理
能够检测和报告在读写过程中出现的错误
1 2 3 4 5 6 7 8 9 10 11 12 13 14 15 16 17 18 19 20 21 22 23 24 25 26 27 28 29 30 void MainWindow::on_btnIn_clicked () QFile file ("./test.txt" ) ; bool open_flag = file.open (QIODevice::ReadOnly | QIODevice::Text); if (!open_flag){ qDebug () << "Open File Failed!" ; return ; } QTextStream in (&file) ; in.setEncoding (QStringConverter::Utf8); int context = file.size (); qDebug () << "File size: " << context; while (!in.atEnd ()){ QString line = in.readLine (); qDebug () << "File Content: " << line; } } void MainWindow::on_btnOut_clicked () QFile file ("./test1.txt" ) ; bool open_flag = file.open (QIODevice::WriteOnly | QIODevice::Text); if (!open_flag){ qDebug () << "Open File Failed!" ; return ; } QTextStream out (&file) ; out.setEncoding (QStringConverter::Utf8); out << "Program 45-QFile001 write something to this File, 我是传玺, 文本字符流" ; file.close (); }
QTextStream 无法设置GBK等编码格式,应使用QTextCodec设置编码格式,处理的不在是stream流而是QByteArray字节数组。
1 2 3 4 5 6 7 8 9 10 11 12 13 14 15 16 17 18 19 20 21 22 23 24 25 26 27 28 29 30 31 32 33 34 35 36 37 38 39 40 41 42 43 44 45 46 47 48 49 void MainWindow::on_btnOpenIcon_clicked () std::cout << "分步骤打开" << std::endl; QFileDialog qFileDialog; qFileDialog.setWindowTitle (tr ("Open File" )); qFileDialog.setDirectory ("/Users/liuchuanxi/项目/QT" ); qFileDialog.setFileMode (QFileDialog::ExistingFiles); qFileDialog.setNameFilter (tr ("Images (*.png *.jpg *.bmp);;Text files (*.txt)" )); if (qFileDialog.exec ()){ QStringList fileNames = qFileDialog.selectedFiles (); for (const QString &fileName : fileNames) { std::cout << "Selected File: " << fileName.toStdString () << std::endl; file.setFileName (fileName); bool open_flag = file.open (QIODevice::ReadOnly | QIODevice::Text); if (!open_flag){ qDebug () << "Open File Failed!" ; return ; } QTextCodec *codec = QTextCodec::codecForName ("GBK" ); int context = file.size (); qDebug () << "File size: " << context; ui->textEdit->clear (); while (!file.atEnd ()){ QByteArray line = file.readLine (); QString line_code = codec->toUnicode (line); qDebug () << "File Content: " << line; qDebug () << "编码 File Content: " << line_code; if (file.pos () == line.length ()+1 ){ ui->textEdit->setText (line_code); }else { ui->textEdit->append (line_code); } } } } else { std::cout << "No File Selected" << std::endl; return ; } }
QFileDialog文件对话框
QFileDialog开发流程
实例化:QFileDialog dialog;
设置模式: 设置对话的模式,如打开文件,保存文件等
Dialog.setFileMode(QFileDialog::AnyFile);
设置过滤器:如果需要,设置文件类型过滤器,以限制用户可以选择的文件类型。
Dialog.setNameFilter(tr(“Images (*.png *.xpm *.jpg);;Text files (*.txt);;XML files (*.xml)”));
显示对话框:通过调用exec()方法显示对话框,并在用户作出选择后执行相应的操作。
if (dialog.exec()){
QStringList files = dialog.selectedFiles();
//对用户选定的文件进行操作
}
通过selectedFiles方法获取用户选择的文件路径列表,然后对这些文件进行处理。这是使用QFileDialog的基本模式。Qt也允许使用静态方法直接创建和显示对话框,例如:QFileDialog::getOpenFileName(),这些方法更简单,但是提供的自定义选项较少。
静态方法打开文件
1 2 3 4 5 6 7 8 9 10 11 12 13 14 15 16 17 18 19 void MainWindow::on_btnOpenIcon_clicked () QString fileName = QFileDialog::getOpenFileName (this , tr ("Open File" ), "/home" , tr ("Images (*.png *.xpm *.jpg )" )); qDebug () << 'File Name:' << fileName; QFile file (fileName) ; bool open_flag = file.open (QIODevice::ReadOnly | QIODevice::Text); if (!open_flag){ qDebug () << "Open File Failed!" ; return ; } QTextStream in (&file) ; in.setEncoding (QStringConverter::Utf8); int context = file.size (); qDebug () << "File size: " << context; while (!in.atEnd ()){ QString line = in.readLine (); qDebug () << "File Content: " << line; } }
tr() 的作用是:
标记字符串为可翻译 :告诉 Qt 的翻译工具(lupdate)这个字符串需要被提取到翻译文件(.ts)中运行时翻译 :在程序运行时,会根据当前语言环境自动查找并返回对应的翻译文本。文件过滤器字符串通常需要显示在用户界面中(如文件对话框),因此应该支持多语言:
;;的作用:分割各过滤条件。
分步骤打开文件
1 2 3 4 5 6 7 8 9 10 11 12 13 14 15 16 17 18 19 void MainWindow::btnOldConnectFunc () std::cout << "Old Connect Button Clicked: QObject::connect(sender, SIGNAL(signal), receiver, SLOT(slot));" << std::endl; std::cout << "分步骤打开" << std::endl; QFileDialog qFileDialog; qFileDialog.setWindowTitle (tr ("Open File" )); qFileDialog.setDirectory ("/Users/liuchuanxi/项目/QT" ); qFileDialog.setFileMode (QFileDialog::ExistingFiles); qFileDialog.setNameFilter (tr ("Images (*.png *.jpg *.bmp);;Text files (*.txt)" )); if (qFileDialog.exec ()){ QStringList fileNames = qFileDialog.selectedFiles (); for (const QString &fileName : fileNames) { std::cout << "Selected File: " << fileName.toStdString () << std::endl; } } else { std::cout << "No File Selected" << std::endl; } }
静态保存文件
1 2 3 4 5 6 7 8 9 10 11 12 13 14 15 16 17 18 void MainWindow::btnNewConnectFunc () std::cout << "New Connect Button Clicked: QObject::connect(sender, &Sender::signal, receiver, &Receiver::slot);" << std::endl; qDebug () << "静态方法实现保存文件" ; QString fileName = QFileDialog::getSaveFileName (this , tr ("Save File" ), "/Users/liuchuanxi/项目/QT/untitled.txt" , tr ("Text files (*.txt)" )); qDebug () <<"保存的文件:" << fileName; QFile file (fileName) ; bool open_flag = file.open (QIODevice::WriteOnly | QIODevice::Text); if (!open_flag){ qDebug () << "Open File Failed!" ; return ; } QTextStream out (&file) ; out.setEncoding (QStringConverter::Utf8); out << "这是保存后自动生成的文字" ; file.close (); }
分步骤保存文件
1 2 3 4 5 6 7 8 9 10 11 12 13 14 15 16 17 18 19 20 21 22 23 24 25 26 void MainWindow::on_btnSaveIcon_clicked () std::cout << "分步骤保存" << std::endl; QFileDialog qFileDialog; qFileDialog.setWindowTitle (tr ("Open File" )); qFileDialog.setDirectory ("/Users/liuchuanxi/项目/QT" ); qFileDialog.setAcceptMode (QFileDialog::AcceptSave); qFileDialog.setDefaultSuffix ("txt" ); qFileDialog.setFileMode (QFileDialog::AnyFile); qFileDialog.setNameFilter (tr ("Text files (*.txt)" )); if (qFileDialog.exec () == QFileDialog::Accepted){ QString fileName = qFileDialog.selectedFiles ().first (); qDebug () <<"保存的文件:" << fileName; QFile file (fileName) ; bool open_flag = file.open (QIODevice::WriteOnly | QIODevice::Text); if (!open_flag){ qDebug () << "Open File Failed!" ; return ; } QTextStream out (&file) ; out.setEncoding (QStringConverter::Utf8); out << "这是保存后自动生成的文字" ; file.close (); } else { std::cout << "No File Selected" << std::endl; } }
保存文件时当文件存在时不要弹出对话框
1 2 3 4 5 6 7 8 9 10 11 12 13 14 15 16 17 18 19 20 21 22 23 24 25 26 27 28 29 30 31 32 33 34 35 36 37 38 39 40 41 42 43 44 45 46 47 48 49 50 51 52 53 54 55 56 57 58 59 60 void MainWindow::on_btnSaveIcon_clicked () std::cout << "分步骤保存" << std::endl; if (!file.isOpen ()){ QFileDialog qFileDialog; qFileDialog.setWindowTitle (tr ("Open File" )); qFileDialog.setDirectory ("/Users/liuchuanxi/项目/QT" ); qFileDialog.setAcceptMode (QFileDialog::AcceptSave); qFileDialog.setDefaultSuffix ("txt" ); qFileDialog.setFileMode (QFileDialog::AnyFile); qFileDialog.setNameFilter (tr ("Text files (*.txt)" )); if (qFileDialog.exec () == QFileDialog::Accepted){ QString fileName = qFileDialog.selectedFiles ().first (); qDebug () <<"保存的文件:" << fileName; this ->setWindowTitle (fileName+"--传玺记事本" ); file.setFileName (fileName); bool open_flag = file.open (QIODevice::WriteOnly | QIODevice::Text); if (!open_flag){ qDebug () << "Open File Failed!" ; return ; } QString codecName = ui->encodeComboBox->currentText (); const char * codecNameCharPtr = codecName.toStdString ().c_str (); QTextCodec *codec = QTextCodec::codecForName (codecNameCharPtr); QString context = ui->textEdit->toPlainText (); QByteArray out = codec->fromUnicode (context); qint64 writeFlag = file.write (out); file.flush (); } else { std::cout << "No File Selected" << std::endl; return ; } } else { QString fileName = file.fileName (); file.close (); file.setFileName (fileName); bool open_flag = file.open (QIODevice::WriteOnly | QIODevice::Text); if (!open_flag){ qDebug () << "Open File Failed!" ; return ; } QString codecName = ui->encodeComboBox->currentText (); const char * codecNameCharPtr = codecName.toStdString ().c_str (); QTextCodec *codec = QTextCodec::codecForName (codecNameCharPtr); QString context = ui->textEdit->toPlainText (); QByteArray out = codec->fromUnicode (context); qint64 writeFlag = file.write (out); file.flush (); int a = 1 ; } }
读取文件显示在窗口中
1 2 3 4 5 6 7 8 9 10 11 12 13 14 15 16 17 18 19 20 21 22 23 24 25 26 27 28 29 30 31 32 33 34 35 36 37 38 39 40 41 void MainWindow::on_btnOpenIcon_clicked () std::cout << "分步骤打开" << std::endl; QFileDialog qFileDialog; qFileDialog.setWindowTitle (tr ("Open File" )); qFileDialog.setDirectory ("/Users/liuchuanxi/项目/QT" ); qFileDialog.setFileMode (QFileDialog::ExistingFiles); qFileDialog.setNameFilter (tr ("Images (*.png *.jpg *.bmp);;Text files (*.txt)" )); if (qFileDialog.exec ()){ QStringList fileNames = qFileDialog.selectedFiles (); for (const QString &fileName : fileNames) { std::cout << "Selected File: " << fileName.toStdString () << std::endl; QFile file (fileName) ; bool open_flag = file.open (QIODevice::ReadOnly | QIODevice::Text); if (!open_flag){ qDebug () << "Open File Failed!" ; return ; } QTextStream in (&file) ; in.setEncoding (QStringConverter::Utf8); int context = file.size (); qDebug () << "File size: " << context; ui->textEdit->clear (); while (!in.atEnd ()){ QString line = in.readLine (); qDebug () << "File Content: " << line; if (in.pos () == line.length ()+1 ){ ui->textEdit->setText (line); }else { ui->textEdit->append (line); } } } } else { std::cout << "No File Selected" << std::endl; } }
保存显示在窗口中的内容
1 2 3 4 5 6 7 8 9 10 11 12 13 14 15 16 17 18 19 20 21 22 23 24 25 26 27 28 29 void MainWindow::on_btnSaveIcon_clicked () std::cout << "分步骤保存" << std::endl; QFileDialog qFileDialog; qFileDialog.setWindowTitle (tr ("Open File" )); qFileDialog.setDirectory ("/Users/liuchuanxi/项目/QT" ); qFileDialog.setAcceptMode (QFileDialog::AcceptSave); qFileDialog.setDefaultSuffix ("txt" ); qFileDialog.setFileMode (QFileDialog::AnyFile); qFileDialog.setNameFilter (tr ("Text files (*.txt)" )); if (qFileDialog.exec () == QFileDialog::Accepted){ QString fileName = qFileDialog.selectedFiles ().first (); qDebug () <<"保存的文件:" << fileName; QFile file (fileName) ; bool open_flag = file.open (QIODevice::WriteOnly | QIODevice::Text); if (!open_flag){ qDebug () << "Open File Failed!" ; return ; } QTextStream out (&file) ; out.setEncoding (QStringConverter::Utf8); QString context = ui->textEdit->toPlainText (); out << context; file.close (); } else { std::cout << "No File Selected" << std::endl; return ; } }
关闭文档
1 2 3 4 5 6 7 8 9 10 11 12 13 void MainWindow::on_btnCloseIcon_clicked () std::cout << "Close Icon Clicked: on_objectName_signalName format" << std::endl; ui->textEdit->clear (); this ->setWindowTitle ("传玺记事本" ); if (file.isOpen ()){ ui->textEdit->clear (); file.close (); }else { ui->textEdit->clear (); } }
关闭文档 时跳出弹窗 QMessageBox
1 2 3 4 5 6 7 8 9 10 11 12 13 14 15 16 17 18 19 20 21 22 23 24 25 26 27 28 29 30 31 32 33 34 35 36 37 38 39 40 41 42 43 44 45 46 47 48 49 50 51 52 53 54 55 void MainWindow::on_btnCloseIcon_clicked () std::cout << "Close Icon Clicked: on_objectName_signalName format" << std::endl; QMessageBox msgBox; if (file.isOpen ()){ msgBox.setWindowTitle (file.fileName ()); } msgBox.setText ("文件已被修改。" ); msgBox.setInformativeText ("你要保存更改吗?" ); msgBox.setIconPixmap (QPixmap (":/icon/res/sketchbook.png" ).scaled (48 , 48 , Qt::KeepAspectRatio, Qt::SmoothTransformation)); msgBox.setStandardButtons (QMessageBox::Save | QMessageBox::Discard | QMessageBox::Cancel); msgBox.setButtonText (QMessageBox::Save, "保存" ); msgBox.setButtonText (QMessageBox::Cancel, "取消" ); msgBox.setButtonText (QMessageBox::Discard, "放弃" ); msgBox.setDefaultButton (QMessageBox::Save); int ret = msgBox.exec (); switch (ret){ case QMessageBox::Save: qDebug () << "Save was clicked" ; this ->on_btnSaveIcon_clicked (); break ; case QMessageBox::Discard: qDebug () << "Don't Save was clicked" ; ui->textEdit->clear (); this ->setWindowTitle ("传玺记事本" ); if (file.isOpen ()){ ui->textEdit->clear (); file.close (); }else { ui->textEdit->clear (); } break ; case QMessageBox::Cancel: qDebug () << "Cancel was clicked" ; return ; } return ; }
QComboBox
QComboBox是创建下拉列表的一个控件。它允许用户从一组选项中选择一个,并可以配置为可编辑,使用户能够在其中输入文本。该控件应用于需要从多个选项中进行选择的用户界面场景。
功能
描述
API方法
添加选项
向下拉列表添加单个或多个选项
addItem(), addItems()
获取选项
获取当前选中的文本或索引
currentText(), currentIndex()
设置选项
设置当前选中的项
setCurrentIndex(int)
移除选项
从下拉列表中移除项
removeItem(int)
信号
当选项改变时触发事件
currentIndexChanged(int)
可编辑性
设置下拉列表是否可编辑
setEditable(bool)
自定义数据
向下拉列表项关联额外的数据
setItemData(int, const QVariant&)
清空列表
移除所有选项
clear()
1 2 3 4 5 6 7 8 9 10 11 12 13 14 15 16 17 18 19 20 21 22 23 24 25 26 27 28 29 30 31 32 33 34 35 36 37 38 39 40 41 42 43 44 45 46 47 48 49 50 51 52 53 54 55 56 57 58 59 60 61 62 63 64 65 66 67 68 69 70 71 72 73 74 75 76 77 78 79 80 81 82 MainWindow::MainWindow (QWidget *parent) : QMainWindow (parent) , ui (new Ui::MainWindow){ QObject::connect (ui->encodeComboBox, &QComboBox::currentIndexChanged, this , &MainWindow::oncurrentIndexChanged); } void MainWindow::oncurrentIndexChanged (int index) qDebug () << index; qDebug () <<"当前编码:" << ui->encodeComboBox->currentText (); ui->textEdit->clear (); if (file.isOpen ()){ qDebug () << "文件已打开" ; ui->textEdit->clear (); QTextCodec* codec = QTextCodec::codecForName (ui->encodeComboBox->currentText ().toStdString ().c_str ()); file.seek (0 ); while (!file.atEnd ()){ QByteArray line = file.readLine (); QString line_code = codec->toUnicode (line); qDebug () << "编码 File Content: " << line_code; if (file.pos () == line.length ()+1 ){ ui->textEdit->setText (line_code); }else { ui->textEdit->append (line_code); } } } } void MainWindow::on_btnOpenIcon_clicked () std::cout << "分步骤打开" << std::endl; QFileDialog qFileDialog; qFileDialog.setWindowTitle (tr ("Open File" )); qFileDialog.setDirectory ("/Users/liuchuanxi/项目/QT" ); qFileDialog.setFileMode (QFileDialog::ExistingFiles); qFileDialog.setNameFilter (tr ("Images (*.png *.jpg *.bmp);;Text files (*.txt)" )); if (qFileDialog.exec ()){ QStringList fileNames = qFileDialog.selectedFiles (); for (const QString &fileName : fileNames) { std::cout << "Selected File: " << fileName.toStdString () << std::endl; file.setFileName (fileName); bool open_flag = file.open (QIODevice::ReadOnly | QIODevice::Text); if (!open_flag){ qDebug () << "Open File Failed!" ; return ; } QString codecName = ui->encodeComboBox->currentText (); const char * codecNameCharPtr = codecName.toStdString ().c_str (); QTextCodec *codec = QTextCodec::codecForName (codecNameCharPtr); int context = file.size (); qDebug () << "File size: " << context; ui->textEdit->clear (); while (!file.atEnd ()){ QByteArray line = file.readLine (); QString line_code = codec->toUnicode (line); qDebug () << "File Content: " << line; qDebug () << "编码 File Content: " << line_code; if (file.pos () == line.length ()+1 ){ ui->textEdit->setText (line_code); }else { ui->textEdit->append (line_code); } } } } else { std::cout << "No File Selected" << std::endl; return ; } }
注 :如果文件以GBK编码保存,用GBK解码->UTF-8编码->UTF-8解码->GBK编码后得到的编码内容和文件保存的GBK编码内容不一样。
游标QTextCursor
1 2 3 4 5 6 7 8 9 10 11 12 MainWindow::MainWindow (QWidget *parent) : QMainWindow (parent) , ui (new Ui::MainWindow){ QObject::connect (ui->textEdit, &QTextEdit::cursorPositionChanged, this , &MainWindow::onCursorPositionChanged); } void MainWindow::onCursorPositionChanged () QTextCursor cursor = ui->textEdit->textCursor (); qDebug () << "列: " << cursor.columnNumber ()+1 << "行: " << cursor.blockNumber ()+1 ; int row = cursor.blockNumber ()+1 ; int column = cursor.columnNumber ()+1 ; ui->posLabel->setText (QString::number (row)+"行," +QString::number (column)+"列" ); }
窗口标题
1 this ->setWindowTitle (fileName+"--传玺记事本" );
当前行高亮
QTextEdit::ExtraSelection用来表示额外文本选择和高亮的结构
结构体:包含两个成员,QTextCursor和QTextCharFormat。QTextCursor表示在文本中的一个位置或者区间,而QTextFormat用于定义这个区间的格式,比如背景、字体。
设置ExtraSelection:可以创建一个或多个ExtraSelection对象,为他们设置相应的光标位置和格式,然后通过QTextEdit的setExtraSelections方法将这些对象应用到文本编辑器中。这样,你可以对文本的特定部分应用特定的格式,而不影响其他文本。
高亮当前行:要高亮显示当前行,你需要在cursorPositionChanged()信号的槽函数中创建一个ExtraSelection对象。使用当前的QTextCursor对象来确定当前行的位置,并设置背景颜色为你选择的高亮颜色。
QTextCharFormat::format的成员函数:
设置和获取字体样式
设置字体属性
setFontWeight()设置字体粗细
setFontItalic()设置字体倾斜
setFontUnderline()设置字体带下划线
设置文本颜色
setForeground()设置字体前景色
setBackground()设置字体背景色
其他文本属性
setToolTip()设置文本的工具提示
setAnchor()设置文本为超链接
setAnchorHref设置超链接的目标URL
1 2 3 4 5 6 7 8 9 10 11 12 13 14 15 16 17 18 19 20 21 22 23 24 25 26 MainWindow::MainWindow (QWidget *parent) : QMainWindow (parent) , ui (new Ui::MainWindow){ QObject::connect (ui->textEdit, &QTextEdit::cursorPositionChanged, this , &MainWindow::onCursorPositionChanged); } void MainWindow::onCursorPositionChanged () QTextCursor cursor = ui->textEdit->textCursor (); qDebug () << "列: " << cursor.columnNumber ()+1 << "行: " << cursor.blockNumber ()+1 ; int row = cursor.blockNumber ()+1 ; int column = cursor.columnNumber ()+1 ; ui->posLabel->setText (QString::number (row)+"行," +QString::number (column)+"列" ); QList<QTextEdit::ExtraSelection> extraSelections; QTextEdit::ExtraSelection selection; selection.cursor = ui->textEdit->textCursor (); QBrush qBrush (Qt::yellow) ; selection.format.setBackground (qBrush); selection.format.setProperty (QTextFormat::FullWidthSelection, true ); extraSelections.append (selection); ui->textEdit->setExtraSelections (extraSelections); }
QList
QList是一个容器类,内部实现类似于数组,但也提供了链表特性。QList设计旨在提供一个在多数情况下既高效又方便的通用类表容器。用于存储元素列表。
数组式存储:连续内存存储其元素,这意味着提供了索引访问(通过通过下标操作符[]),以及相对高效的迭代性能。
动态调整大小:与静态数组不同,QList可以动态增长和缩减,自动管理内存分配。
链表特性:虽然QList主要基于数组,但它也提供了一些链表操作,例如在列表开始和结束处添加和移除元素。这些操作比数组中间插入或删除元素更高效。
复制时共享内存:QList使用隐式共享或写时复制的技术。这意味着当你复制一个QList时,他不会立即复制所有元素,而是共享相同的数据,直到你尝试修改其中一个列表,此时他才进行实际的复制。
头文件 :#inlcude <QList>
实例化 :QList<int> list;
添加元素 :list.append(1);
访问元素 :int fisrtElement = list[0]; 或者 int firstElement = list.at(0);
遍历 :
1 2 3 4 5 6 7 for (int i=0 ; i<list.size (); ++i){ qDebug () << list[i]; } for (int item: list){ qDebug () << item; }
移除元素 :
1 2 3 list.removeAt (1 ); list.removeOne (3 ); list.clear ();
创建快捷键
在Qt中实现快捷键功能涉及到QShortcut类
1 2 3 4 5 6 QShortcut* shortcut = new QShortcut (QKeySequence ("Ctrl+N" ), &window); QObject::connect (shortcut, &QShortcut::activated, [&](){ QMessageBox::information (&window, "Shortcut Activated" , "Ctrl+N was pressed" ); });
1 2 3 4 5 6 7 8 9 10 QShortcut* shortcutOpen = new QShortcut (QKeySequence ("Ctrl+O" ), this ); QShortcut* shortcutSave = new QShortcut (QKeySequence ("Ctrl+S" ), this ); QObject::connect (shortcutOpen, &QShortcut::activate, [&](){ Widget::on_pushButtonOpen_clicked (); }); QObject::connect (shortcutSave, &QShortcut::activate, [&](){ Widget::on_pushButtonSave_clicked (); });
1 2 3 4 5 6 7 8 9 MainWindow::MainWindow (QWidget *parent) : QMainWindow (parent) , ui (new Ui::MainWindow){ QShortcut* openShortcut = new QShortcut (QKeySequence (tr ("Ctrl+O" , "File|Open" )), this ); QShortcut* saveShortcut = new QShortcut (QKeySequence (tr ("Ctrl+S" , "File|Save" )), this ); connect (openShortcut, &QShortcut::activated, this , &MainWindow::on_btnOpenIcon_clicked); connect (saveShortcut, &QShortcut::activated, this , &MainWindow::on_btnSaveIcon_clicked); }
字体放大缩小
lambda 函数方式
1 2 3 4 5 6 7 8 9 10 11 12 13 14 15 16 17 18 19 20 21 22 23 24 25 26 27 28 29 30 31 32 33 MainWindow::MainWindow (QWidget *parent) : QMainWindow (parent) , ui (new Ui::MainWindow){ QShortcut* zoomInShortcut = new QShortcut (QKeySequence (tr ("Ctrl+Shift+=" )), this ); QShortcut* zoomOutShortcut = new QShortcut (QKeySequence (tr ("Ctrl+-" )), this ); connect (zoomInShortcut, &QShortcut::activated, this , [=](){ qDebug () << "Zoom In" ; QFont font = ui->textEdit->font (); int fontSize = font.pointSize (); if (fontSize==-1 ) return ; int newFontSize = fontSize + 1 ; font.setPointSize (newFontSize); ui->textEdit->setFont (font); }); connect (zoomOutShortcut, &QShortcut::activated, this , [=](){ qDebug () << "Zoom Out" ; QFont font = ui->textEdit->font (); int fontSize = font.pointSize (); if (fontSize==-1 ) return ; int newFontSize = fontSize - 1 ; font.setPointSize (newFontSize); ui->textEdit->setFont (font); }); }
独立定义放缩函数 方式
1 2 3 4 5 6 7 8 9 10 11 12 13 14 15 16 17 18 19 20 21 22 23 24 25 26 27 28 29 30 31 32 33 34 35 36 37 38 39 40 41 #ifndef MAINWINDOW_H #define MAINWINDOW_H #include <QMainWindow> #include <iostream> #include <QFile> QT_BEGIN_NAMESPACE namespace Ui {class MainWindow ;} QT_END_NAMESPACE class MainWindow : public QMainWindow{ Q_OBJECT public : QFile file; QString preEncodeName; MainWindow (QWidget *parent = nullptr ); ~MainWindow (); void zoomIn () void zoomOut () private slots: void on_btnCloseIcon_clicked () void btnOldConnectFunc () void btnNewConnectFunc () void on_btnOpenIcon_clicked () void on_btnSaveIcon_clicked () void oncurrentIndexChanged (int index) void onCursorPositionChanged () private : Ui::MainWindow *ui; }; #endif
1 2 3 4 5 6 7 8 9 10 11 12 13 14 15 16 17 18 19 20 21 22 23 24 25 26 27 28 29 30 31 32 33 34 35 36 37 38 39 40 41 42 MainWindow::MainWindow (QWidget *parent) : QMainWindow (parent) , ui (new Ui::MainWindow){ QShortcut* zoomInShortcut = new QShortcut (QKeySequence (tr ("Ctrl+Shift+=" )), this ); QShortcut* zoomOutShortcut = new QShortcut (QKeySequence (tr ("Ctrl+-" )), this ); connect (zoomInShortcut, &QShortcut::activated, this , [=](){ zoomIn (); }); connect (zoomOutShortcut, &QShortcut::activated, this , [=](){ zoomOut (); }); } void MainWindow::zoomIn () qDebug () << "Zoom In" ; QFont font = ui->textEdit->font (); int fontSize = font.pointSize (); if (fontSize==-1 ) return ; int newFontSize = fontSize + 1 ; font.setPointSize (newFontSize); ui->textEdit->setFont (font); } void MainWindow::zoomOut () qDebug () << "Zoom Out" ; QFont font = ui->textEdit->font (); int fontSize = font.pointSize (); if (fontSize==-1 ) return ; int newFontSize = fontSize - 1 ; font.setPointSize (newFontSize); ui->textEdit->setFont (font); }
事件
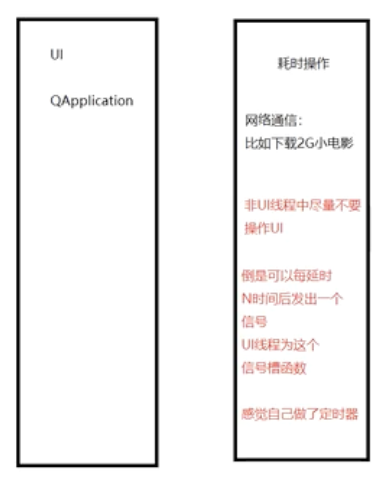
Qt是C++框架主要用来开发窗口的应用程序。我们使用的基于窗口的应用程序都是基于事件,其目的主要是用来实现回调(无需手动写调用函数代码,自动调用,因为只有这样程序的效率才是最高),所以在Qt框架内部为我们提供了一些事件处理机制,当窗口事件产生之后,事件会经过:事件产生->事件派发->事件过滤->事件分发->事件处理几个阶段。Qt窗口中对于产生的一系列事件都有默认的处理动作,如果我们有特殊需求就需要在合适的阶段重写事件的处理动作,比如信号与槽就是一种 (信号与槽就无法处理窗口大小改变时的处理过程)。
事件是由系统或者Qt本身在不同的场景下发生的。当用户按下/移动鼠标/敲击键盘,或者窗口关闭/大小变化/隐藏/显示都会发出一个相应的事件。一些事件在对用户操作做出响应时发生,如鼠标/键盘事件等;另一些事件则是由系统自动发出,如计时器事件。
每一个Qt应用程序都对应一个唯一的QApplication应用对象,然后调用该对象的exec()函数,这样Qt框架内部的事件检测就开始了(程序将进入事件循环来监听应用程序的事件)。
查看QWidget protected function
事件在Qt中产生之后的分发过程 :事件传递
事件产生后,Qt使用应用程序对象调用notify()函数将事件发送到指定的窗口。在a.exec()中会自动调用notify()函数。
1 2 [override virtual ] bool QApplication::notify (QObject* receiver, QEvent* e)
事件在发送过程中可以通过事件过滤器进行过滤,默认不对任何产生的事件进行过滤,可以自定义。可处理本控件及其关联的控件的事件。
1 2 3 [virtual ] bool QObject::eventFilter (QObject* watched, QEvent* event)
当事件发送到指定的窗口之后,窗口的事件分发器会对收到的事件进行分类,此处也是Qt框架自动处理。只针对本控件事件。
1 2 [override virtual protected ] bool QWidget::event (QEvent* event)
事件分发器会将分类之后的事件(鼠标事件、键盘事件、绘图事件)分发给对应的事件处理器函数进行处理,每个事件处理器函数都有默认的处理动作(我们也可以重写这些事件处理器函数),比如:鼠标事件。可以自定义
1 2 3 4 5 6 7 [virtual protected ] void QWidget::mousePressEvent (QMouseEvent* event) [virtual protected ] void QWidget::mouseReleaseEvent (QMouseEvent* event) [virtual protected ] void QWidget::mouseMoveEvent (QMouseEvent* event)
事件响应反向传递
在事件处理中,accept()和ignore()函数用于控制事件在组件中的传播。accept()组件会“接收”事件,阻止其进一步传播到其他组件;而ignore()会让事件继续传播到父组件。accept()和ignore()确保事件的唯一响应组件,防止事件泄漏到其他组件
事件过程中的事件处理环节
程序关闭之前的询问
1 2 3 4 5 6 7 8 9 10 11 12 13 14 15 16 17 18 19 20 21 22 23 24 25 26 27 28 29 30 31 32 33 34 35 36 37 38 39 40 41 42 43 44 45 46 47 #ifndef MAINWINDOW_H #define MAINWINDOW_H #include <QMainWindow> #include <iostream> #include <QFile> QT_BEGIN_NAMESPACE namespace Ui {class MainWindow ;} QT_END_NAMESPACE class MainWindow : public QMainWindow{ Q_OBJECT public : QFile file; QString preEncodeName; MainWindow (QWidget *parent = nullptr ); ~MainWindow (); void zoomIn () void zoomOut () void enterEvent (QEnterEvent *event) override void leaveEvent (QEvent *event) override void wheelEvent (QWheelEvent *event) override void closeEvent (QCloseEvent* event) override void resizeEvent (QResizeEvent* event) override private slots: void on_btnCloseIcon_clicked () void btnOldConnectFunc () void btnNewConnectFunc () void on_btnOpenIcon_clicked () void on_btnSaveIcon_clicked () void oncurrentIndexChanged (int index) void onCursorPositionChanged () private : Ui::MainWindow *ui; }; #endif
1 2 3 4 5 6 7 8 9 10 11 12 13 14 15 16 17 18 19 20 21 22 23 24 25 26 27 28 29 30 31 32 33 34 35 36 37 38 39 40 41 42 43 44 45 46 47 48 49 50 51 52 53 54 55 void MainWindow::enterEvent (QEnterEvent *event) qDebug () << "mouse enter" ; } void MainWindow::leaveEvent (QEvent *event) qDebug () << "mouse leave" ; } void MainWindow::wheelEvent (QWheelEvent *event) qDebug () << "wheel" ; qDebug () << event->angleDelta (); } void MainWindow::closeEvent (QCloseEvent *event) qDebug () << "close widget" ; QMessageBox msgBox; if (file.isOpen ()){ msgBox.setWindowTitle (file.fileName ()); } msgBox.setText ("记事本关闭" ); msgBox.setInformativeText ("你要关闭窗口吗?" ); msgBox.setIconPixmap (QPixmap (":/icon/res/sketchbook.png" ).scaled (48 , 48 , Qt::KeepAspectRatio, Qt::SmoothTransformation)); msgBox.setStandardButtons (QMessageBox::Yes | QMessageBox::No); msgBox.setButtonText (QMessageBox::Yes, "关闭" ); msgBox.setButtonText (QMessageBox::No, "不关闭" ); msgBox.setDefaultButton (QMessageBox::Yes); int ret = msgBox.exec (); switch (ret){ case QMessageBox::Yes: qDebug () << "Yes was clicked" ; event->accept (); break ; case QMessageBox::No: qDebug () << "No was clicked" ; event->ignore (); break ; } } void MainWindow::resizeEvent (QResizeEvent *event) qDebug () << "resize widget:" << "old size:" << event->oldSize () << "new size:" << event->size (); }
项目目录结构
自定义按键 : MyButton
1 2 3 4 5 6 7 8 9 10 11 12 13 14 15 16 17 18 19 20 21 22 23 24 25 26 27 28 #ifndef MYBUTTON_H #define MYBUTTON_H #include <QWidget> class MyButton : public QWidget{ Q_OBJECT private : QPixmap pic; public : explicit MyButton (QWidget *parent = nullptr ) void enterEvent (QEnterEvent* event) override void leaveEvent (QEvent* event) override void mousePressEvent (QMouseEvent* event) override void paintEvent (QPaintEvent* event) override signals: void clicked () }; #endif
1 2 3 4 5 6 7 8 9 10 11 12 13 14 15 16 17 18 19 20 21 22 23 24 25 26 27 28 29 30 31 32 33 34 35 36 #include "mybutton.h" #include <QPainter> MyButton::MyButton (QWidget *parent): QWidget (parent) { pic.load (":/icon/res/notebook.png" ); setFixedSize (pic.size ()); update (); } void MyButton::enterEvent (QEnterEvent *event) pic.load (":/icon/res/open.png" ); update (); } void MyButton::leaveEvent (QEvent *event) pic.load (":/icon/res/notebook.png" ); update (); } void MyButton::mousePressEvent (QMouseEvent *event) pic.load (":/icon/res/open2.png" ); update (); emit clicked () ; } void MyButton::paintEvent (QPaintEvent *event) QPainter painter (this ) ; painter.drawPixmap (rect (), pic); }
1 2 3 4 5 6 7 8 9 10 11 MainWindow::MainWindow (QWidget *parent) : QMainWindow (parent) , ui (new Ui::MainWindow) { ui->setupUi (this ); connect (ui->mybutton, &MyButton::clicked, [=](){ qDebug () << "MyButton Clicked" ; }); }
控件mybutton从原来的QWidget控件类(MyButton类继承的父类)提升为MyButton类
自定义控件事件 : MyTextEdit
自定义控件MyTextEdit并让其继承自Qt中的直接父控件类QTextEdit。
自定义控件MyTextEdit的构造函数的参数类型设置为Qt中的根部父控件类指针QWidget*,并在初始化列表中用传入的根部父控件类指针对象实例化直接父控件类QTextEdit,目的是把QDesigner界面的根部控件QWidget中的QTextEdit控件提升为 MyTextEdit控件。
在自定义控件类中定义各事件处理函数,例如void MyTextEdit::wheelEvent(QWheelEvent* e)
在触发的事件处理函数结束时设置event->accept()结束该事件的传播,或者将该事件上传给直接的父控件处理,QTextEdit::wheelEvent(e), 防止该函数的子类覆盖父类。
1 2 3 4 5 6 7 8 9 10 11 12 13 14 15 16 17 18 19 20 21 22 #ifndef MYTEXTEDIT_H #define MYTEXTEDIT_H #include <QTextEdit> class MyTextEdit : public QTextEdit{ Q_OBJECT public : MyTextEdit (QWidget *parent); protected : void wheelEvent (QWheelEvent *event) override void keyPressEvent (QKeyEvent *event) override void keyReleaseEvent (QKeyEvent *event) override private : bool ctrlKeyPressed = false ; }; #endif
1 2 3 4 5 6 7 8 9 10 11 12 13 14 15 16 17 18 19 20 21 22 23 24 25 26 27 28 29 30 31 32 33 34 35 36 37 38 39 40 41 42 43 44 45 46 47 48 49 50 51 52 53 54 55 56 57 58 #include "myTextEdit.h" #include <QWheelEvent> MyTextEdit::MyTextEdit (QWidget *parent): QTextEdit (parent) { } void MyTextEdit::wheelEvent (QWheelEvent *event) qDebug () << "MyTextEdit.cpp wheelEvent" ; qDebug () << event->angleDelta (); if (event->angleDelta ().y () > 0 && this ->ctrlKeyPressed) { qDebug () << "Zoom In" ; this ->zoomIn (); event->accept (); } else if (event->angleDelta ().y () < 0 && this ->ctrlKeyPressed) { qDebug () << "Zoom Out" ; this ->zoomOut (); event->accept (); } else { QTextEdit::wheelEvent (event); } } void MyTextEdit::keyPressEvent (QKeyEvent *event) if (event->key () == Qt::Key_Control){ qDebug () << "Ctrl Key Pressed" ; this ->ctrlKeyPressed = true ; event->accept (); } else { QTextEdit::keyPressEvent (event); } } void MyTextEdit::keyReleaseEvent (QKeyEvent *event) if (event->key () == Qt::Key_Control){ qDebug () << "Ctrl Key Released" ; this ->ctrlKeyPressed = false ; event->accept (); } else { QTextEdit::keyPressEvent (event); } }
事件过程中的事件过滤环节
之前通过继承QTextEdit来重写事件处理函数实现Ctrl+滚轮的检测,现在通过事件过滤器实现。
在Qt事件处理过程中,引入事件过滤器 可以让你在事件达到目标对象之前进行拦截和处理。这是一种强大的机制,允许你在不同对象间共享事件处理逻辑或在父对象中集中处理待定事件。步骤如下:
定义事件过滤器 :事件过滤器通常是一个重写了QObject::eventFilter()方法的对象。这个方法会在事件传递给目标对象之前被调用。安装事件过滤器 :使用QObject::installEventFilter()方法安装事件过滤器。这个方法告诉Qt在将事件发送给特定对象之前先通过过滤器对象。(例如,如果你想在父窗口中过滤子窗口事件,你需要在父窗口的对象上调用QObject::installEventFilter(),并将子窗口作为参数传递。)某控件对象通过调用QObject::installEventFilter(另一个控件对象)实现在事件发送给本控件对象时调用另一个控件对象的QObject::eventFilter()方法。事件过滤器逻辑 :在QObject::eventFilter()方法内部,你可以编写自定义逻辑来决定如何处理或忽略事件。如果此方法返回true,则表示事件已被处理,不应该继续传递;如果返回false,则事件将正常传递给目标对象。事件分发 :当事件发生时,Qt首先将事件发送到安装了事件过滤器QObject::installEventFilter()的对象。在这一步,eventFilter()方法被调用。决定是否传递事件 :根据eventFilter()方法的返回值,Qt决定是否继续向目标对象传递事件。如果过滤器返回true,事件处理到此结束;如果返回false,事件继续传递到原始目标对象。目标对象处理事件 :如果事件过滤器允许事件继续传递,目标对象将像没有事件过滤器存在时那样处理事件。
事件过滤器特别适用于以下情况:
通过使用事件过滤器,Qt应用程序可以获得更大的灵活性和更细粒度的事件处理控制。
1 2 3 4 5 6 7 8 9 10 11 12 13 14 15 16 17 18 19 20 21 22 23 24 25 26 27 28 29 30 31 32 33 34 35 36 37 38 39 40 41 42 43 44 45 46 47 48 49 50 51 52 53 MainWindow::MainWindow (QWidget *parent) : QMainWindow (parent) , ui (new Ui::MainWindow) { ui->setupUi (this ); ui->textEdit->installEventFilter (this ); } bool MainWindow::eventFilter (QObject *obj, QEvent *event) qDebug () << "Filtering event for:" << obj; qDebug () << "type: " << event->type (); if (event->type () == QEvent::MouseButtonDblClick){ qDebug () << obj->objectName () << " Mouse Double Click Event" ; } if (event->type () == QEvent::Wheel){ qDebug () << obj->objectName () << " Mouse Wheel Event" ; } if (event->type () == QEvent::KeyPress){ QKeyEvent* keyEvent = static_cast <QKeyEvent*>(event); if (keyEvent->key () == Qt::Key_Control){ qDebug () << "Ctrl Key Pressed" ; } } if (event->type () == QEvent::Wheel){ if (QGuiApplication::keyboardModifiers () == Qt::ControlModifier){ qDebug () << "Ctrl + Mouse Wheel Event" ; QWheelEvent* wheelEvent = static_cast <QWheelEvent*>(event); if (wheelEvent->angleDelta ().y () > 0 ){ qDebug () << "Zoom In" ; zoomIn (); }else { qDebug () << "Zoom Out" ; zoomOut (); } return true ; } } return false ; }
记事本项目总结
类别
功能
描述
UI设计师基本控件操作
Widget
基础的用户界面单元,用于构建复杂的用户界面。
QPushButton
用于创建按钮
QHBoxLayout
水平布局管理器,用于水平排列控件。
QVBoxLayout
垂直布局管理器,用于垂直排列控件。
TextEdit
多行文本编辑器控件。
Stylesheet
使用样式表来定制控件的外观。
文件操作类
QFile
用于读取和写入文件。
文件选择对话框类
QFileDialog
提供了一个对话框,允许用户选择文件或目录。
Qt的信号与槽
用于对象之间的通信机制。
消息对话框
QMessageBox
用于显示信息、告警、错误等对话框。
快捷键捕获和处理
用于捕获和处理键盘快捷键。
Ctrl按键信号捕获和处理
专门处理Ctrl按键的信号。
鼠标滚轮信号捕获和处理
用于捕获和处理鼠标滚轮动作。
事件处理
Event
用于处理不同的事件。
文本字符编码检测
用于检测和处理文本的字符编码。
字体放大缩小
用于调整字体的大小。
Qt程序开发流程
涉及从设计到部署的整个开发流程。
串口调试助手
项目描述
检测并列举系统中的可用串口
配置波特率,校验位,停止位,数据位
启动串口
发送数据
接收数据
需要硬件usb转串口
UI设计
自动检测可用串口并添加到串口comBox中
1 2 3 4 5 6 7 8 9 10 11 12 13 14 15 16 17 18 19 20 21 22 23 24 25 26 #include "mainwindow.h" #include "ui_mainwindow.h" #include <QSerialPortInfo> #include <QDebug> MainWindow::MainWindow (QWidget *parent) : QMainWindow (parent) , ui (new Ui::MainWindow) { ui->setupUi (this ); ui->centralwidget->setLayout (ui->windowGridLayout); QList<QSerialPortInfo> serialList = QSerialPortInfo::availablePorts (); for (QSerialPortInfo serial : serialList) { qDebug () << serial.portName (); ui->chuanComboBox->addItem (serial.portName ()); } } MainWindow::~MainWindow () { delete ui; }
初始化构造函数
设置comBox的默认项
1 2 3 4 5 6 7 8 9 10 11 12 13 14 15 16 17 18 19 20 21 22 23 24 25 26 27 28 #include "mainwindow.h" #include "ui_mainwindow.h" #include <QSerialPortInfo> #include <QDebug> MainWindow::MainWindow (QWidget *parent) : QMainWindow (parent) , ui (new Ui::MainWindow) { ui->setupUi (this ); ui->centralwidget->setLayout (ui->windowGridLayout); QList<QSerialPortInfo> serialList = QSerialPortInfo::availablePorts (); for (QSerialPortInfo serial : serialList) { qDebug () << serial.portName (); ui->chuanComboBox->addItem (serial.portName ()); } ui->boTeComboBox->setCurrentIndex (6 ); ui->dataComboBox->setCurrentIndex (3 ); } MainWindow::~MainWindow () { delete ui; }
信号与槽
打开串口 时为串口配置波特率、数据位、校验位、停止位、流控参数。1 2 3 4 5 6 7 8 9 10 11 12 13 14 15 16 17 18 19 20 21 22 23 24 25 26 27 28 29 30 #ifndef MAINWINDOW_H #define MAINWINDOW_H #include <QMainWindow> #include <QSerialPort> QT_BEGIN_NAMESPACE namespace Ui {class MainWindow ;} QT_END_NAMESPACE class MainWindow : public QMainWindow{ Q_OBJECT public : MainWindow (QWidget *parent = nullptr ); ~MainWindow (); private slots: void on_closePushButton_clicked () private : Ui::MainWindow *ui; QSerialPort* serialPort; }; #endif
1 2 3 4 5 6 7 8 9 10 11 12 13 14 15 16 17 18 19 20 21 22 23 24 25 26 27 28 29 30 31 32 33 34 35 36 37 38 39 40 41 42 43 44 45 46 47 48 49 50 51 52 53 54 55 56 57 58 59 60 61 62 63 64 65 66 67 68 69 70 71 72 73 74 75 MainWindow::MainWindow (QWidget *parent) : QMainWindow (parent) , ui (new Ui::MainWindow) { ui->setupUi (this ); ui->centralwidget->setLayout (ui->windowGridLayout); QList<QSerialPortInfo> serialList = QSerialPortInfo::availablePorts (); for (QSerialPortInfo serial : serialList) { qDebug () << serial.portName (); ui->chuanComboBox->addItem (serial.portName ()); } ui->boTeComboBox->setCurrentIndex (6 ); ui->dataComboBox->setCurrentIndex (3 ); serialPort = new QSerialPort (this ); } void MainWindow::on_closePushButton_clicked () qDebug () << "串口打开关闭槽函数" ; serialPort->setPortName (ui->chuanComboBox->currentText ()); serialPort->setBaudRate (ui->boTeComboBox->currentText ().toInt ()); serialPort->setDataBits (QSerialPort::DataBits (ui->dataComboBox->currentText ().toUInt ())); switch (ui->validComboBox->currentIndex ()) { case 0 : serialPort->setParity (QSerialPort::NoParity); break ; case 2 : serialPort->setParity (QSerialPort::MarkParity); break ; case 1 : serialPort->setParity (QSerialPort::EvenParity); break ; case 3 : serialPort->setParity (QSerialPort::OddParity); break ; case 4 : serialPort->setParity (QSerialPort::SpaceParity); break ; } switch (ui->stopComboBox->currentIndex ()) { case 0 : serialPort->setStopBits (QSerialPort::OneStop); break ; case 1 : serialPort->setStopBits (QSerialPort::OneAndHalfStop); break ; case 2 : serialPort->setStopBits (QSerialPort::TwoStop); break ; default : break ; } if (ui->streamComboBox->currentText () == "No" ) { serialPort->setFlowControl (QSerialPort::NoFlowControl); } if (serialPort->open (QIODevice::ReadWrite)) { qDebug () << "串口打开成功" ; } else { qDebug () << "串口打开失败" ; } }
发送文本信息 1 2 3 4 5 6 7 8 9 10 11 12 13 14 15 16 17 18 19 20 MainWindow::MainWindow (QWidget *parent) : QMainWindow (parent) , ui (new Ui::MainWindow) { connect (serialPort, &QSerialPort::readyRead, this , &MainWindow::onSerialDataReadyToRead); } void MainWindow::onSerialDataReadyToRead () qDebug () << "接收数据槽函数" ; QByteArray data = serialPort->readAll (); qDebug () << "串口对象读取的Byte数据:" << data; QString revMessage = QString::fromUtf8 (data); qDebug () << "串口对象读取的string数据:" << revMessage; }
状态栏 1 2 3 4 5 6 7 8 9 10 11 12 13 14 15 16 17 18 19 20 21 22 23 24 25 26 27 28 29 30 31 32 33 34 35 36 37 #ifndef MAINWINDOW_H #define MAINWINDOW_H #include <QMainWindow> #include <QSerialPort> QT_BEGIN_NAMESPACE namespace Ui {class MainWindow ;} QT_END_NAMESPACE class MainWindow : public QMainWindow{ Q_OBJECT public : MainWindow (QWidget *parent = nullptr ); ~MainWindow (); private slots: void on_closePushButton_clicked () void on_sendPushButton_clicked () void onSerialDataReadyToRead () private : Ui::MainWindow *ui; QSerialPort* serialPort; int writeCount; int readCount; QString sendHis; }; #endif
1 2 3 4 5 6 7 8 9 10 11 12 13 14 15 16 17 18 19 20 21 22 23 24 25 26 27 28 29 30 31 32 33 34 35 36 37 38 39 40 41 42 43 44 45 46 47 48 49 50 51 52 53 54 55 56 57 58 59 60 61 62 63 64 65 66 67 68 69 70 71 72 73 74 75 76 77 78 MainWindow::MainWindow (QWidget *parent) : QMainWindow (parent) , ui (new Ui::MainWindow) { this ->writeCount = 0 ; this ->readCount = 0 ; } void MainWindow::on_sendPushButton_clicked () int writeCount = 0 ; qDebug () << "发送数据槽函数" ; qDebug () << "ui框中数据:" << ui->sendLineEdit->text (); QString sendData = ui->sendLineEdit->text (); qDebug () << "串口对象写入的数据:" << sendData.toUtf8 (); writeCount = serialPort->write (sendData.toUtf8 ()); if (writeCount == -1 ){ QFont font = ui->statusLabel->font (); font.setBold (true ); ui->statusLabel->setFont (font); ui->statusLabel->setText ("Send Failed!" ); }else { this ->writeCount += writeCount; QFont font = ui->statusLabel->font (); font.setBold (true ); ui->statusLabel->setFont (font); ui->statusLabel->setText ("Send OK!" ); ui->sentLabel->setText (QString ("Sent: %1" ).arg (this ->writeCount)); } qDebug () << "接收数据槽函数" ; QString revMessage = ui->sendLineEdit->text (); qDebug () << "串口对象读取的string数据:" << revMessage; ui->textEdit->append (revMessage); if (writeCount != -1 ){ this ->readCount += revMessage.toUtf8 ().size (); qDebug () << "串口对象读取的字节数据:" << revMessage.toUtf8 (); ui->RevLabel->setText (QString ("Received: %1" ).arg (this ->readCount)); if (this ->sendHis != revMessage){ this ->sendHis = revMessage; ui->textEditHis->append (revMessage); } } } void MainWindow::onSerialDataReadyToRead () qDebug () << "接收数据槽函数" ; QByteArray data = serialPort->readAll (); if (!data.isEmpty ()){ qDebug () << "串口对象读取的Byte数据:" << data; QString revMessage = QString::fromUtf8 (data); qDebug () << "串口对象读取的string数据:" << revMessage; ui->textEdit->append (revMessage); this ->readCount += data.size (); ui->RevLabel->setText (QString ("Received: %1" ).arg (this ->readCount)); } }
串口占用给予提示对话框 1 2 3 4 5 6 7 8 9 10 11 12 13 14 15 16 17 18 19 20 21 22 23 24 25 26 27 28 29 30 31 32 33 34 35 36 37 38 39 40 41 42 43 44 45 46 47 48 49 50 51 52 53 54 55 56 57 58 void MainWindow::on_closePushButton_clicked () qDebug () << "串口打开关闭槽函数" ; serialPort->setPortName (ui->chuanComboBox->currentText ()); serialPort->setBaudRate (ui->boTeComboBox->currentText ().toInt ()); serialPort->setDataBits (QSerialPort::DataBits (ui->dataComboBox->currentText ().toUInt ())); switch (ui->validComboBox->currentIndex ()) { case 0 : serialPort->setParity (QSerialPort::NoParity); break ; case 2 : serialPort->setParity (QSerialPort::MarkParity); break ; case 1 : serialPort->setParity (QSerialPort::EvenParity); break ; case 3 : serialPort->setParity (QSerialPort::OddParity); break ; case 4 : serialPort->setParity (QSerialPort::SpaceParity); break ; } switch (ui->stopComboBox->currentIndex ()) { case 0 : serialPort->setStopBits (QSerialPort::OneStop); break ; case 1 : serialPort->setStopBits (QSerialPort::OneAndHalfStop); break ; case 2 : serialPort->setStopBits (QSerialPort::TwoStop); break ; default : break ; } if (ui->streamComboBox->currentText () == "No" ) { serialPort->setFlowControl (QSerialPort::NoFlowControl); } if (serialPort->open (QIODevice::ReadWrite)) { qDebug () << "串口打开成功" ; } else { qDebug () << "串口打开失败" ; QMessageBox msgBox; msgBox.setWindowTitle ("打开串口错误" ); msgBox.setText ("串口可能被占用" ); } }
串口打开变关闭 和串口参数不可修改状态 1 2 3 4 5 6 7 8 9 10 11 12 13 14 15 16 17 18 19 20 21 22 23 24 25 26 27 28 29 30 31 32 33 34 35 36 37 #ifndef MAINWINDOW_H #define MAINWINDOW_H #include <QMainWindow> #include <QSerialPort> QT_BEGIN_NAMESPACE namespace Ui {class MainWindow ;} QT_END_NAMESPACE class MainWindow : public QMainWindow{ Q_OBJECT public : MainWindow (QWidget *parent = nullptr ); ~MainWindow (); private slots: void on_closePushButton_clicked () void on_sendPushButton_clicked () void onSerialDataReadyToRead () private : Ui::MainWindow *ui; QSerialPort* serialPort; int writeCount; int readCount; QString sendHis; bool isSerialPortOpen; }; #endif
1 2 3 4 5 6 7 8 9 10 11 12 13 14 15 16 17 18 19 20 21 22 23 24 25 26 27 28 29 30 31 32 33 34 35 36 37 38 39 40 41 42 43 44 45 46 47 48 49 50 51 52 53 54 55 56 57 58 59 60 61 62 63 64 65 66 67 68 69 70 71 72 73 74 75 76 77 78 79 80 81 82 83 84 85 86 87 88 89 90 91 92 93 94 95 96 97 98 99 100 101 102 103 104 105 106 107 108 109 110 111 112 113 114 MainWindow::MainWindow (QWidget *parent) : QMainWindow (parent) , ui (new Ui::MainWindow) { isSerialPortOpen = false ; ui->sendPushButton->setEnabled (false ); } void MainWindow::on_closePushButton_clicked () qDebug () << "串口打开关闭槽函数" ; serialPort->setPortName (ui->chuanComboBox->currentText ()); serialPort->setBaudRate (ui->boTeComboBox->currentText ().toInt ()); serialPort->setDataBits (QSerialPort::DataBits (ui->dataComboBox->currentText ().toUInt ())); switch (ui->validComboBox->currentIndex ()) { case 0 : serialPort->setParity (QSerialPort::NoParity); break ; case 2 : serialPort->setParity (QSerialPort::MarkParity); break ; case 1 : serialPort->setParity (QSerialPort::EvenParity); break ; case 3 : serialPort->setParity (QSerialPort::OddParity); break ; case 4 : serialPort->setParity (QSerialPort::SpaceParity); break ; } switch (ui->stopComboBox->currentIndex ()) { case 0 : serialPort->setStopBits (QSerialPort::OneStop); break ; case 1 : serialPort->setStopBits (QSerialPort::OneAndHalfStop); break ; case 2 : serialPort->setStopBits (QSerialPort::TwoStop); break ; default : break ; } if (ui->streamComboBox->currentText () == "No" ) { serialPort->setFlowControl (QSerialPort::NoFlowControl); } if (!isSerialPortOpen){ if (serialPort->open (QIODevice::ReadWrite)) { qDebug () << "串口打开成功" ; ui->chuanComboBox->setEnabled (false ); ui->boTeComboBox->setEnabled (false ); ui->dataComboBox->setEnabled (false ); ui->validComboBox->setEnabled (false ); ui->stopComboBox->setEnabled (false ); ui->streamComboBox->setEnabled (false ); ui->closePushButton->setText ("关闭串口" ); ui->sendPushButton->setEnabled (true ); ui->timeSendCheckBox->setEnabled (true ); ui->sendLineEdit->setEnabled (true ); ui->freqLineEdit->setEnabled (true ); ui->newLineSendCheckBox->setEnabled (true ); ui->HexSendCheckBox->setEnabled (true ); ui->formatInputCheckBox->setEnabled (true ); isSerialPortOpen = true ; } else { qDebug () << "串口打开失败" ; QMessageBox msgBox; msgBox.setWindowTitle ("打开串口错误" ); msgBox.setIconPixmap (QPixmap (":icon/res/noun-serial-port-5265721.png" )); msgBox.setText ("串口可能被占用" ); msgBox.exec (); } }else { qDebug () << "串口关闭成功" ; serialPort->close (); ui->chuanComboBox->setEnabled (true ); ui->boTeComboBox->setEnabled (true ); ui->dataComboBox->setEnabled (true ); ui->validComboBox->setEnabled (true ); ui->stopComboBox->setEnabled (true ); ui->streamComboBox->setEnabled (true ); ui->closePushButton->setText ("打开串口" ); isSerialPortOpen = false ; ui->sendPushButton->setEnabled (false ); ui->timeSendCheckBox->setEnabled (false ); ui->sendLineEdit->setEnabled (false ); ui->freqLineEdit->setEnabled (false ); ui->newLineSendCheckBox->setEnabled (false ); ui->HexSendCheckBox->setEnabled (false ); ui->formatInputCheckBox->setEnabled (false ); } }
串口打开和关闭状态识别两种方式:1、代码,设置标识符如上isSerialPortOpen,2、QDesigner设计窗口‘串口打开’组件的QAbstractButton的checkable点选bool参数的on_closePushButton_clicked(bool checked), 用checked替换isSerialPortOpen, 注:不用设置checked的状态
定时发送/定时器 1 2 3 4 5 6 7 8 9 10 11 12 13 14 15 16 17 18 19 20 21 22 23 24 25 26 27 28 29 30 31 32 33 34 35 36 37 38 39 40 #ifndef MAINWINDOW_H #define MAINWINDOW_H #include <QMainWindow> #include <QSerialPort> QT_BEGIN_NAMESPACE namespace Ui {class MainWindow ;} QT_END_NAMESPACE class MainWindow : public QMainWindow{ Q_OBJECT public : MainWindow (QWidget *parent = nullptr ); ~MainWindow (); private slots: void on_closePushButton_clicked () void on_sendPushButton_clicked () void onSerialDataReadyToRead () void on_timeSendCheckBox_clicked (bool checked) private : Ui::MainWindow *ui; QSerialPort* serialPort; int writeCount; int readCount; QString sendHis; bool isSerialPortOpen; QTimer* timer; }; #endif
1 2 3 4 5 6 7 8 9 10 11 12 13 14 15 16 17 18 19 20 21 22 23 24 25 26 27 28 29 30 31 32 33 34 35 36 37 38 39 40 41 42 43 44 45 46 47 48 49 50 51 52 53 54 55 56 57 58 59 60 61 62 63 64 65 66 67 68 69 70 71 72 73 74 75 76 77 78 79 80 81 82 83 84 85 86 87 88 89 90 91 92 93 94 95 96 97 98 99 100 101 102 103 104 105 106 107 108 109 110 111 112 113 114 115 116 117 118 119 120 121 122 123 124 125 126 127 128 129 130 131 132 133 134 135 136 137 138 139 140 141 MainWindow::MainWindow (QWidget *parent) : QMainWindow (parent) , ui (new Ui::MainWindow) { timer = new QTimer (this ); connect (timer, &QTimer::timeout, this , &MainWindow::on_sendPushButton_clicked); } void MainWindow::on_closePushButton_clicked () qDebug () << "串口打开关闭槽函数" ; serialPort->setPortName (ui->chuanComboBox->currentText ()); serialPort->setBaudRate (ui->boTeComboBox->currentText ().toInt ()); serialPort->setDataBits (QSerialPort::DataBits (ui->dataComboBox->currentText ().toUInt ())); switch (ui->validComboBox->currentIndex ()) { case 0 : serialPort->setParity (QSerialPort::NoParity); break ; case 2 : serialPort->setParity (QSerialPort::MarkParity); break ; case 1 : serialPort->setParity (QSerialPort::EvenParity); break ; case 3 : serialPort->setParity (QSerialPort::OddParity); break ; case 4 : serialPort->setParity (QSerialPort::SpaceParity); break ; } switch (ui->stopComboBox->currentIndex ()) { case 0 : serialPort->setStopBits (QSerialPort::OneStop); break ; case 1 : serialPort->setStopBits (QSerialPort::OneAndHalfStop); break ; case 2 : serialPort->setStopBits (QSerialPort::TwoStop); break ; default : break ; } if (ui->streamComboBox->currentText () == "No" ) { serialPort->setFlowControl (QSerialPort::NoFlowControl); } if (!isSerialPortOpen){ if (serialPort->open (QIODevice::ReadWrite)) { qDebug () << "串口打开成功" ; ui->chuanComboBox->setEnabled (false ); ui->boTeComboBox->setEnabled (false ); ui->dataComboBox->setEnabled (false ); ui->validComboBox->setEnabled (false ); ui->stopComboBox->setEnabled (false ); ui->streamComboBox->setEnabled (false ); ui->closePushButton->setText ("关闭串口" ); ui->sendPushButton->setEnabled (true ); ui->timeSendCheckBox->setEnabled (true ); ui->sendLineEdit->setEnabled (true ); ui->freqLineEdit->setEnabled (true ); ui->newLineSendCheckBox->setEnabled (true ); ui->HexSendCheckBox->setEnabled (true ); ui->formatInputCheckBox->setEnabled (true ); isSerialPortOpen = true ; } else { qDebug () << "串口打开失败" ; QMessageBox msgBox; msgBox.setWindowTitle ("打开串口错误" ); msgBox.setIconPixmap (QPixmap (":icon/res/noun-serial-port-5265721.png" )); msgBox.setText ("串口可能被占用" ); msgBox.exec (); } }else { qDebug () << "串口关闭成功" ; serialPort->close (); ui->chuanComboBox->setEnabled (true ); ui->boTeComboBox->setEnabled (true ); ui->dataComboBox->setEnabled (true ); ui->validComboBox->setEnabled (true ); ui->stopComboBox->setEnabled (true ); ui->streamComboBox->setEnabled (true ); ui->closePushButton->setText ("打开串口" ); isSerialPortOpen = false ; ui->sendPushButton->setEnabled (false ); ui->timeSendCheckBox->setEnabled (false ); ui->sendLineEdit->setEnabled (false ); ui->freqLineEdit->setEnabled (false ); ui->newLineSendCheckBox->setEnabled (false ); ui->HexSendCheckBox->setEnabled (false ); ui->formatInputCheckBox->setEnabled (false ); ui->timeSendCheckBox->setCheckState (Qt::Unchecked); timer->stop (); } } void MainWindow::on_timeSendCheckBox_clicked (bool checked) qDebug () << "定时发送数据槽函数, 是否勾选:" << checked; if (checked) { on_sendPushButton_clicked (); int sendDuration = ui->freqLineEdit->text ().toInt (); timer->start (sendDuration); ui->freqLineEdit->setEnabled (false ); ui->sendPushButton->setEnabled (false ); ui->sendLineEdit->setEnabled (false ); }else { timer->stop (); ui->freqLineEdit->setEnabled (true ); ui->sendPushButton->setEnabled (true ); ui->sendLineEdit->setEnabled (true ); } }
清空/保存接收 按键1 2 3 4 5 6 7 8 9 10 11 12 13 14 15 16 17 18 19 20 21 22 23 24 25 26 27 28 29 30 31 32 33 34 void MainWindow::on_clearPushButton_clicked () qDebug () << "清空数据槽函数" ; ui->textEdit->clear (); this ->writeCount = 0 ; this ->readCount = 0 ; ui->sentLabel->setText ("Sent: 0" ); ui->RevLabel->setText ("Received: 0" ); QFont font = ui->statusLabel->font (); font.setBold (true ); ui->statusLabel->setFont (font); ui->statusLabel->setText ("clear" ); } void MainWindow::on_saveRevPushButton_clicked () qDebug () << "保存接收数据槽函数" ; QString revMessage = ui->textEdit->toPlainText (); QString fileName = QFileDialog::getSaveFileName (this , tr ("Save File" ), "./" , tr ("Text Files (*.txt);;All Files (*)" )); if (fileName.isEmpty ()) { return ; } QFile file (fileName) ; if (!file.open (QIODevice::WriteOnly | QIODevice::Text)) { QMessageBox::warning (this , tr ("Error" ), tr ("Cannot open file for writing: %1" ).arg (file.errorString ())); return ; } QTextStream out (&file) ; out << revMessage; file.close (); }
接收时间/状态栏时间 1 2 3 4 5 6 7 8 9 10 11 12 13 14 15 16 17 18 19 20 21 22 23 24 25 26 27 28 29 30 31 32 33 34 35 36 37 38 39 40 41 42 43 44 45 46 47 48 49 50 #ifndef MAINWINDOW_H #define MAINWINDOW_H #include <QMainWindow> #include <QSerialPort> QT_BEGIN_NAMESPACE namespace Ui {class MainWindow ;} QT_END_NAMESPACE class MainWindow : public QMainWindow{ Q_OBJECT public : MainWindow (QWidget *parent = nullptr ); ~MainWindow (); private slots: void on_closePushButton_clicked () void on_sendPushButton_clicked () void onSerialDataReadyToRead () void on_timeSendCheckBox_clicked (bool checked) void on_clearPushButton_clicked () void on_saveRevPushButton_clicked () void refreshStatusTime () void on_revTimeCheckBox_clicked (bool checked) private : Ui::MainWindow *ui; QSerialPort* serialPort; int writeCount; int readCount; QString sendHis; bool isSerialPortOpen; QTimer* timer; QString myTime; bool isTimeBoxChecked; void getSystemTime () }; #endif
1 2 3 4 5 6 7 8 9 10 11 12 13 14 15 16 17 18 19 20 21 22 23 24 25 26 27 28 29 30 31 32 33 34 35 36 37 38 39 40 41 42 43 44 45 46 47 48 49 50 51 52 53 54 55 56 57 58 59 60 61 62 63 64 65 66 67 68 69 70 71 72 73 74 75 76 77 78 79 80 81 82 83 84 85 86 87 88 89 90 91 92 93 94 95 96 97 98 99 100 101 102 103 104 MainWindow::MainWindow (QWidget *parent) : QMainWindow (parent) , ui (new Ui::MainWindow) { ui->setupUi (this ); ui->centralwidget->setLayout (ui->windowGridLayout); QTimer* statusTimer = new QTimer (this ); statusTimer->start (1000 ); isTimeBoxChecked = false ; connect (statusTimer, &QTimer::timeout, this , &MainWindow::refreshStatusTime); } void MainWindow::on_sendPushButton_clicked () int writeCount = 0 ; qDebug () << "发送数据槽函数" ; qDebug () << "ui框中数据:" << ui->sendLineEdit->text (); QString sendData = ui->sendLineEdit->text (); qDebug () << "串口对象写入的数据:" << sendData.toUtf8 (); writeCount = serialPort->write (sendData.toUtf8 ()); if (writeCount == -1 ){ QFont font = ui->statusLabel->font (); font.setBold (true ); ui->statusLabel->setFont (font); ui->statusLabel->setText ("Send Failed!" ); }else { this ->writeCount += writeCount; QFont font = ui->statusLabel->font (); font.setBold (true ); ui->statusLabel->setFont (font); ui->statusLabel->setText ("Send OK!" ); ui->sentLabel->setText (QString ("Sent: %1" ).arg (this ->writeCount)); } qDebug () << "接收数据槽函数" ; QString revMessage = ui->sendLineEdit->text (); qDebug () << "串口对象读取的string数据:" << revMessage; if (isTimeBoxChecked){ getSystemTime (); QString revTimeFormatMessage = "【" + myTime + "】 " + revMessage; ui->textEdit->append (revTimeFormatMessage); }else { ui->textEdit->append (revMessage); } if (writeCount != -1 ){ this ->readCount += revMessage.toUtf8 ().size (); qDebug () << "串口对象读取的字节数据:" << revMessage.toUtf8 (); ui->RevLabel->setText (QString ("Received: %1" ).arg (this ->readCount)); if (this ->sendHis != revMessage){ this ->sendHis = revMessage; ui->textEditHis->append (revMessage); } } } void MainWindow::refreshStatusTime () getSystemTime (); ui->DateLabel->setText (myTime); } void MainWindow::on_revTimeCheckBox_clicked (bool checked) qDebug () << "接收时间戳槽函数, 是否勾选:" << ui->revTimeCheckBox->isChecked (); if (ui->revTimeCheckBox->isChecked ()) { isTimeBoxChecked = true ; }else { isTimeBoxChecked = false ; } } void MainWindow::getSystemTime () QDateTime currentTime = QDateTime::currentDateTime (); myTime = currentTime.toString ("yyyy-MM-dd hh:mm:ss" ); qDebug () << "当前系统时间:" << myTime; }
Hex转换
1 2 3 4 5 6 7 8 9 10 11 12 13 14 15 16 17 18 19 20 21 22 23 24 25 26 27 28 29 30 31 32 33 34 35 36 37 38 39 40 41 void MainWindow::on_hexShowCheckBox_clicked (bool checked) if (checked){ QString tmp = ui->textEdit->toPlainText (); qDebug () << "读取的文本数据String类型:" << tmp; QByteArray tmpByteArray = tmp.toUtf8 (); qDebug () << "转换前的文本数据Byte类型:" << tmpByteArray; QByteArray tmpHex = tmpByteArray.toHex (); qDebug () << "转换后的Hex数据Byte类型:" << tmpHex; QString tmpHexString1= QString::fromUtf8 (tmpHex).toUpper (); QString tmpHexString; qDebug () << "转换后的Hex数据String类型:" << tmpHexString; for (int i=0 ; i<tmpHexString1.size (); i+=2 ){ tmpHexString += tmpHexString1.mid (i, 2 ) + " " ; } ui->textEdit->setText (tmpHexString); }else { QString tmpHexString = ui->textEdit->toPlainText (); qDebug () << "读取的Hex数据String类型:" << tmpHexString; QByteArray tmpHexByteArray = tmpHexString.toUtf8 (); qDebug () << "转换前的Hex数据Byte类型:" << tmpHexByteArray; QByteArray tmpByteArray = QByteArray::fromHex (tmpHexByteArray); qDebug () << "转换后的字符数据Byte类型:" << tmpByteArray; QString tmpString = QString::fromUtf8 (tmpByteArray); qDebug () << "转换后的字符数据String类型:" << tmpString; ui->textEdit->setText (tmpString); } }
问题
在Hex勾选时,老数据已转为Hex但是新数据还是字符。
1 2 3 4 5 6 7 8 9 10 11 12 13 14 15 16 17 18 19 20 21 22 23 24 25 26 27 28 29 30 31 32 33 34 35 36 37 38 39 40 41 42 43 44 45 46 47 48 49 50 51 52 53 54 55 56 57 58 59 60 61 62 63 64 65 66 67 68 69 70 71 72 73 74 75 void MainWindow::on_sendPushButton_clicked () int writeCount = 0 ; qDebug () << "发送数据槽函数" ; qDebug () << "ui框中数据:" << ui->sendLineEdit->text (); QString sendData = ui->sendLineEdit->text (); qDebug () << "串口对象写入的数据:" << sendData.toUtf8 (); writeCount = serialPort->write (sendData.toUtf8 ()); if (writeCount == -1 ){ QFont font = ui->statusLabel->font (); font.setBold (true ); ui->statusLabel->setFont (font); ui->statusLabel->setText ("Send Failed!" ); }else { this ->writeCount += writeCount; QFont font = ui->statusLabel->font (); font.setBold (true ); ui->statusLabel->setFont (font); ui->statusLabel->setText ("Send OK!" ); ui->sentLabel->setText (QString ("Sent: %1" ).arg (this ->writeCount)); } qDebug () << "接收数据槽函数" ; QString revMessage = ui->sendLineEdit->text (); qDebug () << "串口对象读取的string数据:" << revMessage; if (ui->hexShowCheckBox->checkState () == Qt::Checked){ revMessage = "\n" + revMessage; QByteArray tmpByteArray = revMessage.toUtf8 (); QByteArray tmpHex = tmpByteArray.toHex (); revMessage = QString::fromUtf8 (tmpHex); } if (isTimeBoxChecked){ getSystemTime (); QString revTimeFormatMessage = "【" + myTime + "】 " + revMessage; ui->textEdit->append (revTimeFormatMessage); }else { ui->textEdit->append (revMessage); } if (writeCount != -1 ){ this ->readCount += revMessage.toUtf8 ().size (); qDebug () << "串口对象读取的字节数据:" << revMessage.toUtf8 (); ui->RevLabel->setText (QString ("Received: %1" ).arg (this ->readCount)); if (ui->hexShowCheckBox->checkState () == Qt::Checked){ revMessage = ui->sendLineEdit->text (); } if (this ->sendHis != revMessage){ this ->sendHis = revMessage; ui->textEditHis->append (revMessage); } } }
Hex发送按钮 1 2 3 4 5 6 7 8 9 10 11 12 13 14 15 16 17 18 19 20 21 22 23 24 25 26 27 28 29 30 31 32 33 34 35 36 37 38 39 40 41 42 43 44 45 46 47 48 49 50 51 52 53 54 55 56 57 58 59 60 61 62 63 64 65 66 67 68 69 70 71 72 73 74 75 76 77 78 79 80 81 82 83 84 85 86 87 88 89 90 91 92 93 94 95 96 97 98 99 100 101 102 103 104 105 106 107 108 109 110 111 112 113 114 115 116 117 118 119 120 121 122 123 124 125 126 127 128 129 130 131 void MainWindow::on_sendPushButton_clicked () int writeCount = 0 ; qDebug () << "发送数据槽函数" ; qDebug () << "ui框中数据:" << ui->sendLineEdit->text (); QString sendData = ui->sendLineEdit->text (); qDebug () << "串口对象写入的数据:" << sendData.toUtf8 (); if (ui->HexSendCheckBox->isChecked ()){ QByteArray sendDataHex = sendData.toUtf8 (); if (sendData.size () % 2 != 0 ){ QFont font = ui->statusLabel->font (); font.setBold (true ); ui->statusLabel->setFont (font); ui->statusLabel->setText ("Hex Odd!" ); return ; } for (QChar a: sendData){ if (!(a.isDigit () || (a >= 'A' && a <= 'F' ) || (a >= 'a' && a <= 'f' ))){ QFont font = ui->statusLabel->font (); font.setBold (true ); ui->statusLabel->setFont (font); ui->statusLabel->setText ("Hex Out of Range!" ); return ; } } writeCount = serialPort->write (QByteArray::fromHex (sendDataHex)); }else { writeCount = serialPort->write (sendData.toUtf8 ()); } if (writeCount == -1 ){ QFont font = ui->statusLabel->font (); font.setBold (true ); ui->statusLabel->setFont (font); ui->statusLabel->setText ("Send Failed!" ); }else { this ->writeCount += writeCount; QFont font = ui->statusLabel->font (); font.setBold (true ); ui->statusLabel->setFont (font); ui->statusLabel->setText ("Send OK!" ); ui->sentLabel->setText (QString ("Sent: %1" ).arg (this ->writeCount)); } qDebug () << "接收数据槽函数" ; QString revMessage = ui->sendLineEdit->text (); qDebug () << "串口对象读取的string数据:" << revMessage; if (ui->hexShowCheckBox->checkState () == Qt::Checked && ui->HexSendCheckBox->isChecked () == false ){ revMessage = "\n" + revMessage; QByteArray tmpByteArray = revMessage.toUtf8 (); QByteArray tmpHex = tmpByteArray.toHex (); revMessage = QString::fromUtf8 (tmpHex).toUpper (); } else if (ui->hexShowCheckBox->isChecked () == false && ui->HexSendCheckBox->isChecked () == false ){ } else if (ui->hexShowCheckBox->isChecked () == true && ui->HexSendCheckBox->isChecked () == true ){ QString newLine = "\n" ; QByteArray tmpByteArray = newLine.toUtf8 (); QByteArray tmpHex = tmpByteArray.toHex (); revMessage = QString::fromUtf8 (tmpHex) + revMessage; revMessage = revMessage.toUpper (); } else if (ui->hexShowCheckBox->isChecked () == false && ui->HexSendCheckBox->isChecked () == true ){ revMessage = QString::fromUtf8 (QByteArray::fromHex (revMessage.toUtf8 ())); } if (isTimeBoxChecked){ getSystemTime (); QString revTimeFormatMessage = "【" + myTime + "】 " + revMessage; ui->textEdit->append (revTimeFormatMessage); }else { ui->textEdit->append (revMessage); } if (writeCount != -1 ){ this ->readCount += revMessage.toUtf8 ().size (); qDebug () << "串口对象读取的字节数据:" << revMessage.toUtf8 (); ui->RevLabel->setText (QString ("Received: %1" ).arg (this ->readCount)); if (ui->hexShowCheckBox->checkState () == Qt::Checked && ui->HexSendCheckBox->isChecked () == false ){ revMessage = ui->sendLineEdit->text (); } else if (ui->hexShowCheckBox->isChecked () == false && ui->HexSendCheckBox->isChecked () == false ){ } else if (ui->hexShowCheckBox->isChecked () == true && ui->HexSendCheckBox->isChecked () == true ){ revMessage = QString::fromUtf8 (QByteArray::fromHex (ui->sendLineEdit->text ().toUtf8 ())); } else if (ui->hexShowCheckBox->isChecked () == false && ui->HexSendCheckBox->isChecked () == true ){ revMessage = QString::fromUtf8 (QByteArray::fromHex (ui->sendLineEdit->text ().toUtf8 ())); } if (this ->sendHis != revMessage){ this ->sendHis = revMessage; ui->textEditHis->append (revMessage); } } }
新行checkbox 1 2 3 4 5 6 7 8 9 10 11 12 13 14 15 16 17 18 19 20 21 22 23 24 25 26 27 28 29 30 31 32 33 34 35 36 37 38 39 40 41 42 43 44 45 46 47 48 49 50 51 52 53 54 55 56 57 58 59 60 61 62 63 64 65 66 67 68 69 70 71 72 73 74 75 76 77 78 79 80 81 82 83 84 85 86 87 88 89 90 91 92 93 94 95 96 97 98 99 100 101 102 103 104 105 106 107 108 109 110 111 112 113 114 115 116 117 118 119 120 121 122 123 124 125 126 127 128 129 130 131 132 133 134 135 136 137 138 139 140 141 142 143 144 145 146 147 148 149 150 151 152 153 154 155 156 157 158 159 160 161 162 163 164 void MainWindow::on_sendPushButton_clicked () int writeCount = 0 ; qDebug () << "发送数据槽函数" ; qDebug () << "ui框中数据:" << ui->sendLineEdit->text (); QString sendData = ui->sendLineEdit->text (); qDebug () << "串口对象写入的数据:" << sendData.toUtf8 (); if (ui->HexSendCheckBox->isChecked ()){ QByteArray sendDataHex = sendData.toUtf8 (); if (sendData.size () % 2 != 0 ){ QFont font = ui->statusLabel->font (); font.setBold (true ); ui->statusLabel->setFont (font); ui->statusLabel->setText ("Hex Odd!" ); return ; } for (QChar a: sendData){ if (!(a.isDigit () || (a >= 'A' && a <= 'F' ) || (a >= 'a' && a <= 'f' ))){ QFont font = ui->statusLabel->font (); font.setBold (true ); ui->statusLabel->setFont (font); ui->statusLabel->setText ("Hex Out of Range!" ); return ; } } writeCount = serialPort->write (QByteArray::fromHex (sendDataHex)); }else { writeCount = serialPort->write (sendData.toUtf8 ()); } if (writeCount == -1 ){ QFont font = ui->statusLabel->font (); font.setBold (true ); ui->statusLabel->setFont (font); ui->statusLabel->setText ("Send Failed!" ); }else { this ->writeCount += writeCount; QFont font = ui->statusLabel->font (); font.setBold (true ); ui->statusLabel->setFont (font); ui->statusLabel->setText ("Send OK!" ); ui->sentLabel->setText (QString ("Sent: %1" ).arg (this ->writeCount)); } qDebug () << "接收数据槽函数" ; QString revMessage = ui->sendLineEdit->text (); qDebug () << "串口对象读取的string数据:" << revMessage; if (ui->hexShowCheckBox->checkState () == Qt::Checked && ui->HexSendCheckBox->isChecked () == false ){ if (ui->nextLineCheckBox->isChecked ()){ revMessage = "\n" + revMessage; } if (ui->newLineSendCheckBox->isChecked ()){ revMessage = revMessage + "\n" ; } QByteArray tmpByteArray = revMessage.toUtf8 (); QByteArray tmpHex = tmpByteArray.toHex (); revMessage = QString::fromUtf8 (tmpHex).toUpper (); } else if (ui->hexShowCheckBox->isChecked () == false && ui->HexSendCheckBox->isChecked () == false ){ if (ui->nextLineCheckBox->isChecked ()){ revMessage = "\n" + revMessage; } if (ui->newLineSendCheckBox->isChecked ()){ revMessage = revMessage + "\n" ; } } else if (ui->hexShowCheckBox->isChecked () == true && ui->HexSendCheckBox->isChecked () == true ){ QString newLine = "\n" ; QByteArray tmpByteArray = newLine.toUtf8 (); QByteArray tmpHex = tmpByteArray.toHex (); if (ui->nextLineCheckBox->isChecked ()){ revMessage = QString::fromUtf8 (tmpHex) + revMessage; } if (ui->newLineSendCheckBox->isChecked ()){ revMessage = revMessage + QString::fromUtf8 (tmpHex); } revMessage = revMessage.toUpper (); } else if (ui->hexShowCheckBox->isChecked () == false && ui->HexSendCheckBox->isChecked () == true ){ QString newLine = "\n" ; QByteArray tmpByteArray = newLine.toUtf8 (); QByteArray tmpHex = tmpByteArray.toHex (); if (ui->nextLineCheckBox->isChecked ()){ revMessage = QString::fromUtf8 (tmpHex) + revMessage; } if (ui->newLineSendCheckBox->isChecked ()){ revMessage = revMessage + QString::fromUtf8 (tmpHex); } revMessage = QString::fromUtf8 (QByteArray::fromHex (revMessage.toUtf8 ())); } if (isTimeBoxChecked){ getSystemTime (); QString revTimeFormatMessage = "【" + myTime + "】 " + revMessage; ui->textEdit->insertPlainText (revTimeFormatMessage); }else { ui->textEdit->insertPlainText (revMessage); } if (writeCount != -1 ){ this ->readCount += revMessage.toUtf8 ().size (); qDebug () << "串口对象读取的字节数据:" << revMessage.toUtf8 (); ui->RevLabel->setText (QString ("Received: %1" ).arg (this ->readCount)); if (ui->hexShowCheckBox->checkState () == Qt::Checked && ui->HexSendCheckBox->isChecked () == false ){ revMessage = ui->sendLineEdit->text (); } else if (ui->hexShowCheckBox->isChecked () == false && ui->HexSendCheckBox->isChecked () == false ){ } else if (ui->hexShowCheckBox->isChecked () == true && ui->HexSendCheckBox->isChecked () == true ){ revMessage = QString::fromUtf8 (QByteArray::fromHex (ui->sendLineEdit->text ().toUtf8 ())); } else if (ui->hexShowCheckBox->isChecked () == false && ui->HexSendCheckBox->isChecked () == true ){ revMessage = QString::fromUtf8 (QByteArray::fromHex (ui->sendLineEdit->text ().toUtf8 ())); } if (this ->sendHis != revMessage){ this ->sendHis = revMessage; ui->textEditHis->append (revMessage); } } }
1 2 3 4 5 6 7 8 9 10 11 12 13 14 15 16 17 18 19 20 21 22 23 24 25 26 void MainWindow::on_hideBoardPushButton_clicked (bool checked) if (checked){ qDebug () << "隐藏主窗口: " << checked; ui->hideBoardPushButton->setText ("拓展面板" ); ui->groupBoxMText->hide (); }else { qDebug () << "显示主窗口: " << checked; ui->hideBoardPushButton->setText ("隐藏面板" ); ui->groupBoxMText->show (); } } void MainWindow::on_hideHisPushButton_clicked (bool checked) if (checked){ qDebug () << "隐藏历史: " << checked; ui->hideHisPushButton->setText ("拓展历史" ); ui->groupBoxHis->hide (); }else { qDebug () << "显示历史: " << checked; ui->hideHisPushButton->setText ("隐藏历史" ); ui->groupBoxHis->show (); } }
串口combox刷新串口 没有合适的槽函数,需要自定义控件(事件)。采用多项目管理组织样板。
1 2 3 4 5 6 7 8 9 10 11 12 13 14 15 16 17 18 19 20 21 #ifndef COMBOXEVENT_H #define COMBOXEVENT_H #include <QComboBox> #include <QWidget> #include <QMouseEvent> class ComboxEvent : public QComboBox{ Q_OBJECT public : ComboxEvent (QWidget* parent); protected : void mousePressEvent (QMouseEvent* event) override signals: void refresh () }; #endif
1 2 3 4 5 6 7 8 9 10 11 12 13 14 15 16 17 #include "comboxEvent.h" ComboxEvent::ComboxEvent (QWidget *parent): QComboBox (parent) { } void ComboxEvent::mousePressEvent (QMouseEvent *event) if (event->button () == Qt::LeftButton){ emit refresh () ; } QComboBox::mousePressEvent (event); }
串口combox控件提升类型为ComboxEvent。
1 2 3 4 5 6 7 8 9 10 11 12 13 14 15 16 17 18 19 20 21 22 23 24 25 26 27 28 29 30 31 32 33 34 35 36 37 MainWindow::MainWindow (QWidget *parent) : QMainWindow (parent) , ui (new Ui::MainWindow) { ui->setupUi (this ); ui->centralwidget->setLayout (ui->windowGridLayout); QList<QSerialPortInfo> serialList = QSerialPortInfo::availablePorts (); for (QSerialPortInfo serial : serialList) { qDebug () << serial.portName (); ui->chuanComboBox->addItem (serial.portName ()); } connect (ui->chuanComboBox, &ComboxEvent::refresh, this , &MainWindow::on_chuanComboBox_refresh); } void MainWindow::on_chuanComboBox_refresh () qDebug () << "刷新串口" ; ui->chuanComboBox->clear (); QList<QSerialPortInfo> serialList = QSerialPortInfo::availablePorts (); for (QSerialPortInfo serial : serialList) { qDebug () << serial.portName (); ui->chuanComboBox->addItem (serial.portName ()); } QString str = "<b>Refresh Serial Port</b>" ; ui->statusLabel->setText (str); }
预定义命令发送
使用循环生成控件名称
使用findChild根据控件名找到控件对象
在槽函数中使用sender()找到信号发送者
可借助控件属性在信号与槽机制中传递参数,设置自定义属性字典,例如设置控件id以及引用id时利用控件属性提取id
1 2 3 4 5 6 7 8 9 10 11 12 13 14 15 16 17 18 19 20 21 22 23 24 25 26 27 28 29 30 31 32 33 34 35 36 37 38 39 40 41 42 43 44 45 46 47 48 49 50 51 52 53 54 55 56 57 58 59 60 61 62 63 64 65 66 67 68 69 70 #ifndef MAINWINDOW_H #define MAINWINDOW_H #include <QMainWindow> #include <QSerialPort> #include "comboxEvent.h" QT_BEGIN_NAMESPACE namespace Ui {class MainWindow ;} QT_END_NAMESPACE class MainWindow : public QMainWindow{ Q_OBJECT public : MainWindow (QWidget *parent = nullptr ); ~MainWindow (); private slots: void on_closePushButton_clicked () void on_sendPushButton_clicked () void onSerialDataReadyToRead () void on_timeSendCheckBox_clicked (bool checked) void on_clearPushButton_clicked () void on_saveRevPushButton_clicked () void refreshStatusTime () void on_revTimeCheckBox_clicked (bool checked) void on_hexShowCheckBox_clicked (bool checked) void on_hideBoardPushButton_clicked (bool checked) void on_hideHisPushButton_clicked (bool checked) void on_chuanComboBox_refresh () void on_sendSerialTextCommand () private : Ui::MainWindow *ui; QSerialPort* serialPort; int writeCount; int readCount; QString sendHis; bool isSerialPortOpen; QTimer* timer; QString myTime; bool isTimeBoxChecked; void getSystemTime () }; #endif
1 2 3 4 5 6 7 8 9 10 11 12 13 14 15 16 17 18 19 20 21 22 23 24 25 26 27 28 29 30 31 32 33 34 35 36 37 38 39 40 41 42 43 44 45 46 47 48 49 50 51 52 53 54 55 56 57 58 59 60 61 62 63 64 65 66 67 68 69 70 71 72 73 74 75 76 77 78 79 80 81 82 83 84 85 86 87 88 89 90 91 92 93 94 95 96 97 98 99 100 101 102 103 104 105 106 107 108 109 110 111 112 113 114 115 116 117 118 119 120 121 122 123 124 125 126 127 128 129 130 131 132 133 134 135 136 137 138 139 140 141 142 143 144 145 146 147 148 149 150 151 152 153 154 155 156 157 158 159 160 161 162 163 164 165 166 167 168 169 170 171 172 173 174 175 176 177 178 179 180 181 182 183 184 185 186 MainWindow::MainWindow (QWidget *parent) : QMainWindow (parent) , ui (new Ui::MainWindow) { ui->setupUi (this ); ui->centralwidget->setLayout (ui->windowGridLayout); QList<QPushButton*> pushButtonList; for (int i=0 ; i < 12 ; i++){ QString btnName = QString ("pushButton%1" ).arg (i+1 ); QPushButton* btn = findChild <QPushButton*>(btnName); if (btn != nullptr ) { btn->setProperty ("pushButtonId" , i+1 ); pushButtonList.append (btn); connect (btn, &QPushButton::clicked, this , &MainWindow::on_sendSerialTextCommand); } } } void MainWindow::on_sendSerialTextCommand () QPushButton* btn = qobject_cast <QPushButton*>(sender ()); QString lineEditString = QString ("lineEdit" ) + btn->property ("pushButtonId" ).toString (); QLineEdit* lineEdit = findChild <QLineEdit*>(lineEditString); QString checkBoxString = QString ("checkBox" ) + btn->property ("pushButtonId" ).toString (); QCheckBox* checkBox = findChild <QCheckBox*>(checkBoxString); ui->sendLineEdit->setText (lineEdit->text ()); ui->HexSendCheckBox->setChecked (checkBox->isChecked ()); on_sendPushButton_clicked (); }
循环发送预定义命令 1 2 3 4 5 6 7 8 9 10 11 12 13 14 15 16 17 18 19 20 21 22 23 24 25 26 27 28 29 30 31 32 33 34 35 36 37 38 39 40 41 42 43 44 45 46 47 48 49 50 51 52 53 54 55 56 57 58 59 60 61 62 63 64 65 66 67 68 69 70 71 72 73 #ifndef MAINWINDOW_H #define MAINWINDOW_H #include <QMainWindow> #include <QSerialPort> #include "comboxEvent.h" #include <QPushButton> QT_BEGIN_NAMESPACE namespace Ui {class MainWindow ;} QT_END_NAMESPACE class MainWindow : public QMainWindow{ Q_OBJECT public : MainWindow (QWidget *parent = nullptr ); ~MainWindow (); private slots: void on_closePushButton_clicked () void on_sendPushButton_clicked () void onSerialDataReadyToRead () void on_timeSendCheckBox_clicked (bool checked) void on_clearPushButton_clicked () void on_saveRevPushButton_clicked () void refreshStatusTime () void on_revTimeCheckBox_clicked (bool checked) void on_hexShowCheckBox_clicked (bool checked) void on_hideBoardPushButton_clicked (bool checked) void on_hideHisPushButton_clicked (bool checked) void on_chuanComboBox_refresh () void on_sendSerialTextCommand () void on_xunhuanCheckBox_clicked (bool checked) private : Ui::MainWindow *ui; QSerialPort* serialPort; int writeCount; int readCount; QString sendHis; bool isSerialPortOpen; QTimer* timer; QString myTime; bool isTimeBoxChecked; QList<QPushButton*> pushButtonList; void getSystemTime () }; #endif
1 2 3 4 5 6 7 8 9 10 11 12 13 14 15 16 17 18 19 20 21 22 23 24 25 26 27 28 29 30 31 32 33 34 35 36 37 38 39 40 MainWindow::MainWindow (QWidget *parent) : QMainWindow (parent) , ui (new Ui::MainWindow) { ui->setupUi (this ); ui->centralwidget->setLayout (ui->windowGridLayout); for (int i=0 ; i < 12 ; i++){ QString btnName = QString ("pushButton%1" ).arg (i+1 ); QPushButton* btn = findChild <QPushButton*>(btnName); if (btn != nullptr ) { btn->setProperty ("pushButtonId" , i+1 ); pushButtonList.append (btn); connect (btn, &QPushButton::clicked, this , &MainWindow::on_sendSerialTextCommand); } } ui->xunhuanSpinBox->setValue (1000 ); } void MainWindow::on_xunhuanCheckBox_clicked (bool checked) if (ui->xunhuanCheckBox->isChecked ()){ qDebug () << "循环发送数据槽函数, 是否勾选:" << ui->xunhuanCheckBox->isChecked (); for (int i=0 ; i<pushButtonList.size (); i++){ QPushButton* btnTmp = pushButtonList.at (i); emit btnTmp->clicked (); QThread::msleep (ui->xunhuanSpinBox->value ()); } }else {} }
不能在QT的UI线程中使用延时,否则导致UI页面刷新问题, 即页面卡住不更新,但是on_xunhuanCheckBox_clicked中的for循环不断执行着,当for循环执行完,UI页面才刷新内容, 解决方案:1)定时器,2)多线程
定时器
勾选槽函数on_xunhuanCheckBox_clicked:启动循环勾选时启动定时器,取消勾选关闭定时器并将pushbutton id置0。定时发送槽函数xuhuanSend:用定时器发送pushbutton click信号(这样序列命令发送槽函数被触发on_sendSerialTextCommand)和更新pushbutton id。
1 2 3 4 5 6 7 8 9 10 11 12 13 14 15 16 17 18 19 20 21 22 23 24 25 26 27 28 29 30 31 32 33 34 35 36 37 38 39 40 41 42 43 44 45 46 47 48 49 50 51 52 53 54 55 56 57 58 59 60 61 62 63 64 65 66 67 68 69 70 71 72 73 74 75 76 77 78 79 80 81 82 83 84 85 86 #ifndef MAINWINDOW_H #define MAINWINDOW_H #include <QMainWindow> #include <QSerialPort> #include "comboxEvent.h" #include <QPushButton> QT_BEGIN_NAMESPACE namespace Ui {class MainWindow ;} QT_END_NAMESPACE class MainWindow : public QMainWindow{ Q_OBJECT public : MainWindow (QWidget *parent = nullptr ); ~MainWindow (); private slots: void on_closePushButton_clicked () void on_sendPushButton_clicked () void onSerialDataReadyToRead () void on_timeSendCheckBox_clicked (bool checked) void on_clearPushButton_clicked () void on_saveRevPushButton_clicked () void refreshStatusTime () void on_revTimeCheckBox_clicked (bool checked) void on_hexShowCheckBox_clicked (bool checked) void on_hideBoardPushButton_clicked (bool checked) void on_hideHisPushButton_clicked (bool checked) void on_chuanComboBox_refresh () void on_sendSerialTextCommand () void on_xunhuanCheckBox_clicked (bool checked) void xuhuanSend () private : Ui::MainWindow *ui; QSerialPort* serialPort; int writeCount; int readCount; QString sendHis; bool isSerialPortOpen; QTimer* timer; QString myTime; bool isTimeBoxChecked; QList<QPushButton*> pushButtonList; QTimer* xunhuanTimer; int xunhuanCount; void getSystemTime () }; #endif
1 2 3 4 5 6 7 8 9 10 11 12 13 14 15 16 17 18 19 20 21 22 23 24 25 26 27 28 29 30 31 32 33 34 35 36 37 38 39 40 41 42 43 44 45 46 47 48 49 50 51 52 53 54 55 56 57 MainWindow::MainWindow (QWidget *parent) : QMainWindow (parent) , ui (new Ui::MainWindow) { ui->setupUi (this ); ui->centralwidget->setLayout (ui->windowGridLayout); xunhuanTimer = new QTimer (this ); xunhuanCount = 0 ; for (int i=0 ; i < 12 ; i++){ QString btnName = QString ("pushButton%1" ).arg (i+1 ); QPushButton* btn = findChild <QPushButton*>(btnName); if (btn != nullptr ) { btn->setProperty ("pushButtonId" , i+1 ); pushButtonList.append (btn); connect (btn, &QPushButton::clicked, this , &MainWindow::on_sendSerialTextCommand); } } ui->xunhuanSpinBox->setValue (1000 ); connect (xunhuanTimer, &QTimer::timeout, this , &MainWindow::xuhuanSend); } void MainWindow::on_xunhuanCheckBox_clicked (bool checked) if (ui->xunhuanCheckBox->isChecked ()){ qDebug () << "循环发送数据槽函数, 是否勾选:" << ui->xunhuanCheckBox->isChecked (); xunhuanTimer->start (ui->xunhuanSpinBox->value ()); }else { xunhuanTimer->stop (); xunhuanCount = 0 ; } } void MainWindow::xuhuanSend () qDebug () << "循环发送数据定时槽函数" ; if (xunhuanCount < pushButtonList.size ()){ QPushButton* btnTmp = pushButtonList.at (xunhuanCount); emit btnTmp->clicked (); xunhuanCount++; }else { xunhuanCount = 0 ; } }
多线程
自定义一个线程类CustomThread,重写run()虚函数, 当自定义线程类对象start()时就会运行自定义run()函数发出自定义信号threadTimeOut(), 让UI类MainWindow对象捕获执行槽函数xuhuanSend。
1 2 3 4 5 6 7 8 9 10 11 12 13 14 15 16 17 18 19 #ifndef CUSTOMTHREAD_H #define CUSTOMTHREAD_H #include <QThread> #include <QWidget> class CustomThread : public QThread{ Q_OBJECT public : CustomThread (QWidget* parent); protected : void run () override signals: void threadTimeOut () }; #endif
1 2 3 4 5 6 7 8 9 10 11 12 13 14 #include "customThread.h" CustomThread::CustomThread (QWidget *parent): QThread (parent) { } void CustomThread::run () while (true ){ msleep (1000 ); emit threadTimeOut () ; } }
1 2 3 4 5 6 7 8 9 10 11 12 13 14 15 16 17 18 19 20 21 22 23 24 25 26 27 28 29 30 31 32 33 34 35 36 37 38 39 40 41 42 43 44 45 46 47 48 49 50 51 52 53 54 55 56 57 58 59 60 61 62 63 64 65 66 67 68 69 70 71 72 73 74 75 76 77 78 79 80 81 82 83 84 85 86 87 88 89 90 91 92 93 #ifndef MAINWINDOW_H #define MAINWINDOW_H #include <QMainWindow> #include <QSerialPort> #include "comboxEvent.h" #include <QPushButton> #include "customThread.h" QT_BEGIN_NAMESPACE namespace Ui {class MainWindow ;} QT_END_NAMESPACE class MainWindow : public QMainWindow{ Q_OBJECT public : MainWindow (QWidget *parent = nullptr ); ~MainWindow (); private slots: void on_closePushButton_clicked () void on_sendPushButton_clicked () void onSerialDataReadyToRead () void on_timeSendCheckBox_clicked (bool checked) void on_clearPushButton_clicked () void on_saveRevPushButton_clicked () void refreshStatusTime () void on_revTimeCheckBox_clicked (bool checked) void on_hexShowCheckBox_clicked (bool checked) void on_hideBoardPushButton_clicked (bool checked) void on_hideHisPushButton_clicked (bool checked) void on_chuanComboBox_refresh () void on_sendSerialTextCommand () void on_xunhuanCheckBox_clicked (bool checked) void xuhuanSend () private : Ui::MainWindow *ui; QSerialPort* serialPort; int writeCount; int readCount; QString sendHis; bool isSerialPortOpen; QTimer* timer; QString myTime; bool isTimeBoxChecked; QList<QPushButton*> pushButtonList; QTimer* xunhuanTimer; int xunhuanCount; CustomThread* myThread; void getSystemTime () }; #endif
1 2 3 4 5 6 7 8 9 10 11 12 13 14 15 16 17 18 19 20 21 22 23 24 25 26 27 28 29 30 31 32 33 34 35 36 37 38 39 40 41 42 43 44 45 46 47 48 49 50 51 52 53 54 55 56 57 58 59 60 61 62 63 64 65 66 67 68 69 70 71 72 73 74 75 76 77 78 79 80 81 82 83 84 85 86 87 88 89 90 91 MainWindow::MainWindow (QWidget *parent) : QMainWindow (parent) , ui (new Ui::MainWindow) { ui->setupUi (this ); ui->centralwidget->setLayout (ui->windowGridLayout); xunhuanTimer = new QTimer (this ); xunhuanCount = 0 ; myThread = new CustomThread (this ); isSerialPortOpen = false ; isTimeBoxChecked = false ; for (int i=0 ; i < 12 ; i++){ QString btnName = QString ("pushButton%1" ).arg (i+1 ); QPushButton* btn = findChild <QPushButton*>(btnName); if (btn != nullptr ) { btn->setProperty ("pushButtonId" , i+1 ); pushButtonList.append (btn); connect (btn, &QPushButton::clicked, this , &MainWindow::on_sendSerialTextCommand); } } ui->xunhuanSpinBox->setValue (1000 ); connect (myThread, &CustomThread::threadTimeOut, this , &MainWindow::xuhuanSend); } void MainWindow::on_sendSerialTextCommand () QPushButton* btn = qobject_cast <QPushButton*>(sender ()); QString lineEditString = QString ("lineEdit" ) + btn->property ("pushButtonId" ).toString (); QLineEdit* lineEdit = findChild <QLineEdit*>(lineEditString); QString checkBoxString = QString ("checkBox" ) + btn->property ("pushButtonId" ).toString (); QCheckBox* checkBox = findChild <QCheckBox*>(checkBoxString); if (lineEdit->text ().size () <= 0 ){ return ; } ui->sendLineEdit->setText (lineEdit->text ()); ui->HexSendCheckBox->setChecked (checkBox->isChecked ()); on_sendPushButton_clicked (); } void MainWindow::on_xunhuanCheckBox_clicked (bool checked) if (ui->xunhuanCheckBox->isChecked ()){ qDebug () << "循环发送数据槽函数, 是否勾选:" << ui->xunhuanCheckBox->isChecked (); ui->xunhuanSpinBox->setEnabled (false ); myThread->start (); }else { myThread->terminate (); ui->xunhuanSpinBox->setEnabled (true ); xunhuanCount = 0 ; } } void MainWindow::xuhuanSend () qDebug () << "循环发送数据定时槽函数" ; if (xunhuanCount < pushButtonList.size ()){ QPushButton* btnTmp = pushButtonList.at (xunhuanCount); emit btnTmp->clicked (); xunhuanCount++; }else { xunhuanCount = 0 ; } }
* 对话框提示
* 遍历lineEdit和checkBox
* 对话框yes和no用中文
1 2 3 4 5 6 7 8 9 10 11 12 13 14 15 16 17 18 19 20 21 22 23 24 25 26 27 28 29 30 void MainWindow::on_resetPushButton_clicked () QMessageBox msgBox; msgBox.setWindowTitle ("提示" ); msgBox.setIcon (QMessageBox::Question); msgBox.setText ("重置列表不可逆,确认是否重置?" ); QPushButton* yesButton = msgBox.addButton ("是" , QMessageBox::YesRole); QPushButton* noButton = msgBox.addButton ("否" , QMessageBox::NoRole); int ret = msgBox.exec (); if (msgBox.clickedButton () == yesButton) { qDebug () << "重置列表" ; for (int i=0 ; i < pushButtonList.size (); i++){ QPushButton* btn = pushButtonList.at (i); QString lineEditString = QString ("lineEdit" ) + btn->property ("pushButtonId" ).toString (); QLineEdit* lineEdit = findChild <QLineEdit*>(lineEditString); lineEdit->clear (); QString checkBoxString = QString ("checkBox" ) + btn->property ("pushButtonId" ).toString (); QCheckBox* checkBox = findChild <QCheckBox*>(checkBoxString); checkBox->setChecked (false ); } } else if (msgBox.clickedButton () == noButton) { qDebug () << "取消重置列表" ; } }
1 2 3 4 5 6 7 8 9 10 11 12 13 14 15 16 17 18 19 20 21 22 23 24 25 26 27 28 29 30 31 32 33 34 35 36 37 38 39 40 41 42 43 44 45 46 47 48 49 50 51 52 53 54 55 56 57 58 59 60 61 62 63 64 65 66 67 68 69 70 void MainWindow::on_loadPushButton_clicked () QFileDialog fileDialog (this ) ; fileDialog.setFileMode (QFileDialog::AnyFile); QString fileName = fileDialog.getSaveFileName (this , tr ("Save File" ), "./" , tr ("All Files (*)" )); QFile file (fileName) ; bool fileFlag = file.open (QIODevice::WriteOnly | QIODevice::Text); if (!fileFlag) { QMessageBox::warning (this , tr ("Error" ), tr ("Cannot open file for writing: %1" ).arg (file.errorString ())); return ; } QTextStream out (&file) ; for (int i=0 ; i<pushButtonList.size (); i++){ QPushButton* btn = pushButtonList.at (i); QString lineEditString = QString ("lineEdit" ) + btn->property ("pushButtonId" ).toString (); QLineEdit* lineEdit = findChild <QLineEdit*>(lineEditString); QString checkBoxString = QString ("checkBox" ) + btn->property ("pushButtonId" ).toString (); QCheckBox* checkBox = findChild <QCheckBox*>(checkBoxString); out << checkBox->isChecked () << ',' << lineEdit->text () << "\n" ; } file.close (); } void MainWindow::on_savePushButton_clicked () QFileDialog fileDialog (this ) ; fileDialog.setFileMode (QFileDialog::AnyFile); QString fileName = fileDialog.getOpenFileName (this , tr ("Open File" ), "./" , tr ("All Files (*)" )); QFile file (fileName) ; bool fileFlag = file.open (QIODevice::ReadOnly | QIODevice::Text); if (!fileFlag) { QMessageBox::warning (this , tr ("Error" ), tr ("Cannot open file for writing: %1" ).arg (file.errorString ())); return ; } QTextStream in (&file) ; int lineCount = 0 ; while (!in.atEnd () && lineCount < pushButtonList.size ()){ lineCount++; QString line = in.readLine (); QStringList list = line.split ("," ); if (list.size () != 2 ){ QMessageBox::warning (this , tr ("Error" ), tr ("文档格式错误" )); return ; } bool checkBoxChecked = list.at (0 ).toInt (); QString lineEditText = list.at (1 ); try { QString lineEditString = QString ("lineEdit" ) + QString::number (lineCount); QLineEdit* lineEdit = findChild <QLineEdit*>(lineEditString); lineEdit->setText (lineEditText); QString checkBoxString = QString ("checkBox" ) + QString::number (lineCount); QCheckBox* checkBox = findChild <QCheckBox*>(checkBoxString); checkBox->setChecked (checkBoxChecked); }catch (std::exception& e){ QMessageBox::warning (this , tr ("Error" ), tr ("载入文档的数据行超过窗口设定行" )); return ; }catch (...){ QMessageBox::warning (this , tr ("Error" ), tr ("未知错误" )); return ; } } file.close (); }
显示框中内容过多时显示的内容不在最新位置
光标移动到文档末尾
光标可视化
光标焦点(更新太快的话会影响光标点其他地方,响应不过来)
1 2 3 4 5 6 7 8 9 10 11 12 13 14 15 16 17 18 19 20 21 22 23 24 25 26 27 28 29 30 31 32 33 34 35 36 37 38 39 40 41 42 43 44 45 46 47 48 49 50 51 52 53 54 55 56 57 58 59 60 61 62 63 64 65 66 67 68 69 70 71 72 73 74 75 76 77 78 79 80 81 82 83 84 85 86 87 88 89 90 91 92 93 94 95 96 97 98 99 100 101 102 103 104 105 106 107 108 109 110 111 112 113 114 115 116 117 118 119 120 121 122 123 124 125 126 127 128 129 130 131 132 133 134 135 136 137 138 139 140 141 142 143 144 145 146 147 148 149 150 151 152 153 154 155 156 157 158 159 160 161 162 163 164 165 166 void MainWindow::on_sendPushButton_clicked () int writeCount = 0 ; qDebug () << "发送数据槽函数" ; qDebug () << "ui框中数据:" << ui->sendLineEdit->text (); QString sendData = ui->sendLineEdit->text (); qDebug () << "串口对象写入的数据:" << sendData.toUtf8 (); if (ui->HexSendCheckBox->isChecked ()){ QByteArray sendDataHex = sendData.toUtf8 (); if (sendData.size () % 2 != 0 ){ QFont font = ui->statusLabel->font (); font.setBold (true ); ui->statusLabel->setFont (font); ui->statusLabel->setText ("Hex Odd!" ); return ; } for (QChar a: sendData){ if (!(a.isDigit () || (a >= 'A' && a <= 'F' ) || (a >= 'a' && a <= 'f' ))){ QFont font = ui->statusLabel->font (); font.setBold (true ); ui->statusLabel->setFont (font); ui->statusLabel->setText ("Hex Out of Range!" ); return ; } } writeCount = serialPort->write (QByteArray::fromHex (sendDataHex)); }else { writeCount = serialPort->write (sendData.toUtf8 ()); } if (writeCount == -1 ){ QFont font = ui->statusLabel->font (); font.setBold (true ); ui->statusLabel->setFont (font); ui->statusLabel->setText ("Send Failed!" ); }else { this ->writeCount += writeCount; QFont font = ui->statusLabel->font (); font.setBold (true ); ui->statusLabel->setFont (font); ui->statusLabel->setText ("Send OK!" ); ui->sentLabel->setText (QString ("Sent: %1" ).arg (this ->writeCount)); } qDebug () << "接收数据槽函数" ; QString revMessage = ui->sendLineEdit->text (); qDebug () << "串口对象读取的string数据:" << revMessage; if (ui->hexShowCheckBox->checkState () == Qt::Checked && ui->HexSendCheckBox->isChecked () == false ){ if (ui->nextLineCheckBox->isChecked ()){ revMessage = "\n" + revMessage; } if (ui->newLineSendCheckBox->isChecked ()){ revMessage = revMessage + "\n" ; } QByteArray tmpByteArray = revMessage.toUtf8 (); QByteArray tmpHex = tmpByteArray.toHex (); revMessage = QString::fromUtf8 (tmpHex).toUpper (); } else if (ui->hexShowCheckBox->isChecked () == false && ui->HexSendCheckBox->isChecked () == false ){ if (ui->nextLineCheckBox->isChecked ()){ revMessage = "\n" + revMessage; } if (ui->newLineSendCheckBox->isChecked ()){ revMessage = revMessage + "\n" ; } } else if (ui->hexShowCheckBox->isChecked () == true && ui->HexSendCheckBox->isChecked () == true ){ QString newLine = "\n" ; QByteArray tmpByteArray = newLine.toUtf8 (); QByteArray tmpHex = tmpByteArray.toHex (); if (ui->nextLineCheckBox->isChecked ()){ revMessage = QString::fromUtf8 (tmpHex) + revMessage; } if (ui->newLineSendCheckBox->isChecked ()){ revMessage = revMessage + QString::fromUtf8 (tmpHex); } revMessage = revMessage.toUpper (); } else if (ui->hexShowCheckBox->isChecked () == false && ui->HexSendCheckBox->isChecked () == true ){ QString newLine = "\n" ; QByteArray tmpByteArray = newLine.toUtf8 (); QByteArray tmpHex = tmpByteArray.toHex (); if (ui->nextLineCheckBox->isChecked ()){ revMessage = QString::fromUtf8 (tmpHex) + revMessage; } if (ui->newLineSendCheckBox->isChecked ()){ revMessage = revMessage + QString::fromUtf8 (tmpHex); } revMessage = QString::fromUtf8 (QByteArray::fromHex (revMessage.toUtf8 ())); } if (isTimeBoxChecked){ getSystemTime (); QString revTimeFormatMessage = "【" + myTime + "】 " + revMessage; ui->textEdit->insertPlainText (revTimeFormatMessage); }else { ui->textEdit->insertPlainText (revMessage); } if (writeCount != -1 ){ this ->readCount += revMessage.toUtf8 ().size (); qDebug () << "串口对象读取的字节数据:" << revMessage.toUtf8 (); ui->RevLabel->setText (QString ("Received: %1" ).arg (this ->readCount)); if (ui->hexShowCheckBox->checkState () == Qt::Checked && ui->HexSendCheckBox->isChecked () == false ){ revMessage = ui->sendLineEdit->text (); } else if (ui->hexShowCheckBox->isChecked () == false && ui->HexSendCheckBox->isChecked () == false ){ } else if (ui->hexShowCheckBox->isChecked () == true && ui->HexSendCheckBox->isChecked () == true ){ revMessage = QString::fromUtf8 (QByteArray::fromHex (ui->sendLineEdit->text ().toUtf8 ())); } else if (ui->hexShowCheckBox->isChecked () == false && ui->HexSendCheckBox->isChecked () == true ){ revMessage = QString::fromUtf8 (QByteArray::fromHex (ui->sendLineEdit->text ().toUtf8 ())); } if (this ->sendHis != revMessage){ this ->sendHis = revMessage; ui->textEditHis->append (revMessage); } ui->textEdit->moveCursor (QTextCursor::End); ui->textEditHis->moveCursor (QTextCursor::End); ui->textEdit->ensureCursorVisible (); ui->textEditHis->ensureCursorVisible (); } }
网络调试助手
项目概述
网络基础概念
QTcpServer
QTcpClient
TextEdit特定位置输入文字颜色
网络通信相关知识
复习UI控件
开发流程
建立服务器对像、开始监听和newConnect信号 1 2 3 4 5 6 7 8 9 10 11 12 13 14 15 16 17 18 19 20 21 22 23 24 25 26 27 28 29 30 31 32 #ifndef MAINWINDOW_H #define MAINWINDOW_H #include <QMainWindow> #include <QTcpServer> QT_BEGIN_NAMESPACE namespace Ui {class MainWindow ;} QT_END_NAMESPACE class MainWindow : public QMainWindow{ Q_OBJECT public : MainWindow (QWidget *parent = nullptr ); ~MainWindow (); QTcpServer* server; private : Ui::MainWindow *ui; private slots: void on_newClient_connect () void on_startPushButton_clicked () }; #endif
1 2 3 4 5 6 7 8 9 10 11 12 13 14 15 16 17 18 19 20 21 22 23 24 25 26 27 28 29 30 31 32 33 34 35 36 37 38 39 40 41 42 43 44 45 46 47 48 49 50 51 52 53 54 55 56 57 58 #include "mainwindow.h" #include "ui_mainwindow.h" #include <QTcpSocket> MainWindow::MainWindow (QWidget *parent) : QMainWindow (parent) , ui (new Ui::MainWindow) { ui->setupUi (this ); ui->centralwidget->setLayout (ui->widgetVL); server = new QTcpServer (this ); ui->stopPushButton->setEnabled (false ); ui->interruptPushButton->setEnabled (false ); connect (server, &QTcpServer::newConnection, this , &MainWindow::on_newClient_connect); } MainWindow::~MainWindow () { delete ui; } void MainWindow::on_newClient_connect () qDebug () << "有新客户端连接" ; if (server->hasPendingConnections ()) { QTcpSocket *socket = server->nextPendingConnection (); qDebug () << "Client host: " << socket->peerAddress ().toString () << " port: " << socket->peerPort (); ui->showTextEdit->insertPlainText ("客户端地址:" +socket->peerAddress ().toString ()+", 客户端端口:" +QString::number (socket->peerPort ())); } QTextCursor cursor = ui->showTextEdit->textCursor (); cursor.movePosition (QTextCursor::End); ui->showTextEdit->setTextCursor (cursor); } void MainWindow::on_startPushButton_clicked () qDebug () << "服务器开始监听" ; int port = ui->portLineEdit->text ().toInt (); if (!server->listen (QHostAddress::Any, port)) { qDebug () << "Server listen failed" ; return ; } ui->stopPushButton->setEnabled (true ); ui->interruptPushButton->setEnabled (true ); ui->startPushButton->setEnabled (false ); }
显示服务器的IP并监听显示的IP 1 2 3 4 5 6 7 8 9 10 11 12 13 14 15 16 17 18 19 20 21 22 23 24 25 26 27 28 29 30 31 32 33 34 35 36 37 38 39 40 41 42 43 MainWindow::MainWindow (QWidget *parent) : QMainWindow (parent) , ui (new Ui::MainWindow) { ui->setupUi (this ); ui->centralwidget->setLayout (ui->widgetVL); QList<QHostAddress> serverAddresses = QNetworkInterface::allAddresses (); for (QHostAddress address: serverAddresses) { if (address.protocol () == QAbstractSocket::IPv4Protocol) { ui->ipComboBox->addItem (address.toString ()); } } connect (server, &QTcpServer::newConnection, this , &MainWindow::on_newClient_connect); } void MainWindow::on_startPushButton_clicked () qDebug () << "服务器开始监听" ; int port = ui->portLineEdit->text ().toInt (); QHostAddress host (ui->ipComboBox->currentText()) ; if (!server->listen (host, port)) { qDebug () << "Server listen failed" ; return ; } ui->stopPushButton->setEnabled (true ); ui->interruptPushButton->setEnabled (true ); ui->startPushButton->setEnabled (false ); }
在建立的客户连接(socket)中处理数据接收的readyRead信号 1 2 3 4 5 6 7 8 9 10 11 12 13 14 15 16 17 18 19 20 21 22 23 24 25 26 27 28 29 30 31 32 33 34 35 36 37 38 39 40 41 42 43 44 45 46 47 48 49 50 void MainWindow::on_newClient_connect () qDebug () << "有新客户端连接socket" ; if (server->hasPendingConnections ()) { QTcpSocket *socket = server->nextPendingConnection (); qDebug () << "Client host: " << socket->peerAddress ().toString () << " port: " << socket->peerPort (); ui->showTextEdit->insertPlainText ("客户端地址:" +socket->peerAddress ().toString ()+", 客户端端口:" +QString::number (socket->peerPort ())+"\n" ); connect (socket, &QTcpSocket::readyRead, this , &MainWindow::on_readyRead_handler); } } void MainWindow::on_startPushButton_clicked () qDebug () << "服务器开始监听" ; int port = ui->portLineEdit->text ().toInt (); QHostAddress host (ui->ipComboBox->currentText()) ; if (!server->listen (host, port)) { qDebug () << "Server listen failed" ; QMessageBox msgBox; msgBox.setWindowTitle ("监听失败" ); msgBox.setText ("端口号被占用" ); msgBox.exec (); return ; } ui->stopPushButton->setEnabled (true ); ui->interruptPushButton->setEnabled (true ); ui->startPushButton->setEnabled (false ); } void MainWindow::on_readyRead_handler () qDebug () << "在socket连接中接收客服端数据" ; QTcpSocket* socket = qobject_cast <QTcpSocket*>(sender ()); QByteArray revData = socket->readAll (); ui->showTextEdit->insertPlainText ( QString::fromUtf8 (revData)+"\n" ); }
服务端检测客户端socket是否断开
1 2 3 4 5 6 7 8 9 10 11 12 13 14 15 16 17 18 19 20 21 22 23 24 25 26 27 28 29 30 31 32 33 34 35 36 37 38 void MainWindow::on_newClient_connect () qDebug () << "有新客户端连接socket" ; if (server->hasPendingConnections ()) { QTcpSocket *socket = server->nextPendingConnection (); qDebug () << "Client host: " << socket->peerAddress ().toString () << " port: " << socket->peerPort (); ui->showTextEdit->insertPlainText ("客户端地址:" +socket->peerAddress ().toString ()+", 客户端端口:" +QString::number (socket->peerPort ())+"\n" ); connect (socket, &QTcpSocket::readyRead, this , &MainWindow::on_readyRead_handler); connect (socket, &QAbstractSocket::disconnected, this , &MainWindow::on_disconnected_handler); connect (socket, &QAbstractSocket::stateChanged, this , &MainWindow::on_socketStateChanged_handler); } } void MainWindow::on_disconnected_handler () qDebug () << "客户端socket断开" ; ui->showTextEdit->insertPlainText ("客户端断开\n" ); QTcpSocket* socket = qobject_cast <QTcpSocket*>(sender ()); socket->deleteLater (); } void MainWindow::on_socketStateChanged_handler (QAbstractSocket::SocketState socketState) qDebug () << "客户端socket状态改变: " +socketState; if (socketState == QAbstractSocket::UnconnectedState || socketState == QAbstractSocket::ClosingState) { ui->showTextEdit->insertPlainText ("客户端断开\n" ); }else if (socketState == QAbstractSocket::ConnectedState || socketState == QAbstractSocket::ConnectingState) { ui->showTextEdit->insertPlainText ("客户端连接\n" ); } QTextCursor cursor = ui->showTextEdit->textCursor (); cursor.movePosition (QTextCursor::End); ui->showTextEdit->setTextCursor (cursor); }
服务端发送数据
之前的服务端监听的socket连接是局部变量,需要改成全局变量,或者使用全局的server记录的连接过的socket。
1 2 3 4 5 6 7 8 9 10 11 12 13 14 15 16 17 void MainWindow::on_sendPushButton_clicked () qDebug () << "服务端发送" ; QList<QTcpSocket*> tcpSocketClients = server->findChildren <QTcpSocket*>(); if (tcpSocketClients.size () <= 0 ) { QMessageBox msgBox; msgBox.setWindowTitle ("无客户端连接" ); msgBox.setText ("服务端没有监听到客户端socket连接" ); msgBox.exec (); return ; } for (QTcpSocket* tcpSocketClient: tcpSocketClients) { tcpSocketClient->write (ui->sendTextEdit->toPlainText ().toUtf8 ()); } }
服务端选择指定的socket发送数据
自定义ComboBox组件类并覆盖原mousePressEvent事件, 当发生LeftButton时发射自定义信号信号on_comboBox_clicked()。
UI界面MainWindow实现自定义ComboBox组件socketComboBox的信号与槽的连接,并实现槽函数on_socketComboBox_handler。
定义一个全局ComboBox的项索引socketIndex,通过on_socketComboBox_activated(int index)槽函数更新当前项的索引socketIndex。
通过ComboBox的项索引确认选择哪一个socket连接并发送服务端数据
1 2 3 4 5 6 7 8 9 10 11 12 13 14 15 16 17 18 19 20 21 22 23 24 25 26 #ifndef SOCKETCOMBOBOX_H #define SOCKETCOMBOBOX_H #include <QComboBox> #include <QWidget> class SocketComboBox : public QComboBox { Q_OBJECT public : SocketComboBox (QWidget* parent); protected : void mousePressEvent (QMouseEvent* event) override signals: void on_ComboBox_clicked () }; #endif
1 2 3 4 5 6 7 8 9 10 11 12 13 14 15 16 17 18 19 20 21 #include "socketComboBox.h" #include <QMouseEvent> SocketComboBox::SocketComboBox (QWidget* parent): QComboBox (parent) { } void SocketComboBox::mousePressEvent (QMouseEvent *event) if (event->button () == Qt::LeftButton) { emit on_ComboBox_clicked () ; } QComboBox::mousePressEvent (event); }
1 2 3 4 5 6 7 8 9 10 11 12 13 14 15 16 17 18 19 20 21 22 23 24 25 26 27 28 29 30 31 32 33 34 35 36 37 38 39 40 41 42 43 44 45 #ifndef MAINWINDOW_H #define MAINWINDOW_H #include <QMainWindow> #include <QTcpServer> #include "socketComboBox.h" QT_BEGIN_NAMESPACE namespace Ui {class MainWindow ;} QT_END_NAMESPACE class MainWindow : public QMainWindow{ Q_OBJECT public : MainWindow (QWidget *parent = nullptr ); ~MainWindow (); QTcpServer* server; private : Ui::MainWindow *ui; int socketIndex; private slots: void on_newClient_connect () void on_startPushButton_clicked () void on_readyRead_handler () void on_disconnected_handler () void on_socketStateChanged_handler (QAbstractSocket::SocketState socketState) void on_sendPushButton_clicked () void on_socketComboBox_handler () void on_socketComboBox_activated (int index) }; #endif
1 2 3 4 5 6 7 8 9 10 11 12 13 14 15 16 17 18 19 20 21 22 23 24 25 26 27 28 29 30 31 32 33 34 35 36 37 38 39 40 void MainWindow::on_sendPushButton_clicked () qDebug () << "服务端发送" ; QList<QTcpSocket*> tcpSocketClients = server->findChildren <QTcpSocket*>(); if (socketIndex == 0 ) { for (QTcpSocket* tcpSocketClient: tcpSocketClients) { tcpSocketClient->write (ui->sendTextEdit->toPlainText ().toUtf8 ()); } }else { tcpSocketClients[socketIndex-1 ]->write (ui->sendTextEdit->toPlainText ().toUtf8 ()); } } void MainWindow::on_socketComboBox_handler () qDebug () << "筛选目标socket" ; ui->socketComboBox->clear (); if (server->isListening ()) { QList<QTcpSocket *> tcpSocketClients = server->findChildren <QTcpSocket *>(); if (tcpSocketClients.size () <= 0 ) { QMessageBox msgBox; msgBox.setWindowTitle ("无客户端连接" ); msgBox.setText ("服务端没有监听到客户端socket连接" ); msgBox.exec (); return ; } ui->sendPushButton->setEnabled (true ); ui->socketComboBox->addItem ("all" ); for (QTcpSocket *tcpSocketClient: tcpSocketClients) { ui->socketComboBox->addItem (tcpSocketClient->peerAddress ().toString () + ':' + QString::number (tcpSocketClient->peerPort ())); } } } void MainWindow::on_socketComboBox_activated (int index) socketIndex = index; }
停止监听和断开服务器
1 2 3 4 5 6 7 8 9 10 11 12 13 14 15 16 17 18 19 20 21 22 23 24 25 26 27 28 29 30 31 32 33 34 35 36 37 38 39 40 41 42 43 44 45 46 47 48 49 50 51 52 53 54 55 56 57 58 59 60 61 62 63 64 65 66 67 68 69 70 71 72 73 74 MainWindow::MainWindow (QWidget *parent) : QMainWindow (parent) , ui (new Ui::MainWindow) { ui->setupUi (this ); ui->centralwidget->setLayout (ui->widgetVL); ui->stopPushButton->setEnabled (false ); ui->interruptPushButton->setEnabled (false ); ui->sendPushButton->setEnabled (false ); ui->socketComboBox->setEnabled (false ); } void MainWindow::on_startPushButton_clicked () qDebug () << "服务器开始监听" ; int port = ui->portLineEdit->text ().toInt (); QHostAddress host (ui->ipComboBox->currentText()) ; if (!server->listen (host, port)) { qDebug () << "Server listen failed" ; QMessageBox msgBox; msgBox.setWindowTitle ("监听失败" ); msgBox.setText ("端口号被占用" ); msgBox.exec (); return ; } ui->stopPushButton->setEnabled (true ); ui->interruptPushButton->setEnabled (true ); ui->startPushButton->setEnabled (false ); ui->protocolComboBox->setEnabled (false ); ui->ipComboBox->setEnabled (false ); ui->portLineEdit->setEnabled (false ); ui->socketComboBox->setEnabled (true ); } void MainWindow::on_stopPushButton_clicked () qDebug () << "服务器断开连接" ; if (server->isListening ()) { QList<QTcpSocket *> tcpSocketClients = server->findChildren <QTcpSocket *>(); for (QTcpSocket *tcpSocketClient: tcpSocketClients) { tcpSocketClient->close (); tcpSocketClient->deleteLater (); } server->close (); } ui->startPushButton->setEnabled (true ); ui->stopPushButton->setEnabled (false ); ui->interruptPushButton->setEnabled (false ); ui->protocolComboBox->setEnabled (true ); ui->ipComboBox->setEnabled (true ); ui->portLineEdit->setEnabled (true ); ui->sendPushButton->setEnabled (false ); ui->socketComboBox->clear (); ui->socketComboBox->setEnabled (false ); } void MainWindow::on_interruptPushButton_clicked () qDebug () << "退出程序" ; on_stopPushButton_clicked (); delete server; this ->close (); }
客户端
出现的问题是当服务端处在未监听状态时如果客户端建立连接,那么将永远连接不了,即使之后又把服务端设成监听状态
解决方法是不在构造函数中分配client socket而是在建立连接时,将上一次的client分配的socket删除,建一个新的。
1 2 3 4 5 6 7 8 9 10 11 12 13 14 15 16 17 18 19 20 21 22 23 24 25 26 27 28 29 30 31 32 33 34 #ifndef MAINWINDOW_H #define MAINWINDOW_H #include <QMainWindow> #include <QTcpSocket> QT_BEGIN_NAMESPACE namespace Ui {class MainWindow ;} QT_END_NAMESPACE class MainWindow : public QMainWindow{ Q_OBJECT public : MainWindow (QWidget *parent = nullptr ); ~MainWindow (); private : Ui::MainWindow *ui; QTcpSocket* client; private slots: void on_connectPushButton_clicked () void on_receiveData_handler () void on_sendPushButton_clicked () void on_interruptPushButton_clicked () void on_stateChange_handler () }; #endif
1 2 3 4 5 6 7 8 9 10 11 12 13 14 15 16 17 18 19 20 21 22 23 24 25 26 27 28 29 30 31 32 33 34 35 36 37 38 39 40 41 42 43 44 45 46 47 48 49 50 51 52 53 54 55 56 57 58 59 60 61 62 63 64 65 66 67 68 69 70 71 72 73 74 75 76 77 78 79 80 81 82 83 84 85 86 87 88 89 90 91 92 93 94 95 96 97 98 99 100 101 102 103 104 105 106 107 108 109 110 111 112 113 114 115 116 117 118 119 120 121 122 123 124 125 126 127 128 129 130 131 132 133 134 135 136 137 138 139 140 141 #include "mainwindow.h" #include "ui_mainwindow.h" #include <QNetworkInterface> #include <QMessageBox> MainWindow::MainWindow (QWidget *parent) : QMainWindow (parent) , ui (new Ui::MainWindow) { ui->setupUi (this ); ui->centralwidget->setLayout (ui->widgetVL); client = nullptr ; QList<QHostAddress> clientAddresses = QNetworkInterface::allAddresses (); for (QHostAddress address: clientAddresses) { if (address.protocol () == QAbstractSocket::IPv4Protocol) { ui->ipClientComboBox->addItem (address.toString ()); } } ui->interruptPushButton->setEnabled (false ); } MainWindow::~MainWindow () { delete ui; } void MainWindow::on_connectPushButton_clicked () qDebug () << "客户端连接" ; if (!client) { client = new QTcpSocket (this ); }else { delete client; client = new QTcpSocket (this ); } connect (client, &QAbstractSocket::readyRead, this , &MainWindow::on_receiveData_handler); connect (client, &QAbstractSocket::stateChanged, this , &MainWindow::on_stateChange_handler); if (ui->ipClientComboBox->currentText ().isEmpty () || ui->portClientLineEdit->text ().isEmpty () || ui->portServerLineEdit->text ().isEmpty () || ui->ipServerLineEdit->text ().isEmpty ()) { QMessageBox msgBox; msgBox.setWindowTitle ("提醒" ); msgBox.setText ("请设定客户端和服务端的IP和端口号" ); msgBox.exec (); return ; } QHostAddress ipClient = QHostAddress (ui->ipClientComboBox->currentText ()); int portClient = ui->portClientLineEdit->text ().toInt (); client->bind (ipClient, portClient); client->connectToHost (ui->ipServerLineEdit->text (), ui->portServerLineEdit->text ().toInt ()); } void MainWindow::on_receiveData_handler () qDebug () << "客户端接收服务端的数据" ; QByteArray revData = client->readAll (); ui->showTextEdit->insertPlainText (QString::fromUtf8 (revData)+"\n" ); QTextCursor cursor = ui->showTextEdit->textCursor (); cursor.movePosition (QTextCursor::End); ui->showTextEdit->setTextCursor (cursor); } void MainWindow::on_sendPushButton_clicked () qDebug () << "客户端发送数据" ; client->write (ui->sendTextEdit->toPlainText ().toUtf8 ()); } void MainWindow::on_interruptPushButton_clicked () qDebug () << "客户端断开连接" ; client->close (); ui->showTextEdit->append ("客户端断开连接!" ); QTextCursor cursor = ui->showTextEdit->textCursor (); cursor.movePosition (QTextCursor::End); ui->showTextEdit->setTextCursor (cursor); ui->ipClientComboBox->setEnabled (true ); ui->portClientLineEdit->setEnabled (true ); ui->ipServerLineEdit->setEnabled (true ); ui->portServerLineEdit->setEnabled (true ); ui->interruptPushButton->setEnabled (false ); ui->connectPushButton->setEnabled (true ); } void MainWindow::on_stateChange_handler () qDebug () << "客户端和服务端的连接状态发生改变" ; if (client->state () == QAbstractSocket::UnconnectedState) { ui->showTextEdit->append ("服务端断开连接!\n" ); QTextCursor cursor = ui->showTextEdit->textCursor (); cursor.movePosition (QTextCursor::End); ui->showTextEdit->setTextCursor (cursor); ui->ipClientComboBox->setEnabled (true ); ui->portClientLineEdit->setEnabled (true ); ui->ipServerLineEdit->setEnabled (true ); ui->portServerLineEdit->setEnabled (true ); ui->interruptPushButton->setEnabled (false ); ui->connectPushButton->setEnabled (true ); }else if (client->state () == QAbstractSocket::ClosingState){ ui->showTextEdit->append ("正在断开服务端连接!\n" ); }else if (client->state () == QAbstractSocket::ConnectedState) { ui->showTextEdit->append (QString ("连接成功!\n" ).arg (ui->ipServerLineEdit->text ()).arg (ui->portServerLineEdit->text ())); QTextCursor cursor = ui->showTextEdit->textCursor (); cursor.movePosition (QTextCursor::End); ui->showTextEdit->setTextCursor (cursor); ui->ipClientComboBox->setEnabled (false ); ui->portClientLineEdit->setEnabled (false ); ui->ipServerLineEdit->setEnabled (false ); ui->portServerLineEdit->setEnabled (false ); ui->interruptPushButton->setEnabled (true ); ui->connectPushButton->setEnabled (false ); }else if (client->state () == QAbstractSocket::ConnectingState) { ui->showTextEdit->append (QString ("正连接服务端IP: %1, 端口: %2\n" ).arg (ui->ipServerLineEdit->text ()).arg (ui->portServerLineEdit->text ())); } }
客户端设置接收和发送用不同的颜色展示以及左右对齐
1 2 3 4 5 6 7 8 9 10 11 12 13 14 15 16 17 18 19 20 21 22 23 24 void MainWindow::on_receiveData_handler () qDebug () << "客户端接收服务端的数据" ; QByteArray revData = client->readAll (); QTextCursor cursor = ui->showTextEdit->textCursor (); cursor.movePosition (QTextCursor::End); ui->showTextEdit->setAlignment (Qt::AlignLeft); QTextCharFormat format; format.setForeground (QBrush (QColor (Qt::black))); cursor.setCharFormat (format); cursor.insertText (QString::fromUtf8 (revData)+"\n" ); cursor.movePosition (QTextCursor::End); ui->showTextEdit->setTextCursor (cursor); ui->showTextEdit->ensureCursorVisible (); }
1 2 3 4 5 6 7 8 9 10 11 12 13 14 15 16 17 18 19 20 21 22 23 24 25 26 27 28 29 30 31 32 33 34 35 36 37 38 39 40 41 42 43 44 45 46 47 48 49 50 51 52 53 54 55 56 57 58 59 60 61 62 63 64 65 66 67 68 69 70 71 72 73 74 75 76 77 78 79 80 81 82 83 84 85 86 87 88 89 90 91 92 93 94 95 96 97 98 99 100 101 102 103 104 105 106 107 108 109 110 111 112 113 114 115 116 117 118 119 120 121 122 123 124 void MainWindow::on_newClient_connect () qDebug () << "有新客户端连接socket" ; if (server->hasPendingConnections ()) { QTcpSocket *socket = server->nextPendingConnection (); qDebug () << "Client host: " << socket->peerAddress ().toString () << " port: " << socket->peerPort (); ui->showTextEdit->insertPlainText ( "客户端地址:" + socket->peerAddress ().toString () + ", 客户端端口:" + QString::number (socket->peerPort ()) + "\n" ); QTextCursor cursor = ui->showTextEdit->textCursor (); cursor.movePosition (QTextCursor::End); ui->showTextEdit->setTextCursor (cursor); ui->showTextEdit->ensureCursorVisible (); if (ui->socketComboBox->count () == 0 ) { ui->socketComboBox->addItem ("all" ); } ui->socketComboBox->addItem (socket->peerAddress ().toString ()+":" +QString::number (socket->peerPort ())); ui->socketComboBox->setCurrentIndex (ui->socketComboBox->count ()-1 ); socketIndex = ui->socketComboBox->currentIndex (); connect (socket, &QTcpSocket::readyRead, this , &MainWindow::on_readyRead_handler); ui->sendPushButton->setEnabled (true ); connect (socket, &QAbstractSocket::stateChanged, this , &MainWindow::on_socketStateChanged_handler); }else { ui->sendPushButton->setEnabled (false ); } } void MainWindow::on_socketStateChanged_handler (QAbstractSocket::SocketState socketState) QMetaObject mo = QAbstractSocket::staticMetaObject; QMetaEnum me = mo.enumerator (mo.indexOfEnumerator ("SocketState" )); qDebug () << "客户端socket状态改变: " + QString (me.valueToKey (socketState)); QTcpSocket *socket = qobject_cast <QTcpSocket *>(sender ()); if (socketState == QAbstractSocket::UnconnectedState || socketState == QAbstractSocket::ClosingState) { QTextCursor cursor = ui->showTextEdit->textCursor (); cursor.movePosition (QTextCursor::End); ui->showTextEdit->setAlignment (Qt::AlignLeft); QTextCharFormat format; format.setForeground (QBrush (QColor (Qt::red))); cursor.setCharFormat (format); cursor.insertText ( QString (me.valueToKey (socketState))+QString ("信号引起的客户端断开\n" )); if (socketState == QAbstractSocket::UnconnectedState) { QString deleteSocket = socket->peerAddress ().toString ()+':' +QString::number (socket->peerPort ()); int deleteIndex = ui->socketComboBox->findText (deleteSocket); if (deleteIndex != -1 ) { ui->socketComboBox->removeItem (deleteIndex); } if (ui->socketComboBox->count () == 1 ) { ui->socketComboBox->clear (); ui->sendPushButton->setEnabled (false ); } } socket->deleteLater (); } else if (socketState == QAbstractSocket::ConnectedState || socketState == QAbstractSocket::ConnectingState) { QTextCursor cursor = ui->showTextEdit->textCursor (); cursor.movePosition (QTextCursor::End); ui->showTextEdit->setAlignment (Qt::AlignLeft); QTextCharFormat format; format.setForeground (QBrush (QColor (Qt::red))); cursor.setCharFormat (format); cursor.insertText ( QString (me.valueToKey (socketState))+QString ("信号引起的客户端连接\n" )); } QTextCursor cursor = ui->showTextEdit->textCursor (); cursor.movePosition (QTextCursor::End); ui->showTextEdit->setTextCursor (cursor); ui->showTextEdit->ensureCursorVisible (); } void MainWindow::on_sendPushButton_clicked () qDebug () << "服务端发送" ; QList<QTcpSocket *> tcpSocketClients = server->findChildren <QTcpSocket *>(); if (tcpSocketClients.size () <= 0 ) { QMessageBox msgBox; msgBox.setWindowTitle ("发送错误" ); msgBox.setText ("未指定客户端连接" ); msgBox.exec (); return ; } if (socketIndex == 0 ) { for (QTcpSocket *tcpSocketClient: tcpSocketClients) { tcpSocketClient->write (ui->sendTextEdit->toPlainText ().toUtf8 ()); QTextCursor cursor = ui->showTextEdit->textCursor (); cursor.movePosition (QTextCursor::End); ui->showTextEdit->setAlignment (Qt::AlignRight); QTextCharFormat format; format.setForeground (QBrush (QColor (Qt::black))); cursor.setCharFormat (format); cursor.insertText (ui->sendTextEdit->toPlainText ()+"\n" ); } } else { tcpSocketClients[socketIndex - 1 ]->write (ui->sendTextEdit->toPlainText ().toUtf8 ()); QTextCursor cursor = ui->showTextEdit->textCursor (); cursor.movePosition (QTextCursor::End); ui->showTextEdit->setAlignment (Qt::AlignRight); QTextCharFormat format; format.setForeground (QBrush (QColor (Qt::black))); cursor.setCharFormat (format); cursor.insertText (ui->sendTextEdit->toPlainText ()+"\n" ); } }
自定义可视化控件
QPaintEvent绘图事件
QPaintEvent是Qt框架中一个重要的事件类,专门用于处理绘图。当Qt视图组件需要重绘自己的一部分时,就会产生QPainterEvent事件。这通常发生以下几种情况:
窗口第一次显示时:当窗口或控件第一次出现在屏幕上时,系统会生成一个QPainter事件,通知窗口进行自身的绘制。
窗口大小改变时:当用户改变窗口的大小时,窗口的内容通常需要重新绘制以适应新的尺寸。
窗口部分被遮挡后又重新显示时:如果窗口被其他窗口遮挡,然后又重新露出来,被遮挡的部分通常需要重新绘制。
与控件有互动时:
手动请求重绘:通过调用QWidget的update()或者repaint()方法,可以手动触发重绘事件。
在Qt应用程序中,通常通过重写QWidget的paintEvent(QPaintEvent*)方法来处理绘制逻辑。
1 2 3 4 5 6 7 class MyWidget : public QWidget{protected : void paintEvent (QPaintEvent* event) override QPainter painter (this ) ; } }
在painEvent方法中,您可以创建一个QPainter对象并使用它来执行绘制操作。QPainter可以绘制各种基本图形,如线条、矩形、椭圆等,还可以绘制文本和图像。重写paintEvent()是在Qt中进行自定义绘制的标准。
QPainter画家
概述
QPainter可以绘制各种基本图形,如线条、矩形、椭圆等,还可以绘制文本和图像。
初始化QPainter: 首先,需要一个QPaintDevice, 比如一个QWidget或QPixmap,然后使用它来初始化QPainter对象。
设置画笔和面刷:你可以设置画笔(用于描边)和画刷(用于填充)的颜色、样式等。
1 2 painter.setPen (Qt::blue); painter.setBrush (Qt::yellow);
绘制图形:使用QPainter的方法来绘制线条、矩形、圆形、文本。
1 2 3 4 5 6 7 8 9 10 11 12 13 14 15 16 17 18 19 20 21 22 23 24 25 26 27 28 29 painter.drawLine (10 , 10 , 100 , 100 ); painter.drawRect (10 , 10 , 100 , 100 ); painter.drawEllipse (10 ,10 ,40 ,50 ) painter.drawText (10 , 10 , "Hello, Qt" ); painter.drawArc (10 , 10 , 60 , 90 , 45 *16 , 90 *16 ) painter.drawPie (30 , 50 , 100 , 180 , 30 *16 , 120 *16 )
结束绘制:完成绘制后,QPainter对象会在其析构函数中自动结束绘制。
注意:QPainter的使用依赖于Qt 的事件循环,因此通常在QWidget的paintEvent或者类似的事件处理函数中使用它。如果你在Qt应用程序中使用QPainter, 请确保你遵循Qt的事件驱动机制。
渐变色
线性渐变色
QLinearGradient是Qt框架中用于创建线性渐变的类。线性渐变是一种从一个颜色过渡到另一个颜色的效果,其变化沿着两个点之间的直线进行。它用于添加深度、立体或动态效果。
基本用法
创建QLinearGradient对象:指定渐变的起点和终点坐标。
设置颜色停靠点:在渐变线上定义颜色和相应的位置。
使用渐变创建QBrush:用QLinearGradient对象来创建一个QBrush,然后用QBrush在QPainter中进行绘制。
1 2 3 4 5 6 7 8 9 10 11 12 13 14 15 16 #include <QPainter> #incldue <QLinearGradient> void MyWidget::paintEvent (QPaintEvent*) QLinearGradient linearGradient (0 ,0 ,100 ,100 ) ; linearGradient.setColorAt (0 , Qt::red); linearGradient.setColorAt (1 , Qt::blue); QBrush brush (linearGradient) ; QPainter painter (this ) ; painter.setBrush (brush); painter.setPen (Qt::NoPen); painter.drawRect (this ->rect ()); }
QLinearGradient创建了一个从红色到蓝色的渐变,其方向是从小部件的左上角(0,0)到右下角(100,100)。
注意 :
QLinearGradient的颜色变化是岩着两个指定点之间的直线进行的。通过改变这些点的位置,你可以控制渐变的方向和长度。
setColorAt()方法的第一个参数是一个介于0.0和1.0之间的浮点数,表示颜色在渐变线上的位置。0.0通常对应于起点,1.0对应于终点。你可以设置多个颜色停靠点来创建更复杂的渐变效果。例如,可以在0.0处设置一种颜色,在0.5处设置一种颜色,在1.0处在设置一种颜色。
使用QLi nearGradient创建的QBrush可以用于填充任何形状,如矩形、椭圆、多边形。
为了获取更好的视觉效果,可以启用QPainter的抗锯齿选项(QPainter::Antialiasing).
当窗口部件的大小发生变化时,渐变的效果可能也会随之改变,除非你相应地调整渐变的起点和终点坐标或使用其他方法来适应大小变化。
径向渐变
QRadialGradient是Qt框架中用于创建径向渐变的类,径向渐变是从中心向周围辐射的颜色渐变,通常在中心点有一种颜色,外围设置另一种颜色,该渐变适合模拟光源、阴影或创建圆形立体感。
基本用法
创建QRadialGradient对象:指定渐变中心,半径和焦点(可选)。
设置颜色停靠点:在径向渐变中定义颜色和对应的位置。
使用渐变创建QBrush之后用QPainter绘制。
1 2 3 4 5 6 7 8 9 10 11 12 13 14 15 16 17 18 19 #include <QPainter> #include <QRadialGradient> void Mywidget::paintEvent (QPaintEvent* e) QRadialGradient radialGradient (50 , 50 , 50 ) ; radialGradient.setFocalPoint (30 ,30 ); radialGradient.setColorAt (0.0 , Qt::yellow); radialGradient.setColorAt (1.0 , Qt::black); QBrush brush (radialGradient) ; QPainter painter (this ) ; painter.setBrush (brush); painter.setPen (Qt::NoPen) painter.drawRect (this ->rect ()); }
注意 :
setColorAt()方法的第一个参数是一个介于0.0和1.0之间的浮点数,表示颜色在径向渐变中的位置,0.0通常对应于中心点,1.0对应于边缘。通过添加多个颜色停靠点,可以创建复杂的径向渐变效果。
setFocalPoint()方法允许你设置焦点位置,这是渐变颜色开始变化的点,可以与中心点不同。使用QRadialGradient创建的QBrush可以用于填充任何形状,如矩形、椭圆、多边形等。
为了获取更好的视觉效果,可以启用QPainter的抗锯齿项QPainter::Antialiasing。
当绘制较大区域时,可以通过调整渐变的半径和中心点来控制渐变效果的扩展。
QRadialGradient非常适用于创建按钮、指示灯或其他需要有深度感和立体感的界面元素。
圆锥形渐变
QConicalGradient是用于创建圆锥渐变的类。圆锥渐变颜色沿方位角变化,以中心点和初始角为基线 ,颜色沿圆周渐变分布,适合富有动感的视觉效果。
基本用法
创建QConicalGradient对象:指定渐变中心和起始方位角。
设置颜色停靠点:为渐变添加不同的颜色和方位角。
创建Brush之后用QPainter绘图。
1 2 3 4 5 6 7 8 9 10 11 12 13 14 #include <QPainter> #include <QConicalGradient> void Mywidget::paintEvent (QPaintEvent*) QConicalGradient conical (100 , 100 , 0 ) ; conical.setColorAt (0.0 , Qt::red); conical.setColorAt (0.5 , Qt::blue); conical.setColorAt (0.0 , Qt::red); QBrush brush (conical) ; QPainter painter (this ) ; painter.setBrush (brush); painter.setPen (Qt::NoPen); painter.drawRect (this ->rect ()); }
注意 :
QConicalGradient颜色是沿着圆周即辐角分布,其中0.0和1.0在圆周上是相同的位置即转一圈。
角度正顺时针,角度负逆时针,角度的单位是度,0度3点钟方向。
适用于创建旋转或动态效果图,如加载指示器,进度条等。
雷达
1 2 3 4 5 6 7 8 9 10 11 12 13 14 15 16 17 18 19 20 21 22 23 24 25 26 27 28 29 30 #ifndef MAINWINDOW_H #define MAINWINDOW_H #include <QMainWindow> QT_BEGIN_NAMESPACE namespace Ui {class MainWindow ;} QT_END_NAMESPACE class MainWindow : public QMainWindow{ Q_OBJECT public : MainWindow (QWidget *parent = nullptr ); ~MainWindow (); private : Ui::MainWindow *ui; QTimer* timer; int startAngleGlobal; protected : void paintEvent (QPaintEvent *event) }; #endif
1 2 3 4 5 6 7 8 9 10 11 12 13 14 15 16 17 18 19 20 21 22 23 24 25 26 27 28 29 30 31 32 33 34 35 36 37 38 39 40 41 42 43 44 45 46 47 48 49 50 51 52 53 54 55 56 57 58 59 60 61 62 63 64 65 66 67 68 69 70 71 72 #include "mainwindow.h" #include "ui_mainwindow.h" #include <QPainter> #include <QTimer> MainWindow::MainWindow (QWidget *parent) : QMainWindow (parent) , ui (new Ui::MainWindow) { ui->setupUi (this ); ui->centralwidget->setLayout (ui->regionGridLayout); startAngleGlobal = 0 ; timer = new QTimer (this ); timer->setInterval (500 ); timer->start (); connect (timer, &QTimer::timeout, [=](){update ();}); } MainWindow::~MainWindow () { delete ui; } void MainWindow::paintEvent (QPaintEvent *event) QPainter painter (this ) ; QPen pen (QColor(0 , 255 , 0 ), 3 ) ; painter.setRenderHint (QPainter::Antialiasing, true ); painter.setPen (pen); painter.save (); QBrush brush (QColor(0 , 0 , 0 , 220 )) ; painter.setBrush (brush); QRect rect = ui->centralwidget->rect (); painter.setPen (Qt::NoPen); painter.drawRect (rect); painter.restore (); int circleNum = 5 ; int side = (rect.width ()/2 <rect.height ()/2 )?(rect.width ()/2 ):(rect.height ()/2 ); int interval = side/circleNum; for (int i=1 ; i<=circleNum; i++) { if (side-i*interval>=0 ) { painter.drawEllipse (rect.center (), i*interval, i*interval); } } painter.drawLine (rect.center ().x ()-interval*circleNum, rect.center ().y (), rect.center ().x ()+interval*circleNum, rect.center ().y ()); painter.drawLine (rect.center ().x (), rect.center ().y ()+interval*circleNum, rect.center ().x (), rect.center ().y ()-interval*circleNum); if (startAngleGlobal > 360 ) startAngleGlobal -= 360 ; int startAngle = startAngleGlobal; int spanAngle = -90 ; QRect rectPie (rect.center().x()-interval*circleNum, rect.center().y()-interval*circleNum, interval*circleNum*2 , interval*circleNum*2 ) ; QConicalGradient conicalGradient (rect.center(), startAngle) ; conicalGradient.setColorAt (0.0 , QColor (0 , 255 , 0 , 0 )); conicalGradient.setColorAt (0.8 , QColor (0 , 255 , 0 , 0 )); conicalGradient.setColorAt (0.9 , QColor (0 , 255 , 0 , 50 )); conicalGradient.setColorAt (1.0 , QColor (0 , 255 , 0 , 100 )); QBrush brushPie (conicalGradient) ; painter.setBrush (brushPie); painter.setPen (Qt::NoPen); painter.drawPie (rectPie, startAngle*16 , spanAngle*16 ); startAngleGlobal += abs (30 ); }
简易仪表盘
1 2 3 4 5 6 7 8 9 10 11 12 13 14 15 16 17 18 19 20 21 22 23 24 25 26 27 28 29 30 31 32 33 34 #ifndef MAINWINDOW_H #define MAINWINDOW_H #include <QMainWindow> QT_BEGIN_NAMESPACE namespace Ui {class MainWindow ;} QT_END_NAMESPACE class MainWindow : public QMainWindow{ Q_OBJECT public : MainWindow (QWidget *parent = nullptr ); ~MainWindow (); protected : void paintEvent (QPaintEvent *event) override private : Ui::MainWindow *ui; QTimer* timer; float currentAngleGlobal=0 ; int maxAngle = 210 ; int minAngle = -30 ; int mark = 0 ; }; #endif
1 2 3 4 5 6 7 8 9 10 11 12 13 14 15 16 17 18 19 20 21 22 23 24 25 26 27 28 29 30 31 32 33 34 35 36 37 38 39 40 41 42 43 44 45 46 47 48 49 50 51 52 53 54 55 56 57 58 59 60 61 62 63 64 65 66 67 68 69 70 71 72 73 74 75 76 77 78 79 80 81 82 83 84 85 86 87 88 89 90 91 92 93 94 95 96 97 98 99 100 101 102 103 104 105 106 107 108 109 110 111 112 113 114 115 116 117 118 119 120 121 122 123 124 125 126 127 128 129 130 131 132 133 134 135 136 137 138 139 140 141 142 143 144 145 146 147 148 149 150 151 152 153 154 155 156 157 158 159 160 161 162 163 #include "mainwindow.h" #include "ui_mainwindow.h" #include <QPainter> #include <QTimer> MainWindow::MainWindow (QWidget *parent) : QMainWindow (parent) , ui (new Ui::MainWindow) { ui->setupUi (this ); ui->centralwidget->setLayout (ui->centralGL); timer = new QTimer (this ); timer->setInterval (500 ); timer->start (); connect (timer, &QTimer::timeout, [=]() { if (mark == 0 ) { currentAngleGlobal -= 30 ; if (currentAngleGlobal < minAngle) { currentAngleGlobal = minAngle; mark = 1 ; } } if (mark==1 ) { currentAngleGlobal += 40 ; if (currentAngleGlobal > maxAngle) { currentAngleGlobal = maxAngle; mark = 0 ; } } update (); }); } MainWindow::~MainWindow () { delete ui; } void MainWindow::paintEvent (QPaintEvent *event) QMainWindow::paintEvent (event); QPainter painter (this ) ; QRect rect = ui->centralwidget->rect (); painter.setRenderHint (QPainter::Antialiasing, true ); painter.setBrush (Qt::black); painter.drawRect (rect); painter.setBrush (Qt::BrushStyle::NoBrush); int radius = (rect.center ().x ()>rect.center ().y ())?rect.center ().y ():rect.center ().x (); QRadialGradient radGradient (rect.center(), radius) ; radGradient.setColorAt (0.0 , QColor (255 ,0 ,0 , 50 )); radGradient.setColorAt (1.0 , QColor (255 ,0 ,0 , 250 )); painter.drawEllipse (rect.center (), radius, radius); QBrush brush (radGradient) ; painter.setBrush (brush); painter.drawEllipse (rect.center (), radius, radius); painter.setBrush (Qt::BrushStyle::NoBrush); float ratio = 1. /5 ; int smallRadius = (int )(radius*ratio); qDebug () << "smallRadius:" << smallRadius << ", radio: " << ratio << ", Radius: " << radius; QPen pen (Qt::white) ; pen.setWidth (3 ); painter.setPen (pen); painter.drawEllipse (rect.center (), smallRadius, smallRadius); painter.setPen (Qt::NoPen); int textNum = 8 ; pen.setWidth (2 ); painter.setPen (pen); float bigTick = (1 -0.9 )*radius; float midTick = (1 -0.93 )*radius; float smallTick = (1 -0.96 )*radius; float textRadius = 0.8 *radius; int tickInterval = (int )(360. /textNum/10 ); int tickCount = 0 ; for (int i = maxAngle; i >= minAngle; i-=tickInterval) { float xOut = cos (i*M_PI/180 )*radius+rect.center ().x (); float yOut = -sin (i*M_PI/180 )*radius+rect.center ().y (); float xIn; float yIn; float xText; float yText; if (tickCount%5 == 0 && tickCount%10 == 0 ) { xIn = cos (i*M_PI/180 )*(radius-bigTick)+rect.center ().x (); yIn = -sin (i*M_PI/180 )*(radius-bigTick)+rect.center ().y (); xText = cos (i*M_PI/180 )*textRadius+rect.center ().x (); yText = -sin (i*M_PI/180 )*textRadius+rect.center ().y (); QPointF pointText (xText, yText) ; float halfWidth = 1.5 *bigTick; float halfHeight = 1.5 *bigTick; QFont font; font.setPointSize (bigTick); font.setWeight (QFont::Thin); painter.setFont (font); QRectF rectText (pointText.x()-halfWidth, pointText.y()-halfHeight, 2 *halfWidth, 2 *halfHeight) ; painter.drawText (rectText, Qt::AlignCenter, QString::number (tickCount)); }else if (tickCount%5 == 0 && tickCount%10 != 0 ) { xIn = cos (i*M_PI/180 )*(radius-midTick)+rect.center ().x (); yIn = -sin (i*M_PI/180 )*(radius-midTick)+rect.center ().y (); }else { xIn = cos (i*M_PI/180 )*(radius-smallTick)+rect.center ().x (); yIn = -sin (i*M_PI/180 )*(radius-smallTick)+rect.center ().y (); } tickCount++; QPointF pointOut (xOut, yOut) ; QPointF pointIn (xIn, yIn) ; painter.drawLine (pointIn, pointOut); } float currentAngle = currentAngleGlobal; float arrowRadius = 0.68 *radius; float xArrowOut = cos (currentAngle*M_PI/180 )*arrowRadius+rect.center ().x (); float yArrowOut = -sin (currentAngle*M_PI/180 )*arrowRadius+rect.center ().y (); float xArrowIn = cos (currentAngle*M_PI/180 )*smallRadius+rect.center ().x (); float yArrowIn = -sin (currentAngle*M_PI/180 )*smallRadius+rect.center ().y (); QPointF pointArrowOut (xArrowOut, yArrowOut) ; QPointF pointArrowIn (xArrowIn, yArrowIn) ; painter.drawLine (pointArrowIn, pointArrowOut); QRectF rectPie (rect.center().x()-arrowRadius, rect.center().y()-arrowRadius, arrowRadius*2 , arrowRadius*2 ) ; painter.setPen (Qt::NoPen); QRadialGradient arrowRG (rectPie.center(), arrowRadius) ; arrowRG.setColorAt (0.0 , QColor (255 ,153 ,18 , 0 )); arrowRG.setColorAt (0.3 , QColor (255 ,153 ,18 , 0 )); arrowRG.setColorAt (1.0 , QColor (255 ,153 ,18 , 200 )); QBrush arrowBrush (arrowRG) ; painter.setBrush (arrowBrush); painter.drawPie (rectPie, currentAngle*16 , (maxAngle-currentAngle)*16 ); QPointF pointText (rect.center().x(), rect.center().y()) ; float halfWidth = smallRadius; float halfHeight = smallRadius; QFont font; font.setPointSize (smallRadius*0.8 ); font.setWeight (QFont::Bold); painter.setFont (font); QRectF rectText (pointText.x()-halfWidth, pointText.y()-halfHeight, 2 *halfWidth, 2 *halfHeight) ; painter.setPen (Qt::white); painter.drawText (rectText, Qt::AlignCenter, QString::number ((maxAngle-currentAngle)/tickInterval)); }
汽车仪表盘
文字沿着圆周绘制方法:
使用平移和旋转操作坐标轴再绘制文字
painter.save()->painter.translate(x,y)->painter.rotate($\theta$)->painter.restore()
使用QPainterPath路径对象
设置路径形状path.addEllipse(center, radius, radius);
根据路径的位置过去坐标点和角度。
QPointF point = path.pointAtPercent(pos)
qreal angle = path.angleAtPercent(pos)
使用translate平移和rotate旋转坐标系。
drawText绘制文本。
多边形画指针
画指针用到多边形drawPolygon(QPointF* points, int pointCount, Qt::FillRule fillRule)
使用资源文件插入商标。
drawPixmap(QPixmap(":logol/images/porch.png"))cmakeLists.txt中必须在add_executable文件中使用涵盖.qrc文件路径的变量${QRC}, 如果在add_library中使用${QRC}不显示logol。
1 2 3 4 5 6 7 8 9 10 11 12 13 14 15 16 17 18 19 20 21 22 23 24 25 26 27 28 29 30 31 32 33 34 35 36 37 38 39 40 41 42 43 44 45 46 47 48 49 50 51 52 53 54 55 56 57 #ifndef MAINWINDOW_H #define MAINWINDOW_H #include <QMainWindow> #include <tuple> QT_BEGIN_NAMESPACE namespace Ui {class MainWindow ;} QT_END_NAMESPACE class MainWindow : public QMainWindow{ Q_OBJECT public : MainWindow (QWidget *parent = nullptr ); ~MainWindow (); protected : void paintEvent (QPaintEvent *event) override private : Ui::MainWindow *ui; QTimer* timer; float currentAngleGlobal=0 ; int maxAngle = 210 ; int minAngle = -30 ; int maxHighSpeed = -30 ; int minHighSpeed = 50 ; int mark = 0 ; QRect initCanvas (QPainter &painter) ; int drawCircle (QPainter &painter, QRect &rect, int radius, QPen &pen, float ratio) std::tuple<int , int > drawTick (QPainter &painter, QRect &rect, QPen &pen, int radius) ; std::tuple<float , float > drawArrow (QPainter &painter, QRect &rect, int &radius, int &smallRadius) ; void drawPie (QPainter &painter, QRect &rect, int &radius, float &arrowRadius, float ¤tAngle) void drawSpeed (QPainter &painter, QRect &rect, int &textRatio, int &tickInterval, float ¤tAngle, int &smallRadius) void drawShinePie (QPainter &painter, QRect &rect, float radius, float arrowRadius, float currentAngle) void drawLogol (QPainter &painter, QRect &rect, float radius) }; #endif
1 2 3 4 5 6 7 8 9 10 11 12 13 14 15 16 17 18 19 20 21 22 23 24 25 26 27 28 29 30 31 32 33 34 35 36 37 38 39 40 41 42 43 44 45 46 47 48 49 50 51 52 53 54 55 56 57 58 59 60 61 62 63 64 65 66 67 68 69 70 71 72 73 74 75 76 77 78 79 80 81 82 83 84 85 86 87 88 89 90 91 92 93 94 95 96 97 98 99 100 101 102 103 104 105 106 107 108 109 110 111 112 113 114 115 116 117 118 119 120 121 122 123 124 125 126 127 128 129 130 131 132 133 134 135 136 137 138 139 140 141 142 143 144 145 146 147 148 149 150 151 152 153 154 155 156 157 158 159 160 161 162 163 164 165 166 167 168 169 170 171 172 173 174 175 176 177 178 179 180 181 182 183 184 185 186 187 188 189 190 191 192 193 194 195 196 197 198 199 200 201 202 203 204 205 206 207 208 209 210 211 212 213 214 215 216 217 218 219 220 221 222 223 224 225 226 227 228 229 230 231 232 233 234 235 236 237 238 239 240 241 242 243 244 245 246 247 248 249 250 251 252 253 254 255 256 257 258 259 260 261 262 263 264 265 266 267 268 269 270 271 272 273 #include "mainwindow.h" #include "ui_mainwindow.h" #include <QPainter> #include <QTimer> MainWindow::MainWindow (QWidget *parent) : QMainWindow (parent) , ui (new Ui::MainWindow) { ui->setupUi (this ); ui->centralwidget->setLayout (ui->centralGL); setFixedSize (800 , 600 ); timer = new QTimer (this ); timer->setInterval (500 ); timer->start (); connect (timer, &QTimer::timeout, [=]() { if (mark == 0 ) { currentAngleGlobal -= 30 ; if (currentAngleGlobal < minAngle) { currentAngleGlobal = minAngle; mark = 1 ; } } if (mark==1 ) { currentAngleGlobal += 40 ; if (currentAngleGlobal > maxAngle) { currentAngleGlobal = maxAngle; mark = 0 ; } } update (); }); } MainWindow::~MainWindow () { delete ui; } void MainWindow::paintEvent (QPaintEvent *event) QMainWindow::paintEvent (event); QPainter painter (this ) ; QRect rect = initCanvas (painter); int radius = (rect.center ().x ()>rect.center ().y ())?rect.center ().y ():rect.center ().x (); radius =(int )(radius*0.7 ); painter.setBrush (Qt::BrushStyle::NoBrush); QPen pen (QColor(255 ,255 ,255 ,0 )) ; float ratio = 1. /5 ; int smallRadius = drawCircle (painter, rect, radius, pen, ratio); pen.setColor (Qt::white); std::tuple<int , int > paramTuple = drawTick (painter, rect, pen, radius); int textRatio = std::get <0 >(paramTuple); int tickInterval = std::get <1 >(paramTuple); std::tuple<float , float > arrowTuple = drawArrow (painter, rect, radius, smallRadius); float currentAngle = std::get <0 >(arrowTuple); float arrowRadius = std::get <1 >(arrowTuple); drawPie (painter, rect, radius, arrowRadius, currentAngle); pen.setColor (QColor (255 , 255 , 255 , 0 )); ratio = 1. /3 ; QRadialGradient radGradient (rect.center(), ratio*radius) ; radGradient.setColorAt (0.0 , QColor (255 ,0 ,0 , 200 )); radGradient.setColorAt (1.0 , QColor (0 ,0 , 0 , 100 )); QBrush brush (radGradient) ; painter.setBrush (brush); int midRadius = drawCircle (painter, rect, radius, pen, ratio); painter.setBrush (Qt::black); ratio = 1. /5 ; smallRadius = drawCircle (painter, rect, radius, pen, ratio); painter.setPen (Qt::white); drawSpeed (painter, rect, textRatio, tickInterval, currentAngle, smallRadius); drawShinePie (painter, rect, radius*1.1 , radius*1.1 , minAngle); drawLogol (painter, rect, radius); } QRect MainWindow::initCanvas (QPainter &painter) { QRect rect = ui->centralwidget->rect (); painter.setRenderHint (QPainter::Antialiasing, true ); painter.setBrush (Qt::black); painter.drawRect (rect); painter.setBrush (Qt::BrushStyle::NoBrush); return rect; } int MainWindow::drawCircle (QPainter& painter, QRect& rect, int radius, QPen& pen, float ratio) int smallRadius = (int )(radius*ratio); pen.setWidth (3 ); painter.setPen (pen); painter.drawEllipse (rect.center (), smallRadius, smallRadius); painter.setPen (Qt::NoPen); return smallRadius; } std::tuple<int , int > MainWindow::drawTick (QPainter& painter,QRect& rect, QPen& pen, int radius) { int textNum = 13 ; int smallTickNum = 5 ; int textRatio = 4 ; pen.setWidth (2 ); painter.setPen (pen); float bigTick = (1 -0.9 )*radius; float smallTick = (1 -0.96 )*radius; float textRadius = 0.8 *radius; int tickInterval = (int )((maxAngle-minAngle)/(textNum-1. )/smallTickNum); int tickCount = 0 ; for (int i = maxAngle; i >= minAngle; i-=tickInterval) { float xOut = cos (i*M_PI/180 )*radius+rect.center ().x (); float yOut = -sin (i*M_PI/180 )*radius+rect.center ().y (); float xIn; float yIn; float xText; float yText; if (tickCount%5 == 0 ) { xIn = cos (i*M_PI/180 )*(radius-bigTick)+rect.center ().x (); yIn = -sin (i*M_PI/180 )*(radius-bigTick)+rect.center ().y (); xText = cos (i*M_PI/180 )*textRadius+rect.center ().x (); yText = -sin (i*M_PI/180 )*textRadius+rect.center ().y (); QPointF pointText (xText, yText) ; float halfWidth = 1.5 *bigTick; float halfHeight = 1.5 *bigTick; QFont font; font.setPointSize (bigTick); font.setWeight (QFont::Bold); painter.setFont (font); painter.save (); painter.translate (pointText); painter.rotate (-(i-90 )); QRectF rectText (-halfWidth, -halfHeight, 2 *halfWidth, 2 *halfHeight) ; painter.drawText (rectText, Qt::AlignCenter, QString::number (tickCount*textRatio)); painter.restore (); }else { xIn = cos (i*M_PI/180 )*(radius-smallTick)+rect.center ().x (); yIn = -sin (i*M_PI/180 )*(radius-smallTick)+rect.center ().y (); } if (i >= maxHighSpeed && i <= minHighSpeed) { pen.setColor (Qt::red); } tickCount++; QPointF pointOut (xOut, yOut) ; QPointF pointIn (xIn, yIn) ; pen.setWidth (3 ); painter.setPen (pen); painter.drawLine (pointIn, pointOut); pen.setColor (Qt::white); painter.setPen (pen); } return std::make_tuple (textRatio, tickInterval); } std::tuple<float , float > MainWindow::drawArrow (QPainter& painter, QRect& rect, int & radius, int & smallRadius) { float currentAngle = currentAngleGlobal; float arrowRadius = 0.68 *radius; float epsilon = 5.1 ; float xArrowOut = cos (currentAngle*M_PI/180 )*arrowRadius+rect.center ().x (); float yArrowOut = -sin (currentAngle*M_PI/180 )*arrowRadius+rect.center ().y (); float xArrowIn1 = cos ((currentAngle-epsilon)*M_PI/180 )*smallRadius+rect.center ().x (); float yArrowIn1 = -sin ((currentAngle-epsilon)*M_PI/180 )*smallRadius+rect.center ().y (); float xArrowIn2 = cos ((currentAngle+epsilon)*M_PI/180 )*smallRadius+rect.center ().x (); float yArrowIn2 = -sin ((currentAngle+epsilon)*M_PI/180 )*smallRadius+rect.center ().y (); QPointF pointArrowOut (xArrowOut, yArrowOut) ; QPointF pointArrowIn1 (xArrowIn1, yArrowIn1) ; QPointF pointArrowIn2 (xArrowIn2, yArrowIn2) ; QPointF pointArrows[3 ] = {pointArrowOut, pointArrowIn1, pointArrowIn2}; painter.setBrush (Qt::white); painter.drawPolygon (pointArrows, 3 ); return std::make_tuple (currentAngle, arrowRadius); } void MainWindow::drawPie (QPainter& painter, QRect& rect, int & radius, float & arrowRadius, float & currentAngle) float ratio = 1.08 ; QRectF rectPie (rect.center().x()-radius*ratio, rect.center().y()-radius*ratio, radius*ratio*2 , radius*ratio*2 ) ; painter.setPen (Qt::NoPen); QRadialGradient arrowRG (rectPie.center(), radius*ratio) ; arrowRG.setColorAt (0.0 , QColor (255 ,153 ,18 , 0 )); arrowRG.setColorAt (0.3 , QColor (255 ,153 ,18 , 0 )); arrowRG.setColorAt (1.0 , QColor (255 ,153 ,18 , 100 )); QBrush arrowBrush (arrowRG) ; painter.setBrush (arrowBrush); painter.drawPie (rectPie, currentAngle*16 , (maxAngle-currentAngle)*16 ); } void MainWindow::drawSpeed (QPainter& painter, QRect& rect, int & textRatio, int & tickInterval, float & currentAngle, int & smallRadius) float value = (maxAngle-currentAngle)*textRatio/tickInterval; QPointF pointText (rect.center().x(), rect.center().y()) ; float halfWidth = smallRadius; float halfHeight = smallRadius; float offsize = 1.5 ; QFont font; font.setPointSize (smallRadius*0.8 ); font.setWeight (QFont::Bold); painter.setFont (font); QRectF rectText (pointText.x()-halfWidth, pointText.y()-halfHeight, 2 *halfWidth, offsize*halfHeight) ; painter.setPen (Qt::white); QString valueString = QString::number (value); painter.drawText (rectText, Qt::AlignCenter, valueString); QRectF rectTextUnit (pointText.x()-halfWidth/2 , pointText.y()+(offsize-1 ), halfWidth, halfHeight) ; font.setPointSize (smallRadius*0.4 ); painter.setFont (font); painter.drawText (rectTextUnit, Qt::AlignCenter, "Km/h" ); } void MainWindow::drawShinePie (QPainter& painter, QRect& rect, float radius, float arrowRadius, float currentAngle) QRectF rectPie (rect.center().x()-radius, rect.center().y()-radius, radius*2 , radius*2 ) ; painter.setPen (Qt::NoPen); QRadialGradient arrowRG (rectPie.center(), arrowRadius) ; arrowRG.setColorAt (0.0 , QColor (0 ,0 ,0 , 0 )); arrowRG.setColorAt (0.3 , QColor (0 ,0 ,0 , 0 )); arrowRG.setColorAt (0.9 , QColor (0 ,0 ,0 , 10 )); arrowRG.setColorAt (0.95 , QColor (255 ,0 ,0 , 50 )); arrowRG.setColorAt (1.0 , QColor (255 ,0 ,0 , 100 )); QBrush arrowBrush (arrowRG) ; painter.setBrush (arrowBrush); painter.drawPie (rectPie, currentAngle*16 , (maxAngle-currentAngle)*16 ); } void MainWindow::drawLogol (QPainter& painter, QRect& rect, float radius) float logolCenterX = rect.center ().x (); float logolCenterY = rect.center ().y ()+radius*0.5 ; float halfWidth = radius*0.1 ; float halfHeight = radius*0.12 ; QRect rectLogol (logolCenterX-halfWidth, logolCenterY-halfHeight, halfWidth*2 , halfHeight*2 ) ; painter.drawPixmap (rectLogol, QPixmap (":/logol/images/porch.png" )); }
显示自定义按钮
显示控件的方式
代码:在MainWindow中创建MyButton对象,在MyButton中用QPainterEvent绘图。
UI Designer: 插入一个wdiget控件,将它提升为MyButton。
插件:
显示动画效果 QProperyAnimation
自定义插件
动态链接库
使用插件面向接口编程:
1、自定义插件的工程中包括插件类和插件接口类并将整个项目生成动态库或静态库,而不是可执行文件。
2、将生成的库文件(.dylib, dll, .a, .so等)放到qt的designer下例如/opt/homebrew/Cellar/qt/6.9.0/share/qt/plugins/designer/
3、在使用插件的项目中配置CMakeLists.txt,:(1)target_link_libraries链接生成的插件库,(2)target_include_directories导入生成的库使用到的函数的头文件。
动态库 :
编译:编译器将.h和.cpp文件生成.o目标文件
编译时链接:链接器将.o链接到动态文件.dylib 可执行文件(例如.exe)
运行时链接:将动态库文件.dylib链接到可执行文件。
当需要修改某个动态文件时不需要重新编译整个项目的可执行文件 ,只需执行1、2、3 步。
动态库特例插件不光其他项目使用qt designer也使用
Windows +qt creator
在cmake构建时链接通过target_link_libraries完成而不是LIB文件。
linux or macOS +cmake
假设你的插件项目目录如下:
1 2 3 4 5 6 7 8 9 10 11 12 13 14 15 16 17 18 19 20 21 22 23 24 25 26 27 28 29 30 31 32 33 34 35 36 37 38 39 40 41 42 43 44 45 46 47 48 49 |---plugin |---CMakeLists.txt |---widget 插件类,自定义的UI图 |---CMakeLists.txt |---include |---widget.h 头文件中要添加导出宏定义头文件<QtUiPlugin/QDesignerExportWidget>并在widget类名前添加,否则lib文件链接不到widget.h文件 |---src |---widget.cpp |---resources |---form |---mainwindow.ui |---widgetPlugin 插件接口模块(让qtdesigner认识插件),使用qt creator生成的模版 |---include |---widgetPlugin.h |---src |---widgetPlugin.cpp |---resources |---images |---*.png |---icons.qrc 插件显示的图标 |---CMakeLists.txt
说明
**widget.h **文件中要引入<QtDesigner/QDesignerExportWidget>包,并且类名前加宏QDESIGNER_WIDGET_EXPORT目的是在创建自定义 Qt 控件时,确保控件类能够被 Qt Designer 正确识别和加载。
cmake
特性
target_sourcestarget_include_directories
目的 定义哪些文件属于目标
定义在哪里查找头文件
影响对象 CMake 构建系统
C++ 编译器
文件类型 .cpp, .h, .hpp, .c 等
不直接添加文件,只添加目录
Qt MOC 必需(用于找到 Q_OBJECT 头文件)
不需要(但需要包含生成目录)
IDE 支持 让IDE知道文件属于项目
让IDE知道在哪里查找头文件
不能在子目录中生成动态库,在用父目录连接动态库的方式生成插件动态库
qt_add_plugin 生成的是目标文件不是动态文件虽然.dylib结尾,无法链接到其他项目中
1 2 3 4 5 6 7 8 9 10 11 12 13 14 15 16 17 18 19 20 21 22 23 24 25 26 27 28 29 30 31 32 33 34 35 36 37 38 39 40 41 42 43 44 45 46 47 48 49 50 51 52 53 54 55 56 57 58 59 60 61 62 63 64 65 66 67 68 69 70 71 72 73 74 75 76 77 78 79 80 81 82 83 84 85 86 87 88 89 90 91 92 93 94 95 96 97 98 99 100 101 102 103 104 105 106 107 108 109 110 111 112 113 114 115 116 117 118 119 120 121 122 123 124 125 126 127 128 129 130 131 132 133 134 135 136 137 138 139 140 141 142 143 144 145 146 147 148 149 150 151 152 153 154 155 156 157 158 159 160 161 162 163 164 cmake_minimum_required (VERSION 3.16 )set (PROJECT Plugin)project (${PROJECT} )set (PLN widgetPlugin)set (PLNCLASS widget)message ("操作系统${CMAKE_SYSTEM}" )message ("当前CMake工具所在目录:${CMAKE_COMMAND}" )message ("CMake版本号: ${CMAKE_MAJOR_VERSION}.${CMAKE_MINOR_VERSION}.${CMAKE_PATCH_VERSION}" )message ("编译类型${CMAKE_BUILD_TYPE}" )set (CMAKE_PREFIX_PATH "$(brew --prefix qt@6);" ) set (CMAKE_AUTOMOC ON )set (CMAKE_AUTOUIC ON )set (CMAKE_AUTORCC ON )set (CMAKE_INCLUDE_CURRENT_DIR ON )set (CMAKE_CXX_STANDARD 17 )set (CMAKE_CXX_STANDARD_REQUIRED ON )find_package (Qt6 REQUIRED Core Gui Widgets Designer UiPlugin) set (ROOTSRC "" CACHE INTERNAL "global source" )set (ROOTINC "" CACHE INTERNAL "global include" )set (ROOTQRC "" CACHE INTERNAL "global resource" )set (ROOTFORM "" CACHE INTERNAL "global ui dir" )set (ROOTINCDIR "" CACHE INTERNAL "global include dir" )add_subdirectory (${PLNCLASS} )add_subdirectory (${PLN} )message ("\n##############打印CMAKE_CURRENT_SOURCE_DIR路径${CMAKE_CURRENT_SOURCE_DIR}################" )message ("\n==========所有头文件:${ROOTINC}" )message ("\n==========所有源文件:${ROOTSRC}" )message ("\n==========所有qrc文件:${ROOTQRC}" )message ("\n==========所有ui文件所在目录:${ROOTFORMDIR}" )message ("\n==========所有头文件所在目录:${ROOTINCDIR}" )if (NOT CMAKE_BUILD_TYPE) set (CMAKE_BUILD_TYPE Release) endif ()set (CMAKE_BINARY_DIR ${CMAKE_SOURCE_DIR} /cmake-build-release)qt_add_plugin(${PROJECT} ) target_include_directories (${PROJECT} PUBLIC ${ROOTINCDIR} )list (APPEND CMAKE_AUTOUIC_SEARCH_PATHS ${ROOTFORM} )target_sources (${PROJECT} PUBLIC ${ROOTSRC} ${ROOTQRC} ${ROOTINC} ) target_link_libraries (${PROJECT} PUBLIC Qt${QT_VERSION_MAJOR} ::Widgets Qt${QT_VERSION_MAJOR} ::Designer Qt${QT_VERSION_MAJOR} ::Gui Qt${QT_VERSION_MAJOR} ::Core Qt${QT_VERSION_MAJOR} ::UiPlugin) message ("\nCMAKE_CURRENT_BINARY_DIR: ${CMAKE_CURRENT_BINARY_DIR}" )message ("\nCMAKE_BINARY_DIR: ${CMAKE_BINARY_DIR}" )set_target_properties (${PROJECT_NAME} PROPERTIES MACOSX_BUNDLE TRUE MACOSX_BUNDLE_INFO_PLIST ${CMAKE_CURRENT_BINARY_DIR} /Info.plist BUNDLE_OUTPUT_DIRECTORY ${CMAKE_CURRENT_BINARY_DIR} /bin OUTPUT_NAME "app" ) message ("\nqt安装目录:${QT6_INSTALL_PREFIX}" )message ("\ndesigner插件目录:${QT6_INSTALL_PLUGINS}" )set (INSTALL_EXAMPLEDIR "${QT6_INSTALL_PREFIX}/${QT6_INSTALL_PLUGINS}/designer" )install (TARGETS ${PROJECT} RUNTIME DESTINATION "${INSTALL_EXAMPLEDIR}" BUNDLE DESTINATION "${INSTALL_EXAMPLEDIR}" LIBRARY DESTINATION "${INSTALL_EXAMPLEDIR}" )
add_library 生成动态库可以链接到其他项目中使用
1 2 3 4 5 6 7 8 9 10 11 12 13 14 15 16 17 18 19 20 21 22 23 24 25 26 27 28 29 30 31 32 33 34 35 36 37 38 39 40 41 42 43 44 45 46 47 48 49 50 51 52 53 54 55 56 57 58 59 60 61 62 63 64 65 66 67 68 69 70 71 72 73 74 75 76 77 78 79 80 81 82 83 84 85 86 87 88 89 90 91 92 93 94 95 96 97 98 99 100 101 102 103 104 105 106 107 108 109 110 111 112 113 114 115 116 117 118 119 120 121 122 123 124 125 126 127 128 129 130 131 132 133 134 135 136 137 138 139 140 141 142 143 144 145 146 147 148 149 150 151 152 153 154 155 156 157 158 159 160 161 162 163 164 165 cmake_minimum_required (VERSION 3.16 )set (PROJECT Plugin)project (${PROJECT} )set (PLN widgetPlugin)set (PLNCLASS widget)message ("操作系统${CMAKE_SYSTEM}" )message ("当前CMake工具所在目录:${CMAKE_COMMAND}" )message ("CMake版本号: ${CMAKE_MAJOR_VERSION}.${CMAKE_MINOR_VERSION}.${CMAKE_PATCH_VERSION}" )message ("编译类型${CMAKE_BUILD_TYPE}" )set (CMAKE_PREFIX_PATH "$(brew --prefix qt@6);" ) set (CMAKE_AUTOMOC ON )set (CMAKE_AUTOUIC ON )set (CMAKE_AUTORCC ON )set (CMAKE_INCLUDE_CURRENT_DIR ON )set (CMAKE_CXX_STANDARD 17 )set (CMAKE_CXX_STANDARD_REQUIRED ON )find_package (Qt6 REQUIRED Core Gui Widgets Designer UiPlugin) set (ROOTSRC "" CACHE INTERNAL "global source" )set (ROOTINC "" CACHE INTERNAL "global include" )set (ROOTQRC "" CACHE INTERNAL "global resource" )set (ROOTFORM "" CACHE INTERNAL "global ui dir" )set (ROOTINCDIR "" CACHE INTERNAL "global include dir" )add_subdirectory (${PLNCLASS} )add_subdirectory (${PLN} )message ("\n##############打印CMAKE_CURRENT_SOURCE_DIR路径${CMAKE_CURRENT_SOURCE_DIR}################" )message ("\n==========所有头文件:${ROOTINC}" )message ("\n==========所有源文件:${ROOTSRC}" )message ("\n==========所有qrc文件:${ROOTQRC}" )message ("\n==========所有ui文件所在目录:${ROOTFORMDIR}" )message ("\n==========所有头文件所在目录:${ROOTINCDIR}" )if (NOT CMAKE_BUILD_TYPE) set (CMAKE_BUILD_TYPE Release) endif ()set (CMAKE_BINARY_DIR ${CMAKE_SOURCE_DIR} /cmake-build-release)add_library (${PROJECT} SHARED ${ROOTSRC} ${ROOTQRC} ${ROOTINC} )target_include_directories (${PROJECT} PUBLIC ${ROOTINCDIR} )list (APPEND CMAKE_AUTOUIC_SEARCH_PATHS ${ROOTFORM} )target_link_libraries (${PROJECT} PUBLIC Qt${QT_VERSION_MAJOR} ::Widgets Qt${QT_VERSION_MAJOR} ::Designer Qt${QT_VERSION_MAJOR} ::Gui Qt${QT_VERSION_MAJOR} ::Core Qt${QT_VERSION_MAJOR} ::UiPlugin) message ("\nCMAKE_CURRENT_BINARY_DIR: ${CMAKE_CURRENT_BINARY_DIR}" )message ("\nCMAKE_BINARY_DIR: ${CMAKE_BINARY_DIR}" )set_target_properties (${PROJECT_NAME} PROPERTIES MACOSX_BUNDLE TRUE MACOSX_BUNDLE_INFO_PLIST ${CMAKE_CURRENT_BINARY_DIR} /Info.plist BUNDLE_OUTPUT_DIRECTORY ${CMAKE_CURRENT_BINARY_DIR} /bin OUTPUT_NAME "battery" ) file (GLOB DYLIBS "${CMAKE_CURRENT_BINARY_DIR}/*.dylib" )message ("\nqt安装目录:${QT6_INSTALL_PREFIX}" )message ("\ndesigner插件目录:${QT6_INSTALL_PLUGINS}" )set (INSTALL_EXAMPLEDIR "${QT6_INSTALL_PREFIX}/${QT6_INSTALL_PLUGINS}/designer" )install (FILES ${DYLIBS} DESTINATION "${QT6_INSTALL_PREFIX}/${QT6_INSTALL_PLUGINS}/designer" )
1 2 3 4 5 6 7 8 9 10 11 12 13 14 15 16 17 18 19 20 21 22 23 24 25 26 27 28 29 30 31 32 33 34 35 36 message ("\n##############打印CMAKE_CURRENT_SOURCE_DIR路径${CMAKE_CURRENT_SOURCE_DIR}################" )FILE (GLOB SRC "${CMAKE_CURRENT_SOURCE_DIR}/SRC/*.cpp" )FILE (GLOB INC "${CMAKE_CURRENT_SOURCE_DIR}/include/*.h" ) file (GLOB QRC "${CMAKE_CURRENT_SOURCE_DIR}/resources/*.qrc" )message ("src目录下CmakeList中QRC文件路径:${QRC}" )list (APPEND CMAKE_AUTOUIC_SEARCH_PATHS "${CMAKE_CURRENT_SOURCE_DIR}/form" )message ("打印AUTOUIC路径: ${CMAKE_AUTOUIC_SEARCH_PATHS}\n" )set (ROOTSRC ${ROOTSRC} ${SRC} CACHE INTERNAL "Update" FORCE)set (ROOTINC ${ROOTINC} ${INC} CACHE INTERNAL "Update" FORCE)set (ROOTQRC ${ROOTQRC} ${QRC} CACHE INTERNAL "Update" FORCE)set (ROOTFORM ${ROOTFORMDIR} ${CMAKE_AUTOUIC_SEARCH_PATHS} CACHE INTERNAL "Update" FORCE)set (ROOTINCDIR ${ROOTINCDIR} ${CMAKE_CURRENT_SOURCE_DIR} /include / CACHE INTERNAL "Update" FORCE)install (FILES ${INC} DESTINATION ${CMAKE_BINARY_DIR} /include /)
1 2 3 4 5 6 7 8 9 10 11 12 13 14 15 16 17 18 19 20 21 22 23 24 25 26 27 28 29 30 31 32 33 34 35 36 message ("\n#############打印CMAKE_CURRENT_SOURCE_DIR路径${CMAKE_CURRENT_SOURCE_DIR}##########" )FILE (GLOB SRC "${CMAKE_CURRENT_SOURCE_DIR}/SRC/*.cpp" )FILE (GLOB INC "${CMAKE_CURRENT_SOURCE_DIR}/include/*.h" )file (GLOB QRC "${CMAKE_CURRENT_SOURCE_DIR}/resources/*.qrc" )message ("src目录下CmakeList中QRC文件路径:${QRC}" )list (APPEND CMAKE_AUTOUIC_SEARCH_PATHS "${CMAKE_CURRENT_SOURCE_DIR}/form" )message ("打印AUTOUIC路径: ${CMAKE_AUTOUIC_SEARCH_PATHS}\n" )set (ROOTSRC ${ROOTSRC} ${SRC} CACHE INTERNAL "Update" FORCE)set (ROOTINC ${ROOTINC} ${INC} CACHE INTERNAL "Update" FORCE)set (ROOTQRC ${ROOTQRC} ${QRC} CACHE INTERNAL "Update" FORCE)set (ROOTFORM ${ROOTFORMDIR} ${CMAKE_AUTOUIC_SEARCH_PATHS} CACHE INTERNAL "Update" FORCE)set (ROOTINCDIR ${ROOTINCDIR} ${CMAKE_CURRENT_SOURCE_DIR} /include / CACHE INTERNAL "Update" FORCE)install (FILES ${INC} DESTINATION ${CMAKE_BINARY_DIR} /include /)
显式调用动态库
QLibrary
静态链接库
静态库 :
编译:编译器将.h和.cpp文件生成.o目标文件
编译时链接:链接器将.o链接到动态文件.a 可执行文件(例如.exe)
编译时链接:将动态库文件.a链接到可执行文件。
当需要修改某个静态文件时需要重新编译整个项目的可执行文件 。
目录结构
1 2 3 4 5 6 7 8 9 10 |- staticLib/ | |- dialog/ | |- form/ | |- dialogopen.ui | |- include/ | |- dialogopen.h | |- src/ | |- dialogopen.cpp | |- CMakeLists.txt | |- CMakeLists.txt
cmake 生成第三方库并让其他项目使用find_package导入该库,而不是直接导入静态库文件
1 2 3 4 5 6 7 8 9 10 11 12 13 14 15 16 17 18 19 20 21 22 23 24 25 26 27 28 29 30 31 32 33 34 35 36 37 38 39 40 41 42 43 44 45 46 47 48 49 50 51 52 53 54 55 56 57 58 59 60 61 62 63 64 65 66 67 68 69 70 71 72 73 74 75 76 77 78 79 80 81 82 83 84 85 86 87 88 89 90 91 92 93 94 95 96 97 98 99 100 101 102 103 104 105 106 107 108 109 110 111 112 113 114 115 116 117 118 119 120 121 122 123 124 125 126 127 128 129 130 131 132 133 134 135 136 137 138 139 140 141 142 143 144 145 146 147 148 149 150 151 152 153 154 155 156 157 158 159 160 161 162 163 164 165 166 167 168 169 170 171 172 173 174 175 176 177 178 179 180 181 182 183 184 185 186 187 188 189 190 191 192 193 cmake_minimum_required (VERSION 3.16 )set (PROJECT Dialog)project (${PROJECT} )set (PLNCLASS dialog)set (LIBNAME dialogExport)message ("操作系统${CMAKE_SYSTEM}" )message ("当前CMake工具所在目录:${CMAKE_COMMAND}" )message ("CMake版本号: ${CMAKE_MAJOR_VERSION}.${CMAKE_MINOR_VERSION}.${CMAKE_PATCH_VERSION}" )message ("编译类型${CMAKE_BUILD_TYPE}" )set (CMAKE_PREFIX_PATH "$(brew --prefix qt@6);" ) set (CMAKE_AUTOMOC ON )set (CMAKE_AUTOUIC ON )set (CMAKE_AUTORCC ON )set (CMAKE_CXX_STANDARD 17 )set (CMAKE_CXX_STANDARD_REQUIRED ON )get_filename_component (CMAKE_INSTALL_PREFIX ${CMAKE_CURRENT_SOURCE_DIR} DIRECTORY)find_package (Qt6 REQUIRED Core Gui Widgets) set (ROOTSRC "" CACHE INTERNAL "global source" )set (ROOTINC "" CACHE INTERNAL "global include" )set (ROOTQRC "" CACHE INTERNAL "global resource" )set (ROOTFORMDIR "" CACHE INTERNAL "global ui dir" )set (ROOTINCDIR "" CACHE INTERNAL "global include dir" )add_subdirectory (${PLNCLASS} )message ("\n##############打印CMAKE_CURRENT_SOURCE_DIR路径${CMAKE_CURRENT_SOURCE_DIR}################" )message ("\n==========所有头文件:${ROOTINC}" )message ("\n==========所有源文件:${ROOTSRC}" )message ("\n==========所有qrc文件:${ROOTQRC}" )message ("\n==========所有ui文件所在目录:${ROOTFORMDIR}" )message ("\n==========所有头文件所在目录:${ROOTINCDIR}" )if (NOT CMAKE_BUILD_TYPE) set (CMAKE_BUILD_TYPE Release) endif ()set (CMAKE_BINARY_DIR ${CMAKE_SOURCE_DIR} /cmake-build-release)list (APPEND CMAKE_AUTOUIC_SEARCH_PATHS ${ROOTFORMDIR} )add_library (${PROJECT} STATIC ${ROOTSRC} ${ROOTQRC} ${ROOTINC} )target_include_directories (${PROJECT} PUBLIC $<BUILD_INTERFACE:${ROOTINCDIR} > $<INSTALL_INTERFACE:include > ) target_link_libraries (${PROJECT} PUBLIC Qt${QT_VERSION_MAJOR} ::Gui Qt${QT_VERSION_MAJOR} ::Core Qt${QT_VERSION_MAJOR} ::Widgets) message ("\nCMAKE_CURRENT_BINARY_DIR: ${CMAKE_CURRENT_BINARY_DIR}" )message ("\nCMAKE_BINARY_DIR: ${CMAKE_BINARY_DIR}" )set_target_properties (${PROJECT_NAME} PROPERTIES MACOSX_BUNDLE TRUE MACOSX_BUNDLE_INFO_PLIST ${CMAKE_CURRENT_BINARY_DIR} /Info.plist BUNDLE_OUTPUT_DIRECTORY ${CMAKE_CURRENT_BINARY_DIR} /bin OUTPUT_NAME ${LIBNAME} ) file (GLOB DYLIBS "${CMAKE_CURRENT_BINARY_DIR}/*.a" )message ("\nqt安装目录:${QT6_INSTALL_PREFIX}" )message ("\ndesigner插件目录:${QT6_INSTALL_PLUGINS}" )message ("\nCMAKE_INSTALL_PREFIX: ${CMAKE_INSTALL_PREFIX}" )install (TARGETS ${PROJECT} EXPORT ${LIBNAME} Targets RUNTIME DESTINATION ${CMAKE_INSTALL_PREFIX} /bin BUNDLE DESTINATION ${CMAKE_INSTALL_PREFIX} /bin LIBRARY DESTINATION ${CMAKE_INSTALL_PREFIX} /lib ARCHIVE DESTINATION ${CMAKE_INSTALL_PREFIX} /lib INCLUDES DESTINATION ${CMAKE_INSTALL_PREFIX} /include ) install (EXPORT ${LIBNAME} Targets FILE ${LIBNAME} Config.cmake NAMESPACE ${LIBNAME} :: DESTINATION ${CMAKE_INSTALL_PREFIX} /lib/cmake/${LIBNAME} ) install (DIRECTORY ${ROOTINCDIR} DESTINATION include )
1 2 3 4 5 6 7 8 9 10 11 12 13 14 15 16 17 18 19 20 21 22 23 24 25 26 27 28 29 30 31 32 33 34 35 36 message ("\n#############打印CMAKE_CURRENT_SOURCE_DIR路径${CMAKE_CURRENT_SOURCE_DIR}##########" )FILE (GLOB SRC "${CMAKE_CURRENT_SOURCE_DIR}/SRC/*.cpp" )FILE (GLOB INC "${CMAKE_CURRENT_SOURCE_DIR}/include/*.h" )file (GLOB QRC "${CMAKE_CURRENT_SOURCE_DIR}/resources/*.qrc" )message ("src目录下CmakeList中QRC文件路径:${QRC}" )list (APPEND CMAKE_AUTOUIC_SEARCH_PATHS "${CMAKE_CURRENT_SOURCE_DIR}/form" )message ("打印AUTOUIC路径: ${CMAKE_AUTOUIC_SEARCH_PATHS}\n" )set (ROOTSRC ${ROOTSRC} ${SRC} CACHE INTERNAL "Update" FORCE)set (ROOTINC ${ROOTINC} ${INC} CACHE INTERNAL "Update" FORCE)set (ROOTQRC ${ROOTQRC} ${QRC} CACHE INTERNAL "Update" FORCE)set (ROOTFORMDIR ${ROOTFORMDIR} ${CMAKE_AUTOUIC_SEARCH_PATHS} CACHE INTERNAL "Update" FORCE)set (ROOTINCDIR ${ROOTINCDIR} ${CMAKE_CURRENT_SOURCE_DIR} /include / CACHE INTERNAL "Update" FORCE)
其他项目使用find_package导入生成库
find_package(dialogExport REQUIRED PATHS "/Users/liuchuanxi/项目/QT/Qt-project/动态库和静态库/静态库/")
1 2 3 2. ```cmake target_link_libraries(MainWindow PUBLIC Qt${QT_VERSION_MAJOR}::Widgets dialogExport::Dialog)
注: 链接时使用命名空间+项目名称而不是命名空间+导出库名
天气预报
概述
stylesheet界面美化
json数据解析
HTTP通信
自定义控件绘制温度
多控件
代码整合调试能力
stylesheet样式
设置边框弧度
QLabel {background-color: rgb(123, 191, 197); border-radius: 5px;; border-top-left-radius:0px; border-top-right-radius:0px}
应用窗体拖动:鼠标坐标
鼠标点击事件mousePressEvent和鼠标移动事件mouseMoveEvent
天气数据获取
QT的HTTP编程
涉及QT的网络模块来进行HTTP请求和处理HTTP响应。用到QNetWorkAccessManager,QNetworkRequest, QNetworkReply类
步骤1: 包含必要头文件
1 2 3 4 5 6 #include <QCoreApplication> #include <QNetworkAccessManager> #include <QNetworkRequest> #include <QNetworkReply> #include <QObject> #include <QDebug>
步骤2:发送HTTP请求
创建一个QNetworkAccessManager对象,并使用它发送HTTP请求。QNetworkAccessManager对象会异步的处理请求,并返回一个QNetworkReply对象。
1 2 3 4 5 6 7 8 9 10 11 12 13 14 15 int main (int argc, char * arg[]) QCoreApplication a (argc, argv) ; QNetworkAccessManager manager; QNetworkRequest requests (QUrl("http://example.com" )) ; QNetworkReply* reply = manager.get (requests); QObject::connect (reply, &QNectworkReply::finished, [&](){ if (reply->error ()){ qDebug << "Error:" << reply->errorString (); return ; } QString responts = reply->readAll (); qDebug () << "Response:" << response; }); return a.exec (); }
使用QNetworkAccessManager的get方法发送一个HTTP请求到“http://example.com ”。然后我们连接了QNetworkReply对象的finished信号到一个lambda函数,该函数在收到HTTP响应时被调用。
注:
异步处理:QNetworkAccessManager的请求是异步的。这意味着get方法会立即返回,而HTTP响应将在稍后通过信号来处理。
错误处理:应该检查QNetworkReply对象是否有错误,并相应处理。
内存管理:QNetworkReply对象需要被正确地管理,以避免内存泄漏,通常使用QObject::deleteLater来安排删除它是一个好方法。
事件滤波器
为搜索QLabel、输入城市的QLineEdit添加鼠标点击事件搜索执行搜索槽函数和鼠标首次点击搜索框删除城市名的事件
1 2 3 4 5 6 7 8 9 10 11 12 13 14 15 16 17 18 19 20 21 22 23 24 25 26 27 28 29 30 31 32 33 34 35 36 37 38 39 40 41 42 43 44 45 46 47 48 49 50 51 52 53 54 55 56 57 58 59 60 61 62 63 64 65 66 67 68 69 70 71 72 73 74 75 76 77 78 79 80 81 82 83 84 85 86 87 88 89 90 91 92 93 94 95 96 97 98 99 100 101 102 103 104 105 106 107 108 109 110 111 112 113 114 115 116 117 118 119 120 121 122 123 124 125 126 127 128 129 130 131 132 133 134 135 136 137 138 139 140 141 142 143 144 145 146 147 148 149 150 151 152 153 154 155 156 157 158 159 160 161 162 163 164 165 166 167 168 169 170 171 172 173 174 175 176 177 178 179 180 181 182 183 184 185 186 187 188 189 190 191 192 193 194 195 196 197 198 199 200 201 202 203 204 205 206 207 208 209 210 211 212 213 214 215 216 217 218 219 220 221 222 MainWindow::MainWindow (QWidget *parent) : QMainWindow (parent) , ui (new Ui::MainWindow) { ui->setupUi (this ); ui->centralwidget->setLayout (ui->wholeVL); setFixedSize (432 , 784 ); menu = new QMenu (this ); actionClose = new QAction (QIcon (":weather/images/close.png" ), tr ("退出" ), this ); menu->addAction (actionClose); menu->setStyleSheet ("QMenu::item {color:white; background-color:gray}" ); ui->searchLabel->installEventFilter (this ); ui->searchLineEdit->installEventFilter (this ); manager = new QNetworkAccessManager (this ); urlStr = "http://gfeljm.tianqiapi.com/api?unescape=1&version=v9&appid=21676181&appsecret=CfbYCU9k" ; QUrl urlUrl = QUrl (urlStr); QNetworkRequest request (urlUrl) ; response = manager->get (request); connect (menu, &QMenu::triggered, [=](){this ->close ();}); connect (manager, &QNetworkAccessManager::finished, this , &MainWindow::onHttpReply); } bool MainWindow::eventFilter (QObject *obj, QEvent *event) qDebug () << "使用⌚️过滤器增加事件触发信号eventFilter:" << obj; qDebug () << "使用⌚️过滤器增加事件触发信号type:" << event->type (); if (event->type () == QEvent::MouseButtonPress) { QMouseEvent *mouseEvent = static_cast <QMouseEvent *>(event); if (mouseEvent->button () == Qt::LeftButton && obj->objectName () == "searchLabel" ) { on_searchLabel_clicked (); return true ; } else if (mouseEvent->button () == Qt::LeftButton && obj->objectName () == "searchLineEdit" ) { if (firstFocus == true ) { ui->searchLineEdit->clear (); firstFocus = false ; return true ; } } } else if (event->type () == QEvent::KeyPress && obj->objectName () == "searchLineEdit" ) { QKeyEvent* keyEvent = static_cast <QKeyEvent *>(event); if (keyEvent->key () == Qt::Key_Return) { on_searchLabel_clicked (); return true ; } } else if (event->type () == QEvent::Enter && obj->objectName () == "searchLineEdit" ) { QEnterEvent* focusEvent = static_cast <QEnterEvent *>(event); QPointF pos = focusEvent->pos (); QRect lineEditRect = ui->searchLineEdit->frameGeometry (); if (pos.x () > lineEditRect.x () && pos.y () > lineEditRect.y () && pos.x () < lineEditRect.x ()+lineEditRect.width () && pos.y () < lineEditRect.y ()+lineEditRect.height ()) { firstFocus = true ; } return true ; } return false ; } void MainWindow::onHttpReply (QNetworkReply* reply) QVariant status = reply->attribute (QNetworkRequest::HttpStatusCodeAttribute); qDebug () << "http reply:" << reply->error () << ", status:" << status.toInt (); if (reply->error () == QNetworkReply::NoError && status.toInt () == 200 ) { QByteArray data = reply->readAll (); parseWeatherJson (data); }else { QMessageBox msg; msg.setWindowTitle ("网络错误" ); msg.setText (QString ("当前网络状态为:%1" ).arg (status.toInt ())); msg.setIconPixmap (QPixmap (":weather/images/alert.png" ).scaled (20 ,20 , Qt::KeepAspectRatio, Qt::SmoothTransformation)); msg.setStyleSheet ("QPushButton {color:white; display:grid; justify-content: center; place-items: center;}" ); msg.setStyleSheet ("QLabel {color:black; alignment: center;}" ); msg.exec (); } } void MainWindow::parseWeatherJson (QByteArray data) QJsonDocument jsonDoc = QJsonDocument::fromJson (data); if (!jsonDoc.isNull () && jsonDoc.isObject ()) { QJsonObject json = jsonDoc.object (); if (data.contains ("data" ) && json["data" ].isArray ()) { QJsonArray dataArray = json["data" ].toArray (); QJsonObject element = dataArray[0 ].toObject (); QString date = element["date" ].toString (); ui->dateLabel->setText (date); QString week = element["week" ].toString (); ui->weekLabel->setText (week); QString city = element["city" ].toString (); ui->cityLabel->setText (city); QString temp = element["tem" ].toString (); ui->degreeLabel->setText (temp); QString tempMax = element["tem1" ].toString (); QString tempMin = element["tem2" ].toString (); ui->weatherdegreeLabel->setText (tempMin+"~" +tempMax+"°C" ); QString weatherType = element["wea" ].toString (); ui->weatherTextLabel->setText (weatherType); QString airTip = element["air_tips" ].toString (); ui->widet3Label->setText (QString ("感冒指数:" )+airTip); QString windDir = element["win" ].toArray ()[0 ].toString (); ui->windDirectLabel->setText (windDir); QString windPower = element["win_speed" ].toString (); ui->windLevelLabel->setText (windPower); QString pm2_5 = json["aqi" ].toObject ()["pm25" ].toString (); ui->pmLevelLabel->setText (pm2_5); QString humidity = element["humidity" ].toString (); ui->humidLevelLabel->setText (humidity); QString airQuality = element["air_level" ].toString (); ui->airLevelLabel->setText (airQuality); } } } QString getCityCodeFromJson (QString cityName) { QFile file ("/Users/liuchuanxi/项目/QT/Qt-project/天气预报/weather/cityCode.json" ) ; bool fileFlag = file.open (QIODevice::ReadOnly|QIODevice::Text); if (!fileFlag) { QMessageBox msg; msg.setWindowTitle ("城市数据文件错误" ); msg.setText ("打开文件失败" ); msg.setIconPixmap (QPixmap (":weather/images/alert.png" ).scaled (20 ,20 , Qt::KeepAspectRatio, Qt::SmoothTransformation)); msg.setStyleSheet ("QPushButton {color:white; display:grid; justify-content: center; place-items: center;}" ); msg.setStyleSheet ("QLabel {color:black; alignment: center;}" ); msg.exec (); return QString (); } QJsonDocument jsonDoc = QJsonDocument::fromJson (file.readAll ()); file.close (); if (!jsonDoc.isNull () && jsonDoc.isArray ()) { QJsonArray provinces = jsonDoc.array (); for (QJsonValue province: provinces) { if (province.isObject ()) { QString provinceNameLocal = province["name" ].toString (); if (provinceNameLocal == cityName) { return province["code" ].toString (); } } QJsonArray cities = province["city" ].toArray (); for (QJsonValue city: cities) { if (city.isObject ()) { QString cityNameLocal = city["name" ].toString (); if (cityNameLocal == cityName) { return city["code" ].toString (); } } } } } return QString (); } void MainWindow::on_searchLabel_clicked () QString cityNameFromUser = ui->searchLineEdit->text (); QString cityCode; QString enterShortcut = QString (); if (cityNameFromUser.contains ("市" )) { if (cityNameFromUser.contains ("\n" )) { enterShortcut = "\n" ; cityNameFromUser.chop (1 ); cityCode = getCityCodeFromJson (cityNameFromUser); }else { cityCode = getCityCodeFromJson (cityNameFromUser); } }else { if (cityNameFromUser.contains ("\n" )) { enterShortcut = "\n" ; cityNameFromUser.chop (1 ); cityCode = getCityCodeFromJson (cityNameFromUser+"市" ); }else { cityCode = getCityCodeFromJson (cityNameFromUser+"市" ); } } if (cityCode != NULL ) { urlStr = urlStr + "&cityid=" + cityCode; QUrl urlUrl (urlStr) ; QNetworkRequest request (urlUrl) ; manager->get (request); ui->cityLabel->setText (cityNameFromUser); }else { QMessageBox msg; msg.setWindowTitle ("城市搜索" ); msg.setText (QString ("%1不在搜索列表中" ).arg (cityNameFromUser)); msg.setIconPixmap (QPixmap (":weather/images/alert.png" ).scaled (20 ,20 , Qt::KeepAspectRatio, Qt::SmoothTransformation)); msg.setStyleSheet ("QPushButton {color:white; display:grid; justify-content: center; place-items: center;}" ); msg.setStyleSheet ("QLabel {color:black; alignment: center;}" ); msg.exec (); } }
天气图缩放匹配窗口
1 2 3 4 5 6 7 8 9 10 11 12 13 14 15 16 17 18 19 20 21 22 23 24 25 26 27 28 29 30 31 32 33 34 35 36 37 38 39 40 41 42 43 44 45 46 47 48 49 50 51 52 53 54 55 56 57 58 59 60 61 62 63 64 65 66 67 68 69 70 71 72 73 74 75 76 77 78 79 80 81 82 83 84 85 86 87 88 89 90 91 92 93 94 95 96 97 98 99 100 101 102 103 104 void MainWindow::parseWeatherJson (QByteArray data) QJsonDocument jsonDoc = QJsonDocument::fromJson (data); if (!jsonDoc.isNull () && jsonDoc.isObject ()) { QJsonObject json = jsonDoc.object (); if (data.contains ("data" ) && json["data" ].isArray ()) { QJsonArray dataArray = json["data" ].toArray (); for (int i = 0 ; i < dataArray.size (); i++) { QJsonObject element = dataArray[i].toObject (); QString date = element["date" ].toString (); QString week = element["week" ].toString (); QString city = json["city" ].toString (); QString temp = element["tem" ].toString (); QString tempMax = element["tem1" ].toString (); QString tempMin = element["tem2" ].toString (); QString weatherType = element["wea" ].toString (); QString airTip = element["air_tips" ].toString (); QString windDir = element["win" ].toArray ()[0 ].toString (); QString windPower = element["win_speed" ].toString (); QString pm2_5 = json["aqi" ].toObject ()["pm25" ].toString (); QString humidity = element["humidity" ].toString (); QString airQuality = element["air_level" ].toString (); if (i==0 ) { ui->dateLabel->setText (date); ui->weekLabel->setText (week); ui->cityLabel->setText (city); ui->degreeLabel->setText (temp+"°C" ); ui->weatherdegreeLabel->setText (tempMin+"~" +tempMax+"°C" ); ui->weatherTextLabel->setText (weatherType); qDebug () << city << ":" << weatherType; if (weatherIconMap.find (weatherType) == weatherIconMap.end ()) { if (weatherType.contains ("转" )) { int index = weatherType.indexOf ("转" ); if (weatherIconMap.find (weatherType.left (index)) == weatherIconMap.end ()) { ui->weatherLabel->setPixmap (QPixmap (":weather/images/cloud1.png" ).scaled (ui->weatherLabel->size ()*0.5 , Qt::KeepAspectRatio, Qt::SmoothTransformation)); }else { ui->weatherLabel->setPixmap (QPixmap (weatherIconMap[weatherType.left (index)]).scaled (ui->weatherLabel->size ()*0.5 , Qt::KeepAspectRatio, Qt::SmoothTransformation)); } }else { ui->weatherLabel->setPixmap (QPixmap (":weather/images/cloud1.png" ).scaled (ui->weatherLabel->size ()*0.5 , Qt::KeepAspectRatio, Qt::SmoothTransformation)); } } else { ui->weatherLabel->setPixmap (QPixmap (weatherIconMap[weatherType]).scaled (ui->weatherLabel->size ()*0.5 , Qt::KeepAspectRatio, Qt::SmoothTransformation)); } ui->widet3Label->setText (QString ("感冒指数:" )+airTip); ui->windDirectLabel->setText (windDir); ui->windLevelLabel->setText (windPower); ui->pmLevelLabel->setText (pm2_5); ui->humidLevelLabel->setText (humidity); ui->airLevelLabel->setText (airQuality); } days[i].mAirq = airQuality; days[i].mCity = city; days[i].mDate = date; days[i].mWeek = week; days[i].mFl = windPower; days[i].mFx = windDir; days[i].mHumidity = humidity; days[i].mPm2_5 = pm2_5; days[i].mTemp = temp; days[i].mTempHigh = tempMax; days[i].mTempLow = tempMin; days[i].mTips = airTip; days[i].mWeatherType = weatherType; if (weatherIconMap.find (weatherType) == weatherIconMap.end ()) { if (weatherType.contains ("转" )) { int index = weatherType.indexOf ("转" ); if (weatherIconMap.find (weatherType.left (index)) == weatherIconMap.end ()) { days[i].mFileName = QString (":weather/images/cloud1.png" ); }else { days[i].mFileName = weatherIconMap[weatherType.left (index)]; } }else { days[i].mFileName = QString (":weather/images/cloud1.png" ); } } else { days[i].mFileName = weatherIconMap[weatherType]; } } } } }
作图被布局遮挡
如果用整个窗体控件的事件重载方式作图,作得图会被其他控件遮盖掉,需要专门在某个字控件上作图可以为它安装事件过滤器。
Graphics View架构
QPainter不能实现图件的选择、编辑、拖放、修改功能。
QGraphicsView 视图(管理): 关联场景可以让场景中的所有图形项可视化,view坐标左上点 (0,0)。
QGraphicsScene 场景(容器):可以管理多个图形项, scene坐标中心点 (0,0), 创建scene时放置位置的坐标是在scene坐标系中的坐标。
QGraphicsItem 图形项(图元):称为图元,支持鼠标事件响应等, 创建item时放置位置的坐标是在scene坐标系中的坐标。item坐标系原点是以创建item时原点坐在位置确定的(即item坐标原点在item中的相对位置关系在item创建时就固定了),之后设置item->setPos的位置时都是移动item坐标原点在scene中的位置。
QGraphicsView 和QGraphicsScene的坐标相互转化,view->mapToScene(viewPos), view->mapFromScene(scenePos)。
QGraphicsScene和QGraphicsItem的坐标相互转化, item->mapFromScene(scenePos), item->mapToScene(itemPos)
要想实现mouseMoveEvent,则需要在构造函数中添加setMouseTrack(true),直接得到监听事件。若是setMouseTrack(false),只有鼠标按下才会有mouseMove监听事件响应。
在Qt图形视图框架中,有三个主要的坐标系系统。我来详细解释它们的转换关系和获取点击位置坐标的方法。
三个坐标系的关系
1 图元坐标 (Item Coordinates) ←→ 场景坐标 (Scene Coordinates) ←→ 视图坐标 (View Coordinates)
1. 坐标系定义
图元坐标系 (Item Coordinates)
以图元自身的左上角为原点(0,0)
相对于图元自身的坐标系
不受图元位置、旋转、缩放影响
场景坐标系 (Scene Coordinates)
以场景的左上角为原点(0,0)
所有图元的共同参考系
图元的位置(pos())是相对于场景坐标系的
视图坐标系 (View Coordinates)
以视图窗口的左上角为原点(0,0)
像素单位,与显示设备相关
2. 转换方法
图元 ↔ 场景
cpp
1 2 3 4 5 6 7 8 QPointF scenePos = item->mapToScene (itemLocalPos); QPointF itemPos = item->mapFromScene (scenePos); QPointF itemScenePos = item->scenePos ();
场景 ↔ 视图
cpp
1 2 3 4 5 QPoint viewPos = view->mapFromScene (scenePos); QPointF scenePos = view->mapToScene (viewPos);
图元 ↔ 视图
cpp
1 2 3 4 5 QPoint viewPos = view->mapFromScene (item->mapToScene (itemLocalPos)); QPointF itemPos = item->mapFromScene (view->mapToScene (viewPos));
3. 获取点击位置的三种坐标
方法1:在视图的事件处理中获取
cpp
1 2 3 4 5 6 7 8 9 10 11 12 13 14 15 16 17 18 19 20 void MyView::mousePressEvent (QMouseEvent *event) QPoint viewPos = event->pos (); qDebug () << "视图坐标:" << viewPos; QPointF scenePos = mapToScene (viewPos); qDebug () << "场景坐标:" << scenePos; QGraphicsItem* clickedItem = scene ()->itemAt (scenePos, QTransform ()); if (clickedItem) { QPointF itemPos = clickedItem->mapFromScene (scenePos); qDebug () << "图元坐标:" << itemPos; qDebug () << "图元场景位置:" << clickedItem->scenePos (); qDebug () << "图元边界:" << clickedItem->boundingRect (); } }
方法2:在图元的事件处理中获取
cpp
1 2 3 4 5 6 7 8 9 10 11 12 13 14 15 16 17 18 19 void MyNode::mousePressEvent (QGraphicsSceneMouseEvent *event) QPointF itemPos = event->pos (); qDebug () << "图元坐标:" << itemPos; QPointF scenePos = event->scenePos (); qDebug () << "场景坐标:" << scenePos; QGraphicsView* view = scene ()->views ().first (); QPoint viewPos = view->mapFromScene (scenePos); qDebug () << "视图坐标:" << viewPos; QPoint screenPos = event->screenPos (); qDebug () << "屏幕坐标:" << screenPos; }
方法3:在场景的事件处理中获取
cpp
1 2 3 4 5 6 7 8 9 10 11 12 13 14 15 16 17 18 19 20 21 void MyScene::mousePressEvent (QGraphicsSceneMouseEvent *event) QPointF scenePos = event->scenePos (); qDebug () << "场景坐标:" << scenePos; QGraphicsItem* item = itemAt (scenePos, QTransform ()); if (item) { QPointF itemPos = item->mapFromScene (scenePos); qDebug () << "图元坐标:" << itemPos; } if (!views ().isEmpty ()) { QGraphicsView* view = views ().first (); QPoint viewPos = view->mapFromScene (scenePos); qDebug () << "视图坐标:" << viewPos; } }
图表
Qt图表使用QtCharts头文件, QtCharts基于QGraphicsView架构,核心组件是QChartView和QChart。
创建步骤 :
创建QChartView并添加到窗体中: QChartView是QChart视图组件类似于QGraphicsView
创建QChart: 一个图表包含:
数据序列
坐标轴
图例
图表标题
设置图表QChart, 例如标题,添加数据序列对象,设置X、Y轴的标签,图例等。
将QChart添加到QChartView
给序列对象添加数值
创建坐标轴QValueAxis与设置坐标轴以及添加到QChart中
图表添加序列chart->addSeries不能放在序列放在坐标轴的语句series->attachAxis(axisX)之后
在 Qt Charts 中,QValueAxis(数值坐标轴)和 QChartView(图表视图)的坐标系转换是数据可视化的关键操作。以下是它们之间的坐标转换方法及详细示例:
1. 坐标系简介
坐标系
描述
示例值
数据值坐标系 (QValueAxis)逻辑数据值(如 x=10.5, y=20.3)
(0.5, 3.2)
图表绘图区坐标系 (QChart::plotArea)相对于 QChart 的像素坐标(以绘图区左上角为原点)
(150.0, 200.0)
视图坐标系 (QChartView)相对于 QChartView 窗口的像素坐标
(300.0, 400.0)
2. 核心转换方法 (1) 数据值 → 图表像素坐标 (QChart::mapToPosition) 1 QPointF pixelPos = chart ()->mapToPosition (QPointF (xValue, yValue), series);
用途 :将数据点转换为图表绘图区内的像素坐标。参数 :
QPointF(xValue, yValue):数据值。series:关联的数据系列(用于确定坐标轴)。
(2) 图表像素坐标 → 数据值 (QChart::mapToValue) 1 QPointF dataValue = chart ()->mapToValue (QPointF (pixelX, pixelY), series);
用途 :将像素坐标转换回数据值。参数 :
QPointF(pixelX, pixelY):图表绘图区内的像素坐标。
(3) 图表像素坐标 → 视图像素坐标 (QChartView::mapFromScene) 1 QPoint viewPos = chartView->mapFromScene (pixelPos);
用途 :将图表绘图区的坐标转换为 QChartView 窗口坐标。
(4) 视图像素坐标 → 图表像素坐标 (QChartView::mapToScene) 1 QPointF pixelPos = chartView->mapToScene (viewPos);
(5) 屏幕像素坐标 1 QPointF posScreen = event->globalPosition ();
(6) 应用程序窗口像素坐标 1 QPointF posApp = event->scenePosition ();
(7) 视图像素坐标 1 QPointF posView = event->pos ();
3. 完整转换流程 (1) 数据值 → 视图坐标 1 2 3 4 5 QPointF pixelPos = chart ()->mapToPosition (QPointF (xValue, yValue), series); QPoint viewPos = chartView->mapFromScene (pixelPos);
(2) 视图坐标 → 数据值 1 2 3 4 5 QPointF pixelPos = chartView->mapToScene (mouseEvent->pos ()); QPointF dataValue = chart ()->mapToValue (pixelPos, series);
4. 实际应用示例 场景:鼠标悬停显示数据点值 1 2 3 4 5 6 7 8 9 10 11 12 13 14 void CustomChartView::mouseMoveEvent (QMouseEvent* event) QPointF pixelPos = mapToScene (event->pos ()); QPointF dataValue = chart ()->mapToValue (pixelPos, m_series); qDebug () << "Data value at cursor:" << dataValue; QPointF verifyPos = chart ()->mapToPosition (dataValue, m_series); qDebug () << "Back to pixel:" << verifyPos; }
场景:在指定数据点绘制标记 1 2 3 4 5 6 7 8 9 10 11 12 13 14 15 void CustomChartView::paintEvent (QPaintEvent* event) QChartView::paintEvent (event); QPainter painter (viewport()) ; painter.setRenderHint (QPainter::Antialiasing); QPointF dataPoint (2.0 , 4.0 ) ; QPointF pixelPos = chart ()->mapToPosition (dataPoint, m_series); QPoint viewPos = mapFromScene (pixelPos).toPoint (); painter.setPen (QPen (Qt::red, 2 )); painter.drawEllipse (viewPos, 10 , 10 ); }
5. 关键注意事项
坐标系原点差异 :
QChart::plotArea() 的原点是绘图区的左上角。QChartView 的原点是整个窗口的左上角。
坐标轴关联 :
多系列图表需确保 mapToPosition 和 mapToValue 使用正确的 QAbstractSeries* 参数。
动态更新 :
缩放或平移图表后,需重新计算坐标:1 2 connect (chart ()->axes (Qt::Horizontal).first (), &QValueAxis::rangeChanged, this , &CustomChartView::updateCoordinates);
高DPI屏幕适配 :
启用高DPI缩放以避免坐标偏移:1 QGuiApplication::setAttribute (Qt::AA_EnableHighDpiScaling);
6. 转换关系图 1 2 3 4 5 Data Values (QValueAxis) ⇅ mapToValue / mapToPosition Chart Pixel Coordinates (QChart::plotArea) ⇅ mapToScene / mapFromScene View Pixel Coordinates (QChartView)
通过以上方法,可以精准实现 QValueAxis 和 QChartView 之间的坐标转换,满足交互式图表开发需求。
一、模型-视图
在 Qt 框架中,标准项模型(Standard Item Model) 是一种通用的数据模型,用于表示树形或列表结构的数据。它是 QStandardItemModel 类的实现,属于 Qt 的模型-视图架构的一部分。标准项模型提供了一种简单而灵活的方式来存储和操作数据,并与视图组件(如 QTreeView、QListView 或 QTableView)结合使用。
二、核心功能
模型-视图架构 :
Qt 的模型-视图架构将数据(模型)与用户界面(视图)分离。
模型负责管理数据,视图负责显示数据,两者通过信号槽机制进行交互。
QStandardItemModel 是一个实现了 QAbstractItemModel 接口的具体模型类。
标准项模型的特点 :
它是一个通用的、可扩展的数据模型,支持树形结构和表格结构。
数据项由 QStandardItem 对象表示,每个项可以包含文本、图标、工具提示等信息。
支持动态添加、删除和修改数据项。
适用场景 :
需要快速构建简单的树形或表格视图。
数据量较小且不需要复杂的自定义逻辑。
适合原型开发或小型项目。
柱状图
QBarSet 是 Qt 中的一个类,用于在柱状图中表示一组相关数据。它通常与 QBarSeries 一起使用,以便将不同的数据集分组显示。
QBarSeries 是 Qt 中的一个类,用于在图表中表示一系列的数据点,以柱状图的形式展示。它继承自 QAbstractSeries 类,提供了绘制柱状图所需的基本功能。
QBarCategoryAxis 表示条形图横坐标,用于管理和显示条形图中的分类轴,其中每个条形图都属于特定的类别
饼状图
QPieSeries QPieSeries是一个用于创建和展示饼图的类。它提供了基本的饼图绘制功能,包括设置饼图的标签、数据和样式。用户可以通过实例化QPieSeries类并调用其方法来生成饼图。此外,QPieSeries还支持一些交互功能,如设置饼图的颜色、边框宽度等。
holeSize和pieSize范围0~1,否则显示不了饼状图。
QPieSlice QPieSlice是QPieSeries类中的一个重要组成部分,它代表饼图中的一个扇形区域。每个QPieSlice都有一个标签(label)、值(value)以及可选的颜色(color)。QPieSeries通过将数据分成多个QPieSlice来构建饼图,每个QPieSlice的角度与其值成正比。用户可以通过修改QPieSlice的属性来定制饼图中各个扇形的外观。
堆叠图
QBarSet 是 Qt 中的一个类,用于在柱状图中表示一组相关数据。它通常与 QBarSeries 一起使用,以便将不同的数据集分组显示。
QStackedBarSeries 是 Qt 中的一个类,用于在图表中表示一系列的数据点,以柱状图的形式展示。它继承自 QAbstractSeries 类,提供了绘制柱状图所需的基本功能。
QBarCategoryAxis 表示条形图横坐标,用于管理和显示条形图中的分类轴,其中每个条形图都属于特定的类别。
barSeries->setLabelsFormat("@value%")无法实现控制小数位数,只能通过setMath->append(QString::asprintf("%.1f", val).toDouble())实现。
百分比堆叠图
QPercentBarSeries中自带百分号无需setLabelsFormat(“@value%”)。
三维视图模块
Data Visualization的三维显示功能主要由三种三维图形来实现,分别是三维柱状图Q3DBars,三维空间散点Q3DScatter,三维曲面Q3DSurface.这三个类的父类都是QAbstract3DGraph,从QWindow继承而来。Q3DBars, Q3DScatter,Q3DSurface相当于Qt Charts中的QChart图表。
QBar3DSeries, QScatter3DSeries, QSurface3DSeries
QCategory3DAxis, QValue3DAxis
数据代理类就是序列与三维图像之间的翻译官,用于存储序列可调用的数据类。QBarDataProxy, QScatterDataProxy, QSurfaceDataProxy。数据代理下还有数据代理模型项(更细致的处理数据),QItemModelBarDataProxy,QItemModelScatterDataProxy, QHeightMapSurfaceDataProxy, QItemModelSurfaceDataProxy
1 2 3 4 5 #include <QtDataVisualization> using namespace QtDataVisualizationQ3DBars* bar = new Q3DBars; this ->createWindowContainer (bar);
需要使用QWidget::createWindowContainer()在代码中创建三维图表容器,没法在QDesigner中拖拉拽创建容器。
1 2 3 4 5 6 7 8 9 10 namespace QtDataVisualization { typedef QVector<QBarDataItem> QBarDataRow; typedef QList<QBarDataRow*> QBarDataArray; typedef QVector<QScatterDataItem> QScatterDataArray; typedef QVector<QSurfaceDataItem> QSurfaceDataRow; typedef QList<QSurfaceDataRow*> QSurfaceDataArray; }
Qt Data Visualization概述
Qt Data Visualization是Qt框架 中用于3D数据可视化的模块。它提供了一系列用于在3D空间中展示数据的类和组件。
主要组件
1. Q3DBars
用于创建3D柱状图的类。可以展示多个数据系列,支持自定义轴、主题和选择交互。
2. Q3DScatter
用于创建3D散点图的类。适合展示点云数据,支持点的大小和颜色自定义。
3. Q3DSurface
用于创建3D曲面图的类。适合展示连续变化的数据,支持高度图和颜色渐变。
4. QAbstract3DGraph
所有3D图表的基础抽象类。提供通用的3D图表属性和功能。
5. Q3DCamera
控制3D场景中的相机视角。可以设置视角位置、目标点和旋转角度。
6. Q3DTheme
定义3D图表的外观主题。包括颜色、字体、背景等视觉元素。
7. QValue3DAxis
表示3D图表中的数值轴。可以自定义范围、标签格式和刻度。
8. QCategory3DAxis
表示3D图表中的分类轴。用于显示非数值的类别标签。
9. QScatter3DSeries
表示3D散点图中的数据系列。包含数据项和样式属性。
10. QBar3DSeries
表示3D柱状图中的数据系列。包含数据项和样式属性。
11. QSurface3DSeries
表示3D曲面图中的数据系列。包含数据项和样式属性。
12. QCustom3DItem
允许在3D图表中添加自定义的3D对象。可以是简单的几何形状或复杂的3D模型。
基本用法
创建图表视图:
1 2 3 4 5 Q3DBars *graph = new Q3DBars (); QWidget *container = QWidget::createWindowContainer (graph); AI生成项目cpp 运行12
添加数据系列:
1 2 3 4 5 QBar3DSeries *series = new QBar3DSeries (); graph->addSeries (series); AI生成项目cpp 运行12
设置轴:
1 2 3 4 5 6 QValue3DAxis *axisX = new QValue3DAxis (); axisX->setTitle ("X Axis" ); graph->setAxisX (axisX); AI生成项目cpp 运行123
填充数据:
1 2 3 4 5 6 QBarDataArray *dataArray = new QBarDataArray; *dataArray << new QBarDataRow {1 , 2 , 3 }; series->dataProxy ()->addRow (dataArray); AI生成项目cpp 运行123
与其他模块的关系
Qt Data Visualization 模块与其他 Qt 模块有一定的依赖和协作关系,主要包括以下几个方面:
Qt Core
这是 Qt Data Visualization 的基础依赖模块,提供了核心的非 GUI 功能,如信号与槽机制、事件处理、字符串处理等。
所有 Qt Data Visualization 的类都依赖于 Qt Core 提供的功能。
Qt GUI
提供了基础的图形界面支持,包括窗口系统集成、OpenGL 上下文管理等。
Qt Data Visualization 的 3D 渲染依赖于 Qt GUI 模块提供的 OpenGL 功能。
Qt OpenGL
用于支持 3D 数据的渲染,Qt Data Visualization 通过 OpenGL 实现高效的数据可视化效果。
如果用户需要自定义渲染效果,可能需要直接使用 Qt OpenGL 模块。
Qt Widgets
如果需要在传统的 QWidget 应用程序中嵌入 3D 可视化组件(如 Q3DScatter、Q3DSurface 等),则需要依赖 Qt Widgets 模块。
例如,Q3DScatterWidgetItem 是一个可以嵌入到 QGraphicsScene 中的小部件。
Qt Quick
如果需要在 QML 中使用 Qt Data Visualization 的功能(如 Scatter3D、Surface3D 等 QML 类型),则需要依赖 Qt Quick 模块。
该模块提供了与 QML 集成的支持,使得在声明式 UI 中可以方便地使用 3D 数据可视化。
Qt Concurrent
虽然不是直接依赖,但在处理大量数据时,可能会使用 Qt Concurrent 模块进行并行计算,以提高数据处理的效率。
Qt Network
如果数据可视化需要从网络获取数据(如实时数据流),则可能需要使用 Qt Network 模块进行网络通信。
总结:Qt Core 和 Qt GUI ,并可选地结合 Qt Widgets 或 Qt Quick 来实现不同的 UI 集成方式。对于高级功能(如自定义渲染或并行计算),可能还需要其他模块的支持。
基本概念
3D图形类型(Q3DBars、Q3DScatter、Q3DSurface)
Q3DBars
Q3DScatter
Q3DSurface
数据代理(Data Proxy)
在 Qt Data Visualization 中,数据代理(Data Proxy) 是一个中间层,用于管理和转换原始数据,使其能够被可视化组件(如3D图表)正确渲染。它的主要作用是为数据提供一种抽象,允许在不直接修改原始数据的情况下,对数据进行过滤、排序或转换。
核心功能
数据转换 :将原始数据转换为适合可视化的格式(例如,将数值映射到3D坐标系中的点)。数据过滤 :根据条件筛选数据,仅传递符合要求的数据到可视化组件。动态更新 :当原始数据发生变化时,代理可以自动通知可视化组件更新。
常见用途
在 3D散点图(Scatter3D) 或 3D柱状图(Bar3D) 中,代理可以将行/列数据转换为坐标点或柱子。
支持对大数据集进行动态加载或分页处理,提升性能。
示例代码片段
1 2 3 4 5 6 7 8 9 10 class CustomDataProxy : public QScatterDataProxy { Q_OBJECT public : explicit CustomDataProxy (QObject *parent = nullptr ) void updateData (const QList<QVector3D> &newData) }; AI生成项目cpp 运行1234567
注意事项
代理通常与 数据项(Data Item) 配合使用,例如 QScatterDataItem 或 QBarDataItem。
性能敏感场景中,需注意代理的数据处理效率,避免阻塞主线程。
通过数据代理,开发者可以更灵活地控制数据流向和表现形式,而无需直接操作底层数据结构。
类与接口
QAbstract3DGraph
QAbstract3DGraph是Qt Data Visualization模块中的基类,用于表示3D图表的基本功能。它提供了3D图表共有的属性和方法,是其他具体图表类型(如Q3DBars、Q3DScatter和Q3DSurface)的父类。
主要功能
场景管理 :管理3D场景的渲染和显示。坐标轴 :提供对X、Y、Z轴的控制,包括范围、标签和格式。渲染和性能 :控制渲染质量、抗锯齿等性能相关设置。主题和样式 :支持自定义图表的外观,如颜色、字体等。相机和视角 :控制观察视角和相机位置。
常用属性
activeTheme:当前应用的图表主题。shadowQuality:阴影质量设置。selectionMode:图表中数据点的选择模式。aspectRatio:图表的宽高比。horizontalAspectRatio:水平方向的比例。
常用方法
addCustomItem():向图表添加自定义项。removeCustomItem():移除自定义项。setOrthoProjection():设置是否使用正交投影。setSelectionMode():设置选择模式(如无选择、单项选择等)。
信号
activeInputHandlerChanged:当活动的输入处理器改变时触发。activeThemeChanged:当主题改变时触发。aspectRatioChanged:当宽高比改变时触发。
注意事项
QAbstract3DGraph是抽象类,不能直接实例化。需要使用其子类(如Q3DBars)来创建具体的图表。在使用前,确保正确初始化了Qt Data Visualization模块(如调用QApplication::setAttribute(Qt::AA_EnableHighDpiScaling))。
Q3DScene类
Q3DScene是Qt Data Visualization模块中的一个核心类,用于管理3D场景的属性和状态。它作为3D图表的容器,负责处理场景中的各种元素,如相机、灯光、视口等。
主要功能
场景管理 :维护3D场景的整体状态和属性。视口设置 :控制场景的显示区域和大小。相机控制 :管理观察场景的视角和投影方式。灯光配置 :设置场景中的光源位置和属性。选择处理 :管理场景中的对象选择行为。
常用属性
activeCamera:获取或设置当前活动的相机。activeLight:获取或设置当前活动的光源。devicePixelRatio:设备像素比例,用于高DPI显示。selectionQueryPosition:查询选择位置。viewport:场景的视口矩形。
常用方法
setSelectionQueryPosition(const QPoint &position):设置选择查询的位置。invalidateSelection():使当前选择无效。setSlicingActive(bool isSlicing):设置是否启用切片模式。
信号
activeCameraChanged(Q3DCamera *camera):当活动相机改变时触发。activeLightChanged(Q3DLight *light):当活动光源改变时触发。devicePixelRatioChanged(float pixelRatio):当设备像素比例改变时触发。selectionQueryPositionChanged(const QPoint &position):当选择查询位置改变时触发。viewportChanged(const QRect &viewport):当视口改变时触发。
使用示例
1 2 3 4 5 6 7 8 9 10 11 12 13 14 15 16 17 18 Q3DScene *scene = new Q3DScene (); scene->setViewport (QRect (0 , 0 , 800 , 600 )); Q3DCamera *camera = scene->activeCamera (); camera->setCameraPosition (QVector3D (0 , 0 , 500 )); connect (scene, &Q3DScene::viewportChanged, [](const QRect &viewport) { qDebug () << "Viewport changed to:" << viewport; }); AI生成项目cpp 运行 1234567891011121314
Q3DTheme类
Q3DTheme 是 Qt Data Visualization 模块中的一个类,用于定义3D图表(如柱状图、散点图、曲面图等)的视觉样式。它允许你自定义图表的颜色、字体、背景等属性,以创建符合应用需求的统一外观。
主要功能
颜色设置 :控制图表中不同元素的颜色,如背景、网格线、标签、高亮等。字体设置 :定义图表中文本的字体样式。光照效果 :调整3D图表的光照参数,影响阴影和高光的表现。背景渐变 :设置背景的渐变颜色,增强视觉效果。
常用属性
ambientLightStrength:环境光强度,影响整体亮度。backgroundColor:图表背景颜色。baseColors:图表中数据系列的基础颜色列表。gridLineColor:网格线颜色。labelBackgroundColor:标签背景颜色。labelTextColor:标签文本颜色。lightStrength:光源强度,影响阴影和高光。multiHighlightColor:多选高亮颜色。singleHighlightColor:单选高亮颜色。windowColor:窗口背景颜色。
示例代码
1 2 3 4 5 6 7 8 9 10 11 12 13 14 15 Q3DTheme *theme = new Q3DTheme (); theme->setAmbientLightStrength (0.5f ); theme->setBackgroundColor (Qt::white); theme->setGridLineColor (Qt::gray); theme->setLabelTextColor (Qt::black); graph->setActiveTheme (theme); AI生成项目cpp 运行 1234567891011
注意事项
Q3DTheme 通常与 Q3DBars、Q3DScatter 或 Q3DSurface 等图表类一起使用。修改主题属性会立即反映在关联的图表上。
Qt 提供了一些内置主题(如 Q3DTheme::ThemeQt),可以直接使用。
通过 Q3DTheme,你可以轻松实现图表样式的统一管理和自定义,提升用户体验。
数据处理
数据的输入与输出
在Qt Data Visualization中,数据的输入与输出主要涉及如何将数据加载到可视化组件中以及如何从可视化组件中获取数据。
数据输入
数据源 :通常使用Q3DScatter、Q3DBars或Q3DSurface等类来创建可视化组件,并通过这些类的接口输入数据。数据格式 :数据可以以数组、列表或自定义数据结构的形式提供。例如,使用QScatter3DSeries的dataProxy()方法设置数据代理,然后通过addItem()或setArray()方法添加数据点。动态更新 :支持动态更新数据,可以通过addItem()或removeItem()等方法实时修改数据。
数据输出
数据获取 :可以通过dataProxy()方法获取当前的数据代理,进而访问数据点。例如,使用itemAt()方法获取特定位置的数据点。导出功能 :支持将可视化结果导出为图像(如PNG或JPEG),使用grabFramebuffer()方法捕获当前视图。日志与调试 :可以通过Qt的日志系统输出数据状态,便于调试。
注意事项
数据输入时需要确保数据格式与可视化组件的要求匹配,否则可能导致渲染错误。
动态更新数据时,频繁操作可能影响性能,建议批量更新。
数据的更新与动态显示
在Qt Data Visualization中,数据的更新与动态显示是指如何在运行时修改数据并实时更新可视化图表。这通常用于需要动态展示变化数据的场景,如实时监控或数据流可视化。
关键概念
数据序列(Data Series) :
数据序列是存储数据点的容器,例如QScatter3DSeries、QBar3DSeries或QSurface3DSeries。
通过修改数据序列中的数据点,可以实现数据的动态更新。
数据代理(Data Proxy) :
数据代理(如QBarDataProxy或QSurfaceDataProxy)是数据序列与实际数据之间的桥梁。
通过调用数据代理的方法(如resetArray()或setRow())可以批量或逐点更新数据。
动态更新方法 :
直接替换数据 :通过setDataArray()或resetArray()一次性替换整个数据集。逐点更新 :通过setItem()或insertRow()等方法修改或添加单个数据点。
性能优化 :
对于频繁更新的场景,建议使用QML或OpenGL加速渲染。
批量更新数据比逐点更新更高效,尤其是在数据量较大时。
示例代码片段
1 2 3 4 5 6 7 8 9 10 11 12 13 14 QBarDataArray *dataArray = new QBarDataArray; QBarDataRow *dataRow = new QBarDataRow; *dataRow << 1.0 << 2.0 << 3.0 ; dataArray->append (dataRow); barSeries->dataProxy ()->resetArray (dataArray); AI生成项目cpp 运行 12345678910
注意事项
动态更新数据时,可能需要调用series->setMeshRotation()或chart->scene()->activeCamera()->setCameraPosition()来调整视角。
频繁更新数据时,注意避免界面卡顿,可以通过Qt的信号槽机制或定时器控制更新频率。
通过以上方法,可以实现Qt Data Visualization中数据的动态更新与实时显示。
图形设置
外观定制(颜色、材质等)
在Qt Data Visualization中,外观定制允许你调整3D数据可视化 的视觉表现,包括颜色、材质、光照等属性。这些定制选项可以应用于数据系列、坐标轴、背景等元素。
颜色定制
数据系列颜色 :可以为不同的数据点或数据系列设置不同的颜色。例如,在散点图中,每个点可以有不同的颜色。渐变颜色 :可以使用渐变颜色来表示数据的变化,例如从冷色到暖色表示数值的高低。主题颜色 :Qt Data Visualization提供了内置的主题(如QtTheme、PrimaryColorsTheme等),你可以直接使用或基于这些主题进行自定义。
材质定制
数据点材质 :可以为数据点设置材质属性,例如反射率、光泽度等。材质属性影响数据点在光照下的表现。表面材质 :在3D表面图中,可以设置表面的材质属性,例如粗糙度或金属感。
其他外观定制
光照效果 :可以调整光源的位置、强度和颜色,以改变3D场景的明暗和阴影效果。背景和网格线 :可以自定义背景颜色、网格线颜色和透明度,使图表更符合你的设计需求。
示例代码片段
1 2 3 4 5 6 7 8 9 10 11 12 13 14 15 16 QBar3DSeries *series = new QBar3DSeries; series->setBaseColor (Qt::blue); QLinearGradient gradient; gradient.setColorAt (0.0 , Qt::black); gradient.setColorAt (1.0 , Qt::white); series->setBaseGradient (gradient); series->setMeshSmooth (true ); AI生成项目cpp 运行 123456789101112
通过这些定制选项,你可以创建出符合特定需求或品牌风格的3D数据可视化效果。
布局与尺寸调整
概述
在Qt Data Visualization中,布局与尺寸调整是指控制3D数据可视化组件(如Q3DBars、Q3DScatter、Q3DSurface等)及其子元素(坐标轴、图例、标题等)在容器中的位置和大小的机制。通过调整布局参数,可以优化可视化效果的空间利用率。
关键概念
容器尺寸
边距(Margins)
自动调整模式
setAspectRatio():控制3D场景的宽高比(如Qt::AspectRatioMode::KeepAspectRatio)。setHorizontalAspectRatio():仅水平方向的比例调整(适用于Q3DScatter)。
子元素布局
坐标轴 :通过axisX()->setTitle()等设置标题位置,或setLabelAutoRotation调整标签方向。图例 :使用legend->setPosition(Qt::AlignmentFlag)控制位置(如Qt::AlignRight)。
注意事项
动态调整时需考虑性能,频繁重绘可能影响交互流畅度。
部分属性(如边距)可能受主题(Theme)预设值影响,需在设置主题后覆盖。
交互功能
用户交互方式(鼠标、键盘等)
在 Qt Data Visualization 模块中,用户可以通过 鼠标 和 键盘 与 3D 数据可视化图表进行交互,以调整视角、缩放或选择数据点等操作。
鼠标交互
旋转视图 :
按住鼠标左键并拖动,可以旋转 3D 图表,改变观察角度。
适用于 Q3DScatter、Q3DBars 和 Q3DSurface 等图表类型。
缩放视图 :
使用鼠标滚轮上下滚动,可以放大或缩小图表。
也可以通过按住鼠标右键并上下拖动实现缩放。
平移视图 :
按住鼠标中键(滚轮键)并拖动,可以平移图表。
在触控板上,可能支持双指滑动实现平移。
选择数据点 :
单击某个数据点(如散点图中的点或柱状图中的柱子),可以选中该数据点,并触发相关信号(如 selectedElementChanged)。
键盘交互
旋转视图 :
使用方向键(↑、↓、←、→)可以微调图表的旋转角度。
缩放视图 :
重置视图 :
切换显示模式 :
在某些图表类型中,键盘快捷键可以切换显示模式(如切换为平面投影或透视视图)。
自定义交互行为
可以通过编程方式禁用或调整交互行为:
1 2 3 4 5 6 7 8 9 10 11 graph->setRotationEnabled (false ); graph->setZoomEnabled (false ); graph->setSelectionEnabled (false ); AI生成项目cpp 运行12345678
这些交互方式使用户能够直观地探索和分析 3D 数据,提升数据可视化的灵活性。
交互事件处理
在Qt Data Visualization中,交互事件处理允许用户与3D数据可视化图表进行交互。主要包括以下几种交互方式:
旋转
用户可以通过鼠标拖动来旋转3D图表
旋转轴心和速度可以配置
通过Q3DScene::setSelectionQueryPosition()可以设置旋转的中心点
缩放
通过鼠标滚轮或手势进行缩放
缩放级别可以通过Q3DInputHandler控制
可以设置最小/最大缩放限制
选择
点击数据项可以选中
选中项会高亮显示
通过QAbstract3DGraph::selectedSeries()获取选中的系列
平移
按住鼠标右键拖动可以平移视图
平移范围可以通过边界限制
在移动设备上支持触摸平移
事件处理机制
继承自QWidget的标准事件系统
可以重写mousePressEvent(), mouseMoveEvent()等
通过Q3DInputHandler类集中管理输入事件
自定义交互
可以继承Q3DInputHandler创建自定义交互
通过信号/槽机制响应交互事件
可以禁用特定交互方式
交互事件处理使数据可视化更具动态性和用户友好性,是Qt Data Visualization的重要功能之一。
应用案例
简单示例程序
在Qt Data Visualization中,一个简单的示例程序通常包含以下几个基本步骤:
包含必要的头文件
1 2 3 4 #include <QtDataVisualization> AI生成项目cpp 运行1
创建QApplication对象 QApplication对象:
1 2 3 4 5 int main (int argc, char **argv) QApplication app (argc, argv) ; AI生成项目cpp 运行12
创建3D图表对象 Q3DBars、Q3DScatter或Q3DSurface等类来创建3D图表:
1 2 3 4 QtDataVisualization::Q3DBars bars; AI生成项目cpp 运行1
设置图表属性
1 2 3 4 5 6 7 bars.setTitle ("Simple Bar Chart Example" ); bars.rowAxis ()->setTitle ("Row" ); bars.columnAxis ()->setTitle ("Column" ); bars.valueAxis ()->setTitle ("Value" ); AI生成项目cpp 运行1234
创建数据代理 QBarDataProxy等数据代理类来管理数据:
1 2 3 4 QtDataVisualization::QBarDataProxy *proxy = new QtDataVisualization::QBarDataProxy; AI生成项目cpp 运行1
填充数据
1 2 3 4 5 6 7 8 QtDataVisualization::QBarDataArray *dataArray = new QtDataVisualization::QBarDataArray; QtDataVisualization::QBarDataRow *dataRow = new QtDataVisualization::QBarDataRow; *dataRow << 1.0f << 2.0f << 3.0f ; dataArray->append (dataRow); proxy->resetArray (dataArray); AI生成项目cpp 运行12345
将代理设置到图表
1 2 3 4 5 QtDataVisualization::QBar3DSeries *series = new QtDataVisualization::QBar3DSeries (proxy); bars.addSeries (series); AI生成项目cpp 运行12
显示图表
1 2 3 4 bars.show (); AI生成项目cpp 运行1
运行应用程序
1 2 3 4 return app.exec ();AI生成项目cpp 运行1
完整示例代码:
1 2 3 4 5 6 7 8 9 10 11 12 13 14 15 16 17 18 19 20 21 22 23 24 25 26 27 #include <QtDataVisualization> #include <QApplication> int main (int argc, char **argv) QApplication app (argc, argv) ; QtDataVisualization::Q3DBars bars; bars.setTitle ("Simple Bar Chart Example" ); bars.rowAxis ()->setTitle ("Row" ); bars.columnAxis ()->setTitle ("Column" ); bars.valueAxis ()->setTitle ("Value" ); QtDataVisualization::QBarDataProxy *proxy = new QtDataVisualization::QBarDataProxy; QtDataVisualization::QBarDataArray *dataArray = new QtDataVisualization::QBarDataArray; QtDataVisualization::QBarDataRow *dataRow = new QtDataVisualization::QBarDataRow; *dataRow << 1.0f << 2.0f << 3.0f ; dataArray->append (dataRow); proxy->resetArray (dataArray); QtDataVisualization::QBar3DSeries *series = new QtDataVisualization::QBar3DSeries (proxy); bars.addSeries (series); bars.show (); return app.exec (); }
这个简单示例创建了一个包含3个柱状条的3D柱状图,每个柱状条的高度分别为1.0、2.0和3.0。
数据库
Qt SQL模块包含多个类,实现数据库的连接,SQL语句执行,数据获取与界面显示,数据与界面之间使用Model/View结构,方便实现数据的显示和操作。
ui组件QTableView通过QSqlTableModel访问连接数据库系统
代理delegate
QT实现了MVC (model–view–controller)模式,那么QT在操作控件的时候也就有三板斧了,View显示内容,Model提供数据(访问数据都靠其中的索引QModelIndex ),控制自然就是代理了,而且关键是代理,因为代理的作用是在数据模型和显示view之间架起了一座桥,足见其重要性。这里我们以QComboBox为列来说说代理。所有代理类的基类为QAbstractItemDelegate,这是抽象类不能用,但有QStyledItemDelegate可以直接使用,它则作为QT控件默认的代理类。我们来到QStyledItemDelegate类的头文件,这里面注释写得很清楚,哪些是要重写的一看就知道,用了 editing来标注,如下图:
1、createEditor:代理组件创建必要函数数据模型 中取出数据显示在控件中
关键语句说明 :
调用自定义代理对象
1 2 newCombboxDelegate combboxdelegate; ui->TableView->setItemDelegateForColumn (4 ,&combboxdelegate);
多线程程序
对于只有一个线程的程序,操作顺序执行,如果有某个比较耗时的计算cpu或操作IO,容易造成堵塞。
QThread类提供管理线程的方法:
一个对象管理一个线程。QThread threadA; 建立一个线程。
一般从QThread 继承一个自定义类,重载run函数。
启动线程 threadA.start();//开始执行重载的run函数
阻塞当前线程threadA.wait();//等threadA跑完后才能执行当前代码的后半部分
基于互斥量的线程同步
处理用信号与槽机制实现线程同步(主程序被动响应,请求式),也可以用互斥量实现同步(主程序主动询问,阻塞)。QMutex和QMutexLocker是基于互斥量的线程同步类,QMutex定义的实例是互斥量,提供三个函数:
lock():锁定互斥量,如果另一个线程锁定了这个互斥量,将阻塞直到另一个解锁。
unlock(): 解锁一个互斥量。
trylock(): 试图锁定一个互斥量,如果成功返回true;失败(其他线程已经锁定了这个互斥量)返回false,不阻塞线程。非阻塞版
注:只锁一个地方是无法起到互斥的,要锁两个地方,一个是修改处,一个是获取处。
QMutexLocker简化了QMutex处理互斥量:
构造函数接受一个互斥量作为参数,并将其锁定。QMutexLocker locker(&mutex);
析构函数解锁该互斥量。
1 2 3 4 5 6 7 8 9 10 11 12 13 14 15 16 17 18 19 20 21 22 23 24 25 26 27 28 29 30 31 32 33 34 35 36 37 38 39 40 41 42 43 44 45 46 47 48 49 50 51 52 53 54 55 56 57 58 59 60 void DiceThread::run () mStop = false ; mSeq = 0 ; srand (QTime::currentTime ().second ()); while (!mStop) { if (!mPause) { mMutex.lock (); mDiceValue = 100 ; msleep (50 ); mDiceValue = 200 ; msleep (50 ); mDiceValue = 300 ; msleep (50 ); mDiceValue = 400 ; msleep (50 ); mDiceValue = rand (); msleep (50 ); mDiceValue = rand ()%6 + 1 ; mSeq++; mMutex.unlock (); } msleep (1000 ); } quit (); } void DiceThread::readValue (int *seq, int *diceValue) QMutexLocker locker (&mMutex) ; *seq = mSeq; *diceValue = mDiceValue; } bool DiceThread::readValueBool (int *seq, int *diceValue) if (mMutex.tryLock ()) { *seq = mSeq; *diceValue = mDiceValue; mMutex.unlock (); return true ; } else { return false ; } }
基于QReadWriteLock的线程同步
使用互斥量时存在一个问题,每次只能有一个线程获得互斥量的权限。
如果多个线程读取某一个变量,就会出现排队现象。
有时应该允许让多个线程同时读取,互斥量会降低程序的性能。
QReadWriteLock提供几个主要函数:
lockForRead(): 只读方式锁定资源,如果有其他线程以写入方式锁定,这个函数会阻塞。
lockForWrite(): 以写入方式锁定资源,如果本线程或其他线程以读或写模式锁定资源,则函数堵塞。
unlock(): 解锁。
tryLockForRead(): 是lockForRead的非阻塞版
tryLockForWrite(): 是lockForWrite的非阻塞版
QReadLocker和QWriteLocker简化了QReadWriteLock处理互斥量形式,无需与unlock() 配对使用:
构造函数接受一个互斥量作为参数,并将其锁定。
析构函数解锁该互斥量。
1 2 3 4 5 6 7 8 9 QReadWriteLock lock; void threadDAQ::run () ... { QReadLocker locker (&lock) ; get_data_and_write_in_buffer (); } ... }
基于QWaitCondition的线程同步
痛点: 在一个线程解锁资源后,不能及时通知其他线程。(写完了,立即通知其他线程来读。)
QWaitCondition提供如下函数:
wait(QMutex* lockedMutex): 进入等待状态,解锁互斥量lockedMutex, 被唤醒后锁定lockedMutex并退出函数。即等待之前锁住互斥量,进入等待(解锁互斥量,被唤醒后锁住互斥量),括号中的是wait()函数要做的事。
wakeAll(): 唤醒所有处于等待状态的线程,线程唤醒的顺序不确定,由操作系统的调度策略决定。
wakeOne(): 唤醒一个处于等待状态的线程,唤醒哪一个线程不确定,由操作系统调度策略决定。
QWaitCondition一般用于“生产者/消费者”模型中。生产者:生产数据,消费者:使用数据。
等待发生在消费者身上, 生产者提供唤醒。
基于信号量的线程同步
信号量(Semaphore)通常用于保护一定数量 的相同资源 。例如数据采集时的双缓冲区。(缓冲区大小相同)
QSemaphore实现信号量功能的类,提供:
acquire(int n): 尝试获得n个资源,如果不够将阻塞 线程,直到n个资源可用。
release(int n): 释放资源,如果资源已经全部可用,则可扩充资源总数。
int available(): 返回当前信号量的资源个数。
bool tryAcquire(int n=1): 尝试获取n个资源,不成功时不阻 塞线程。

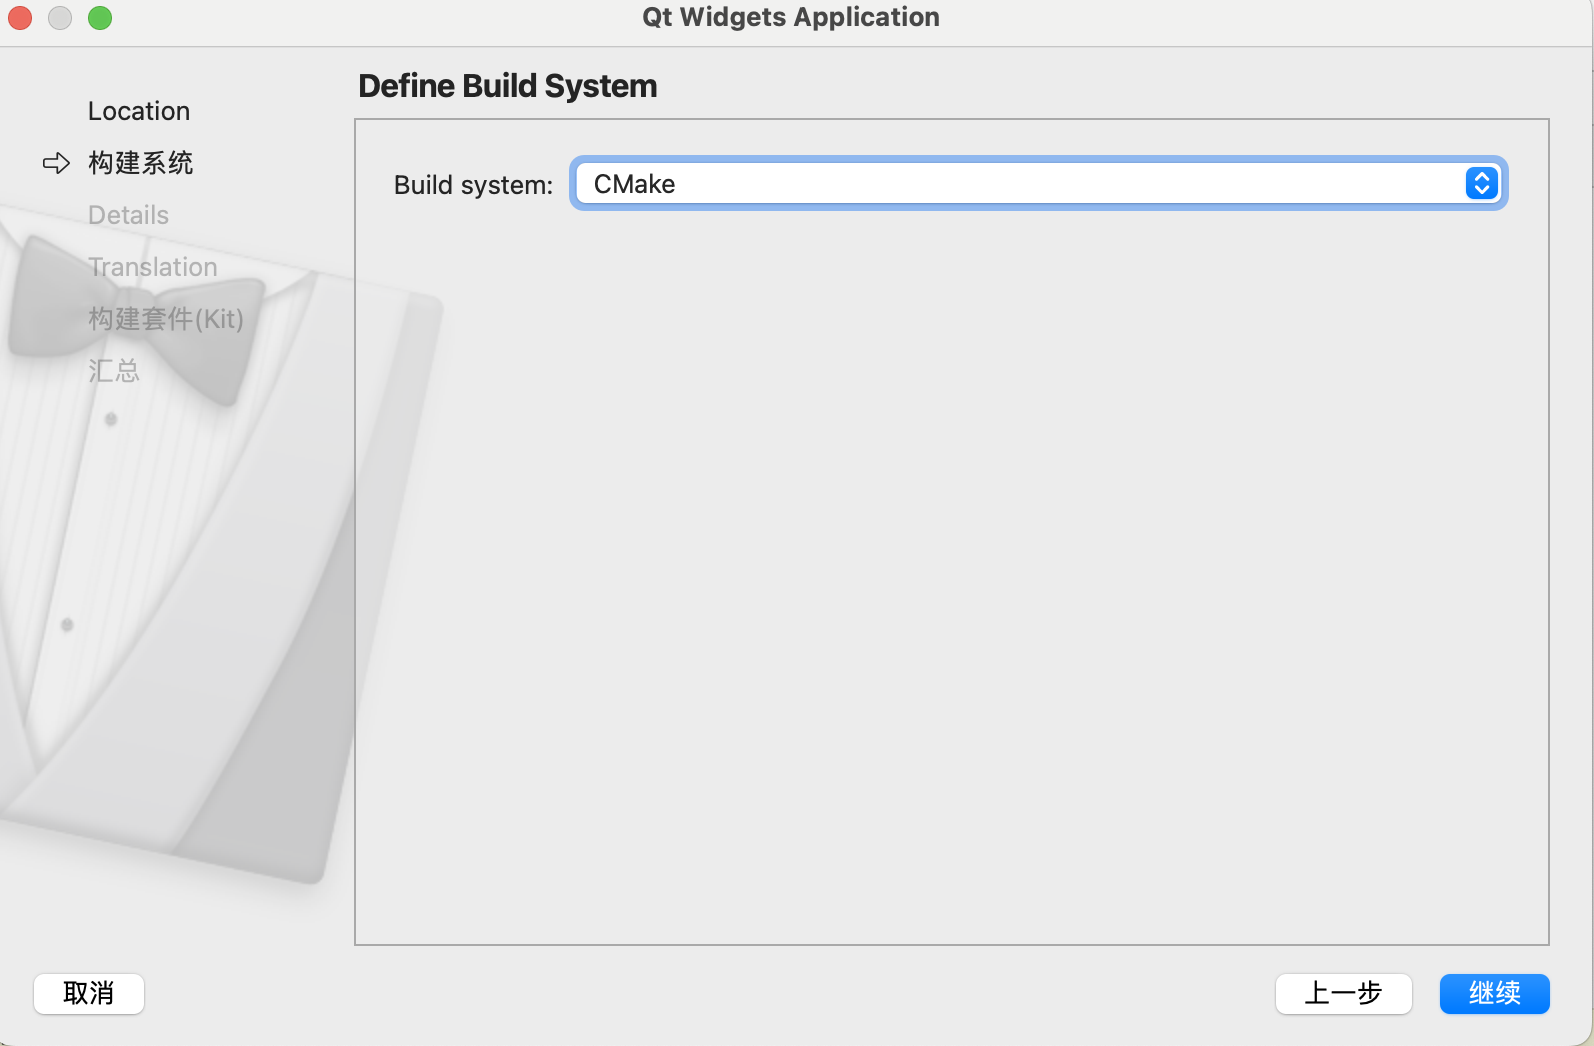

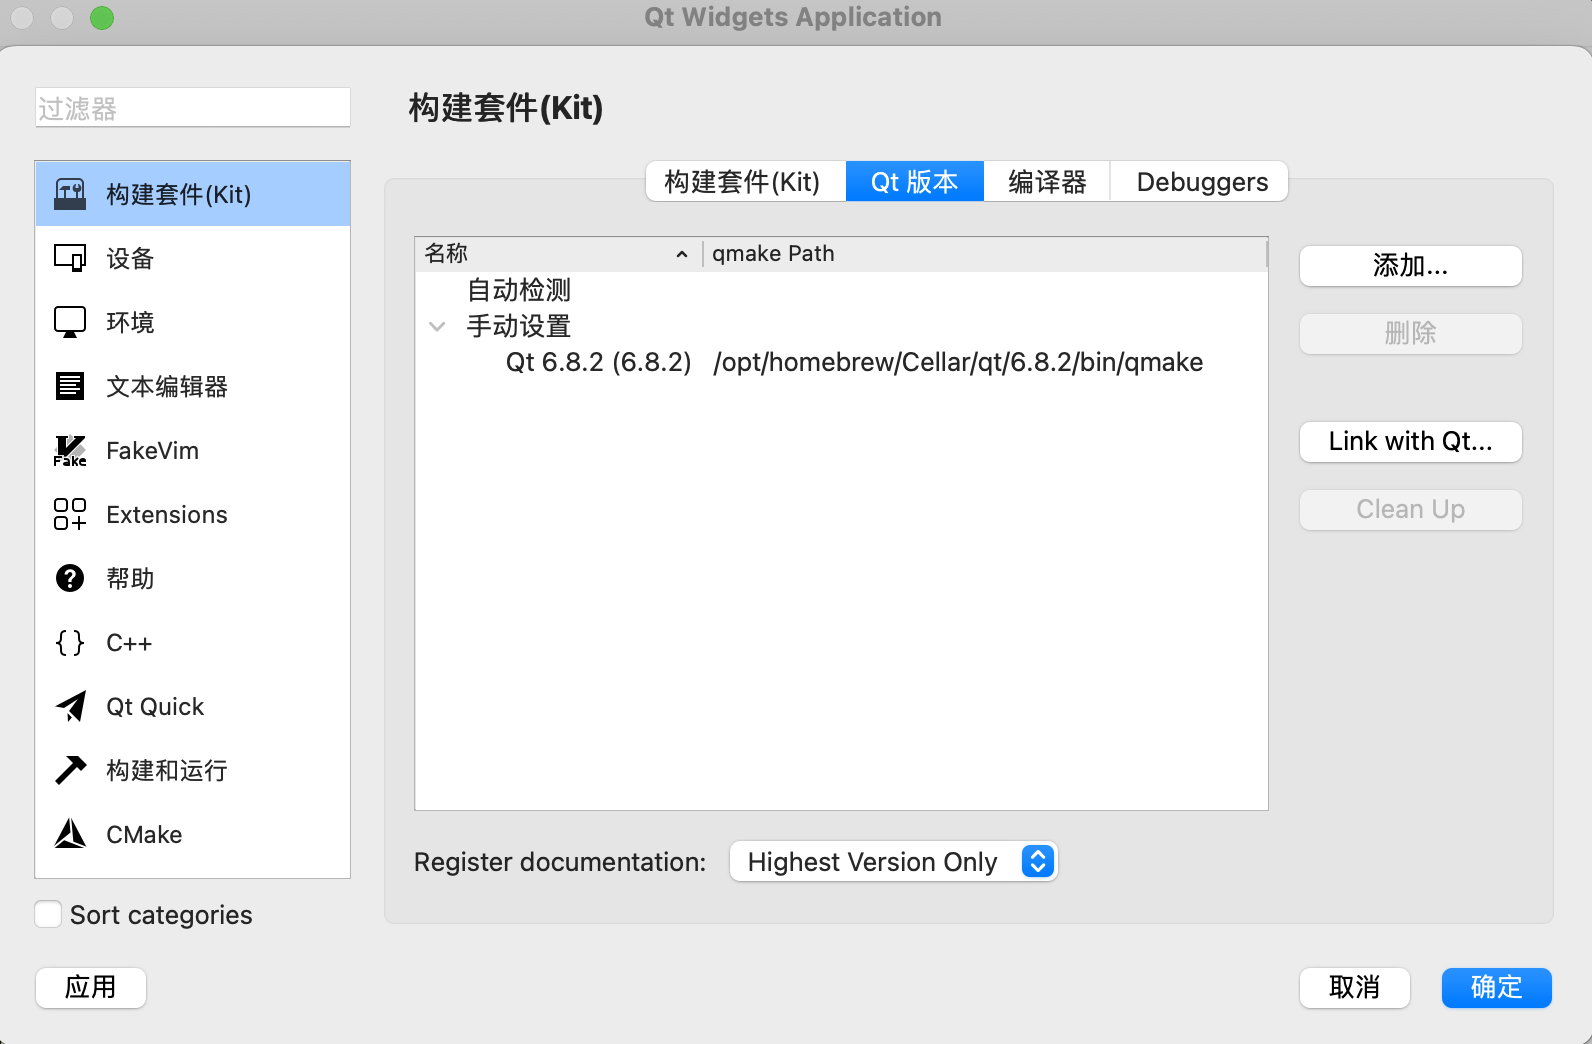
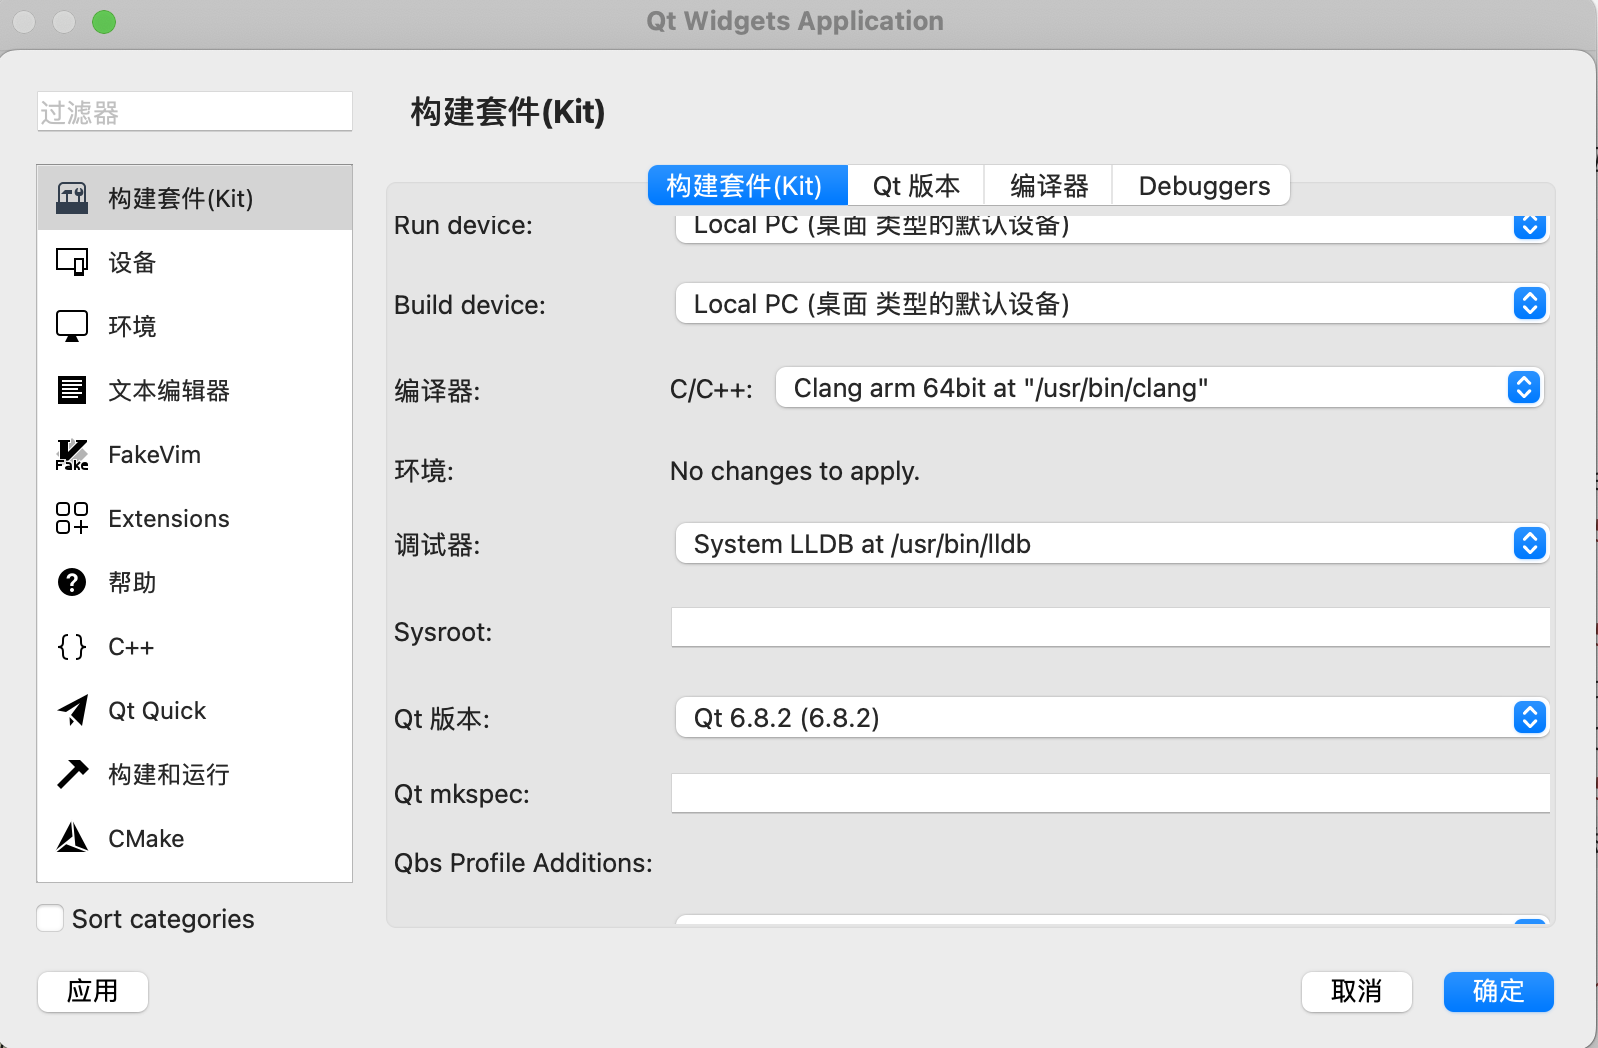
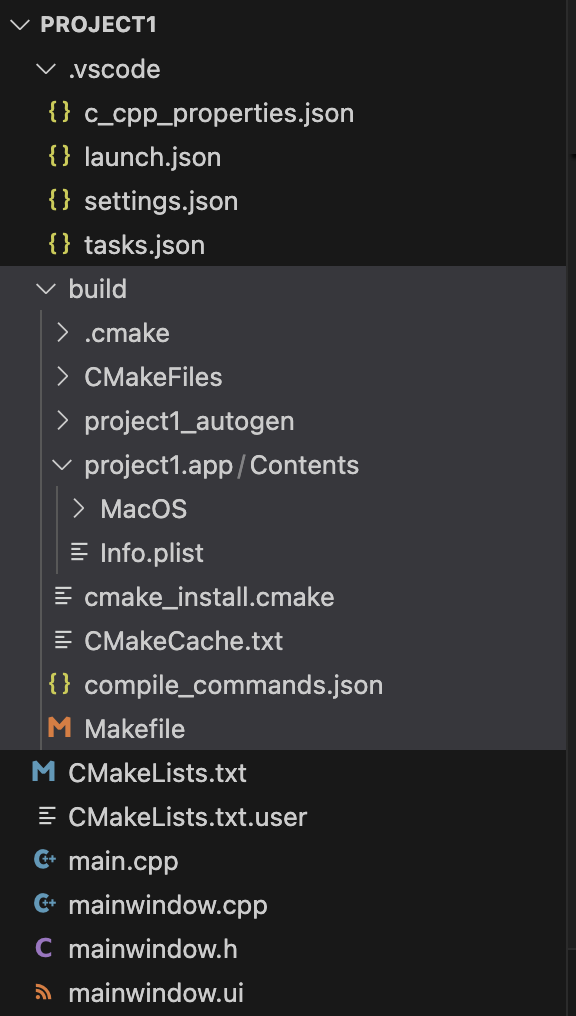
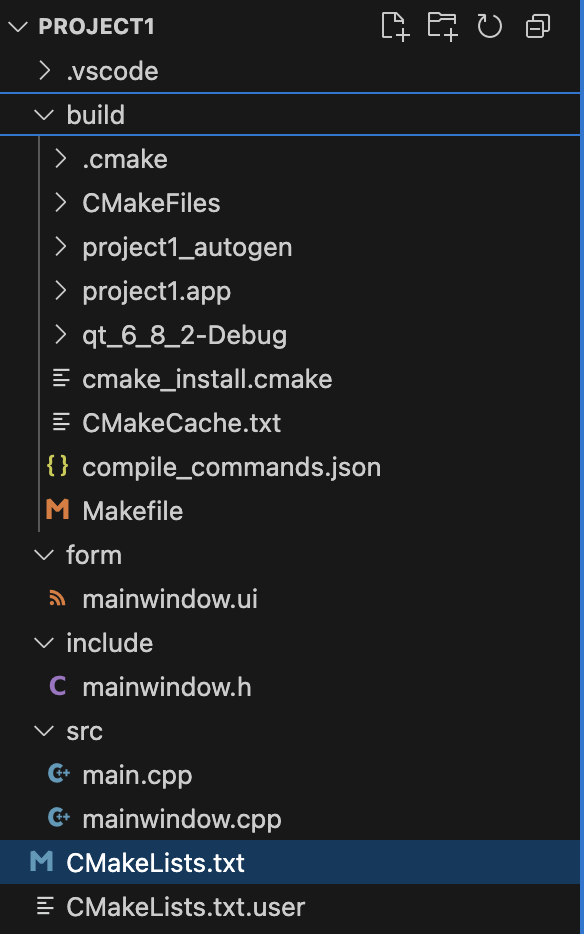
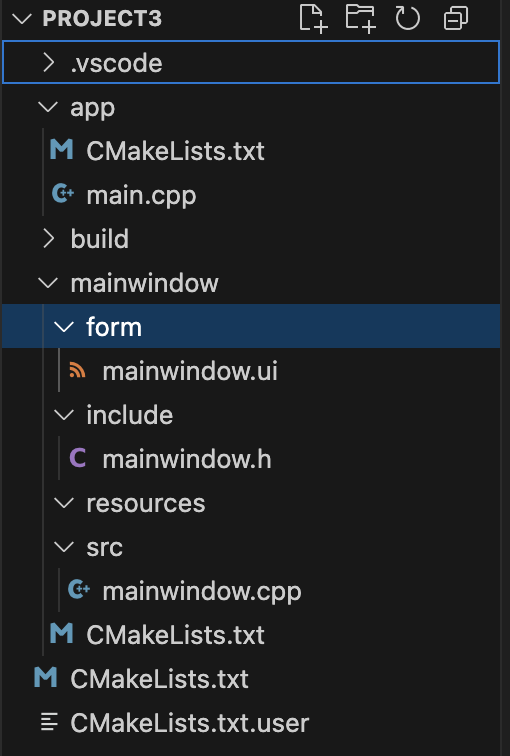
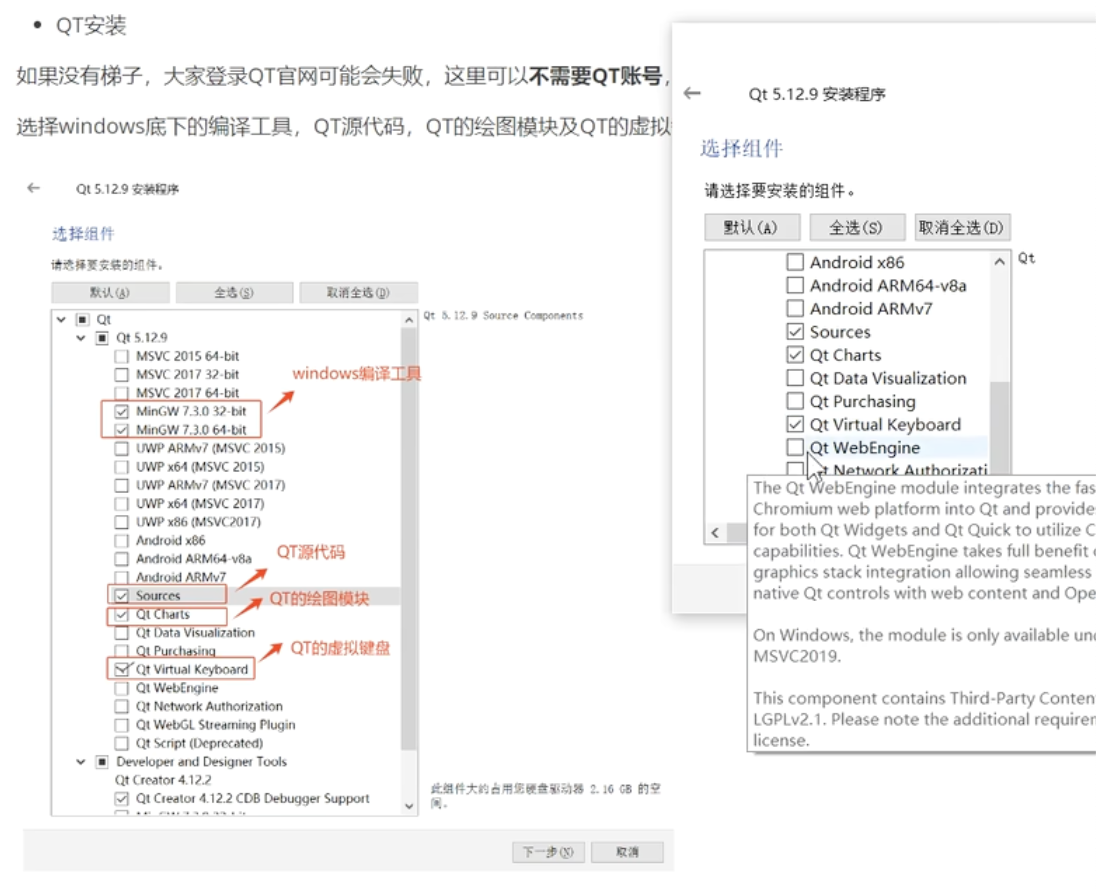

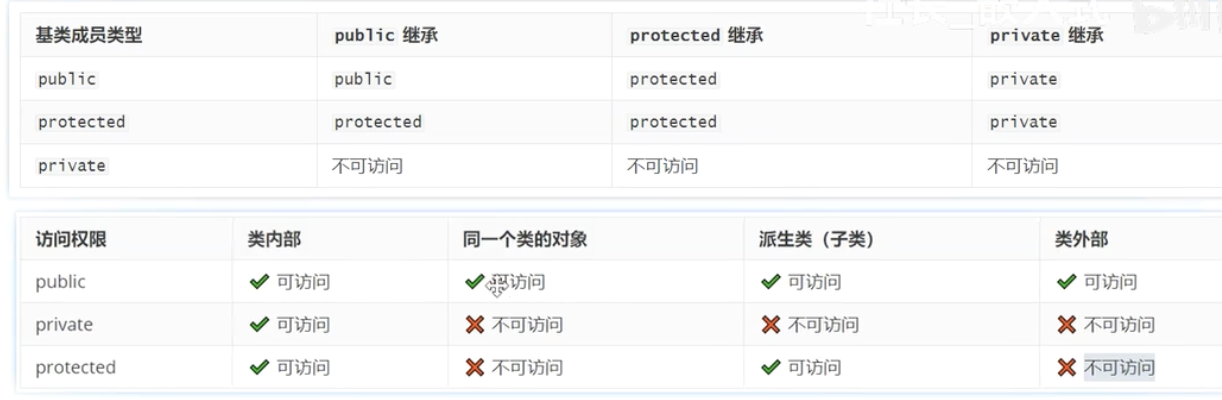
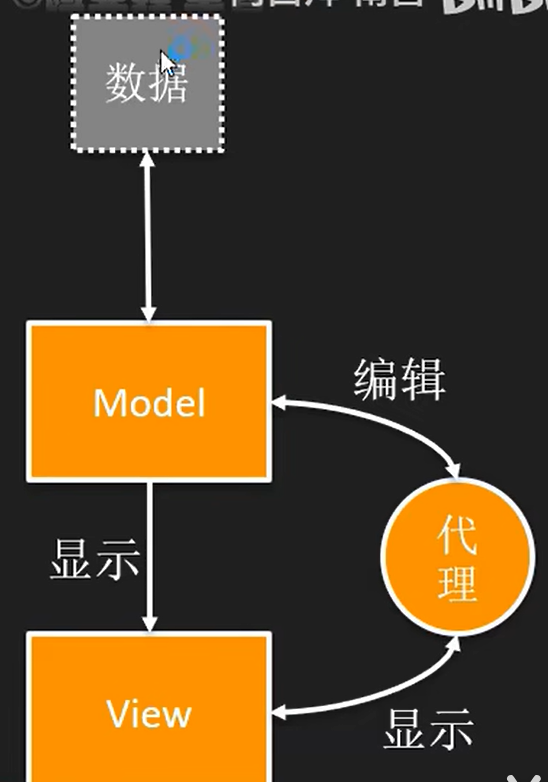
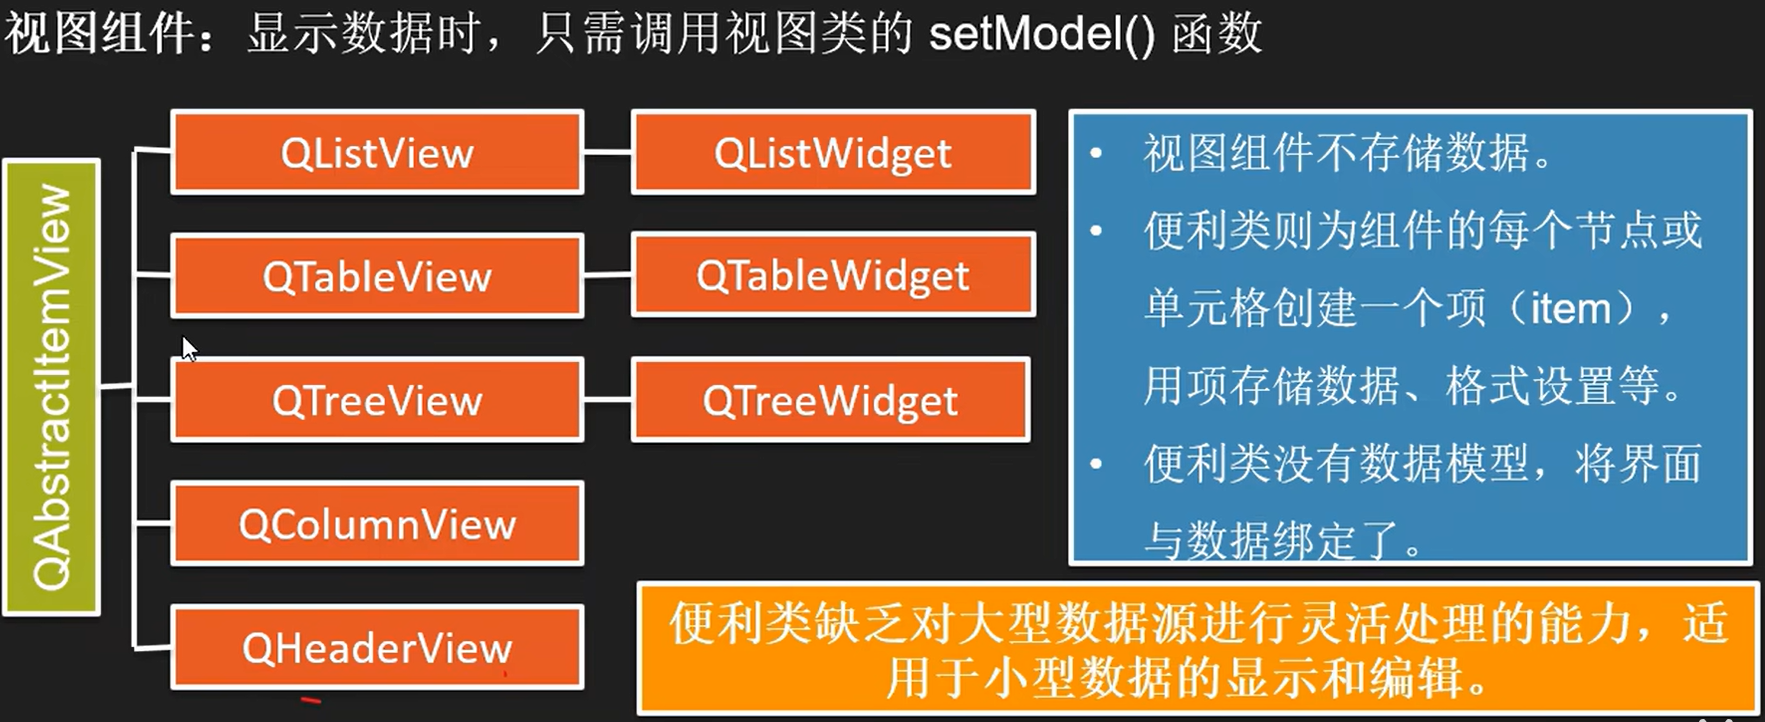
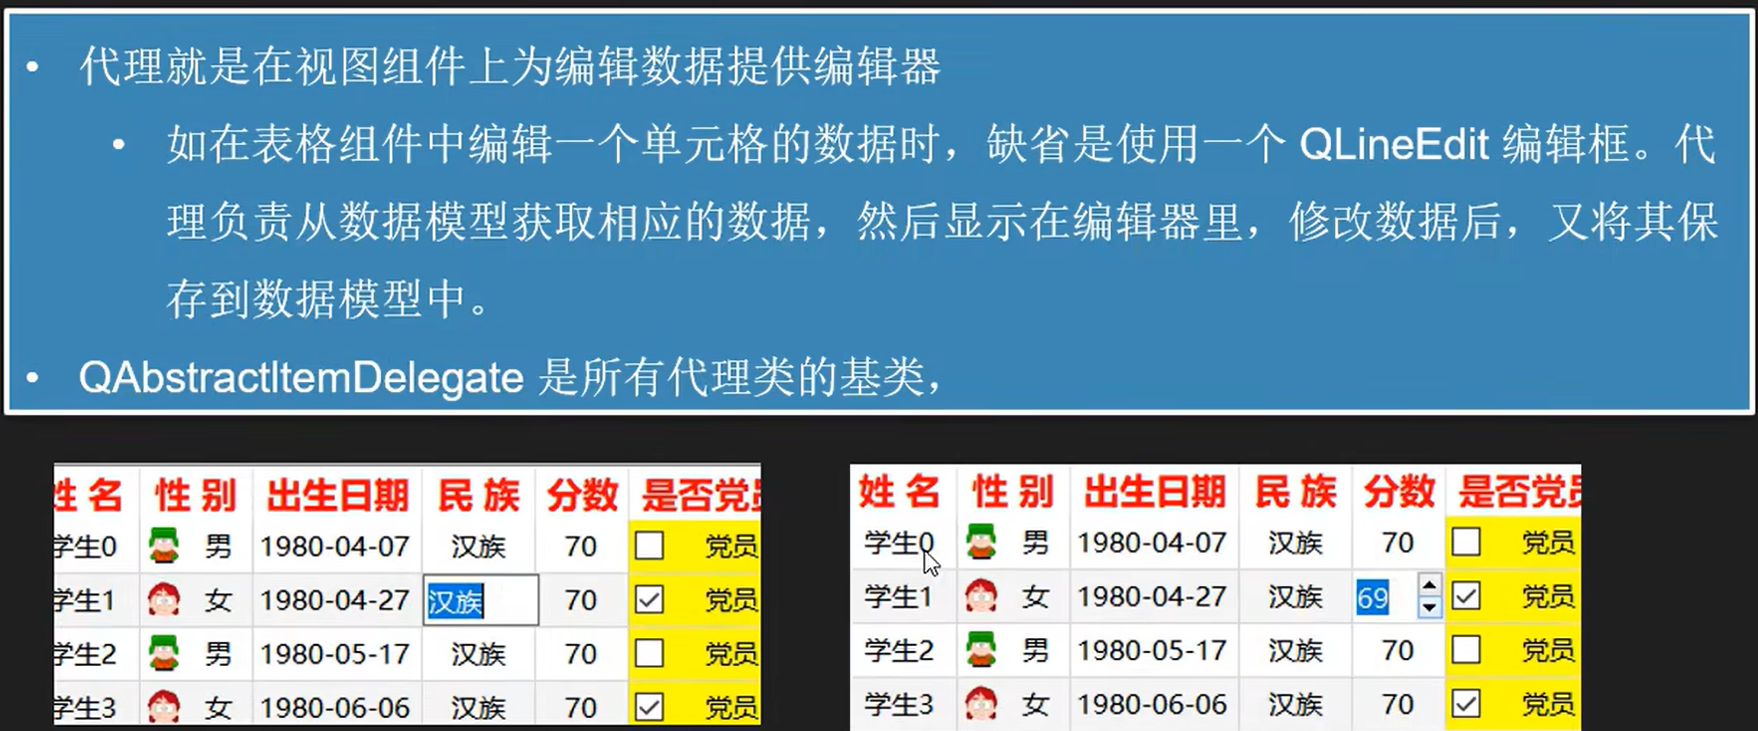
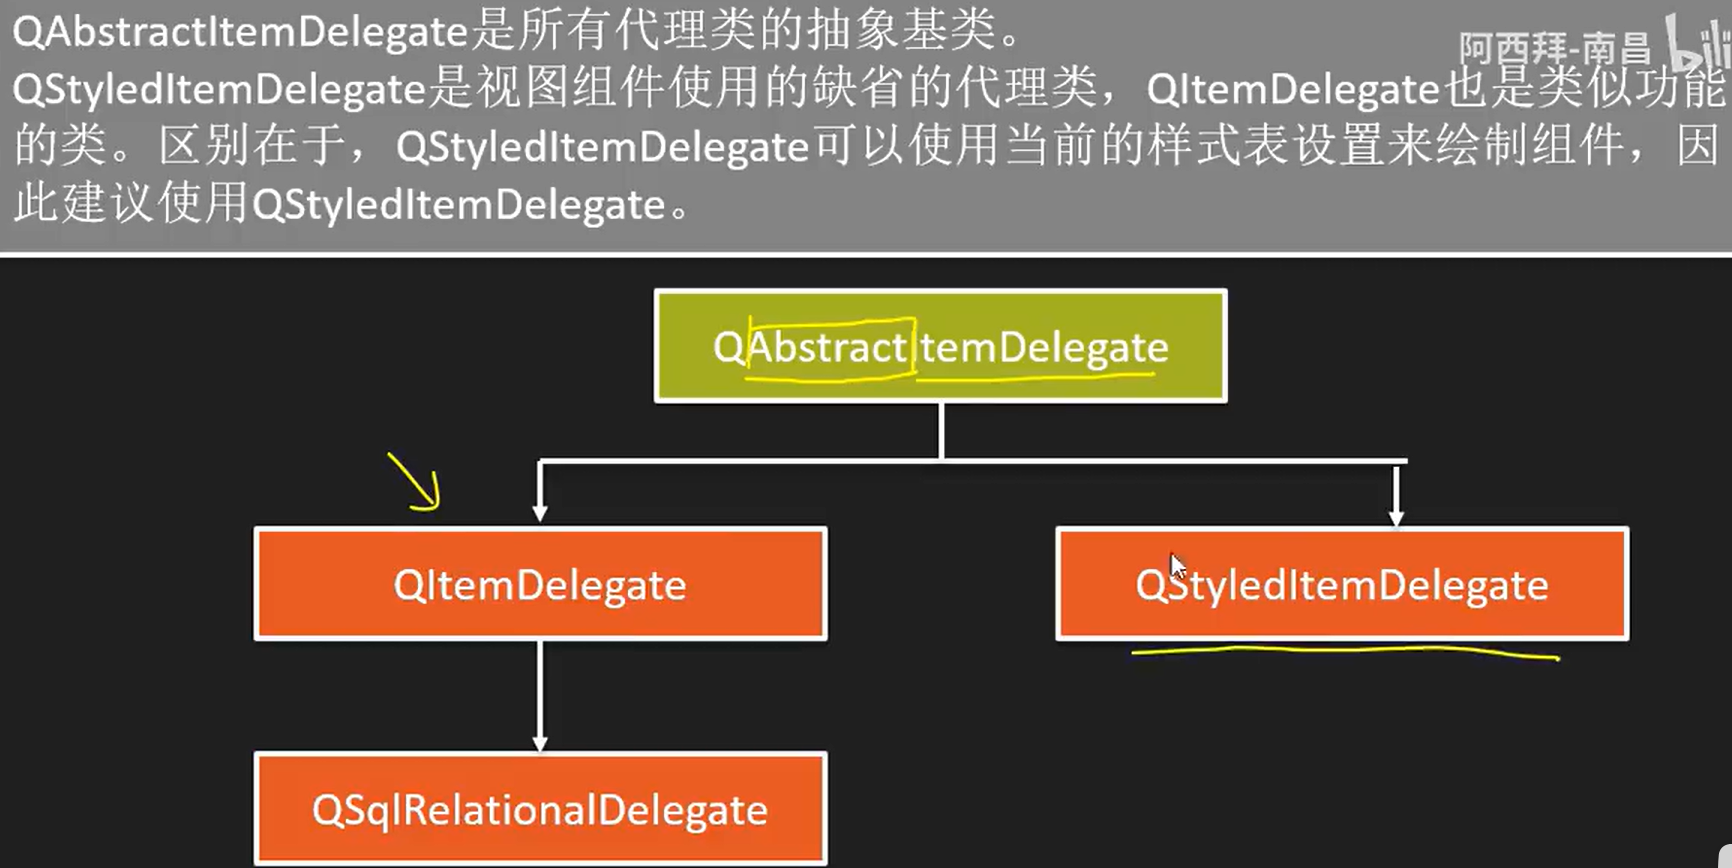

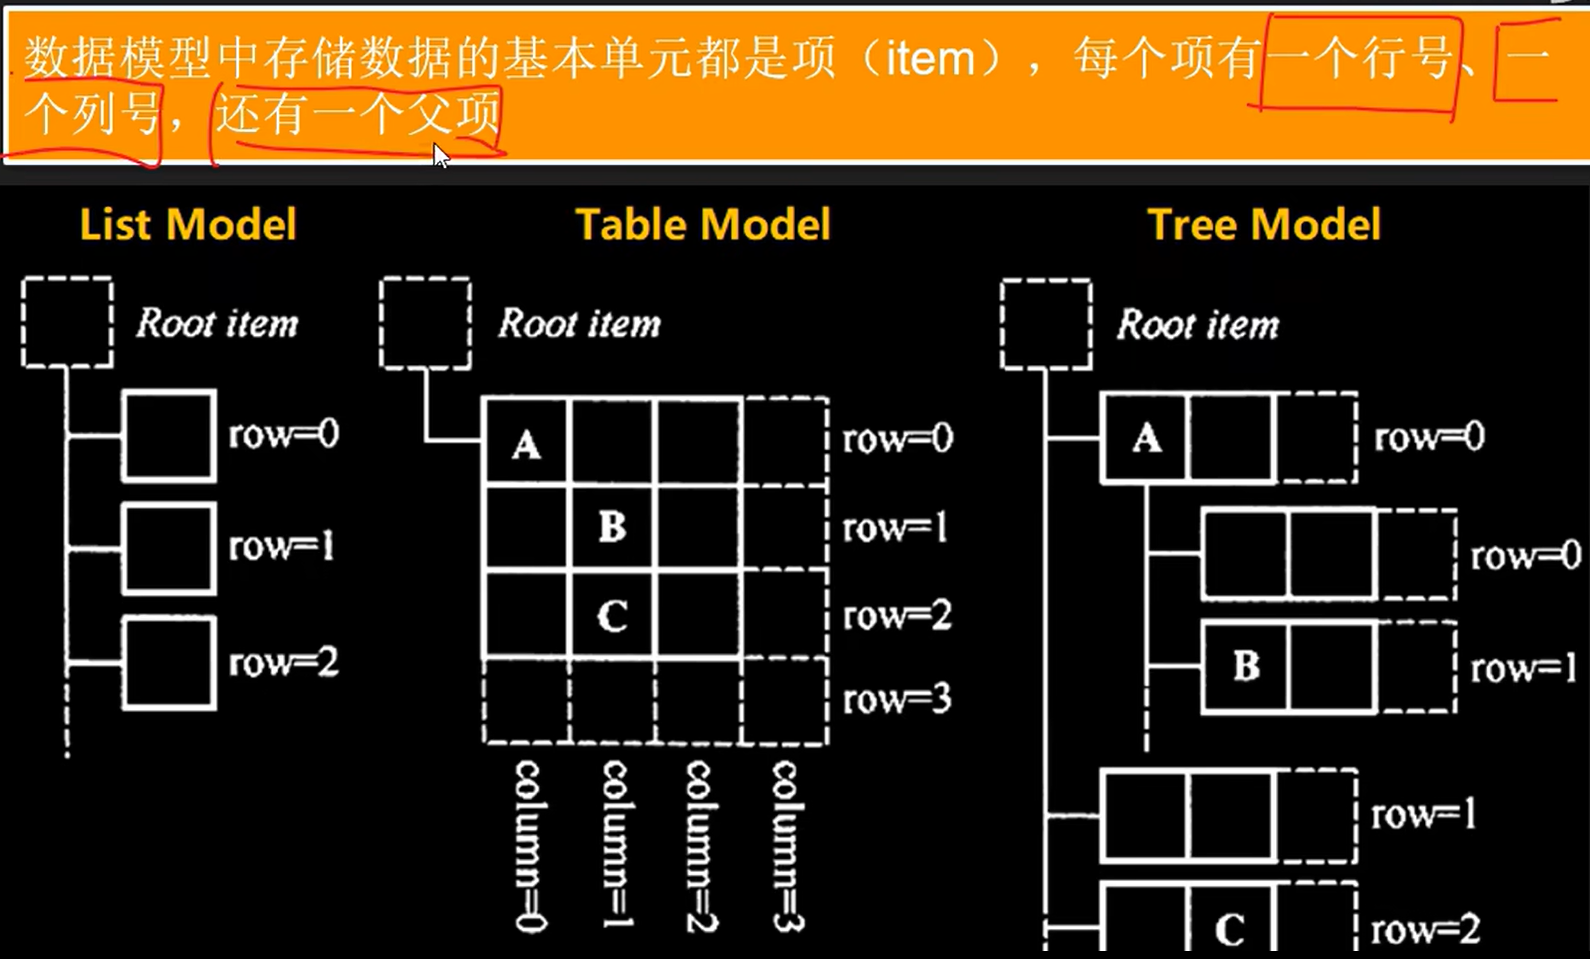
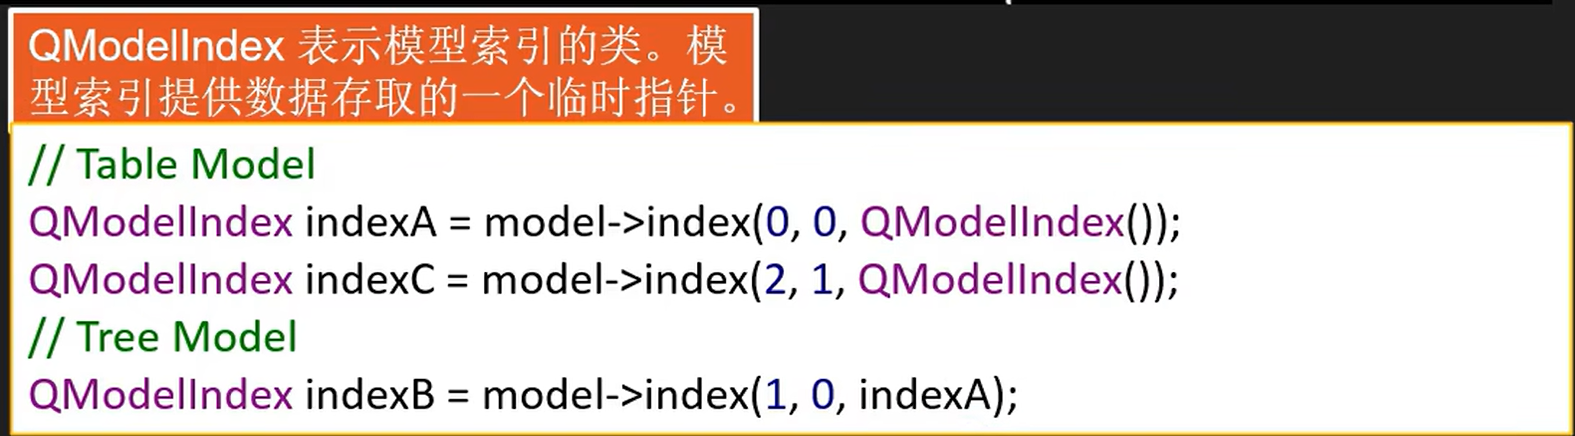

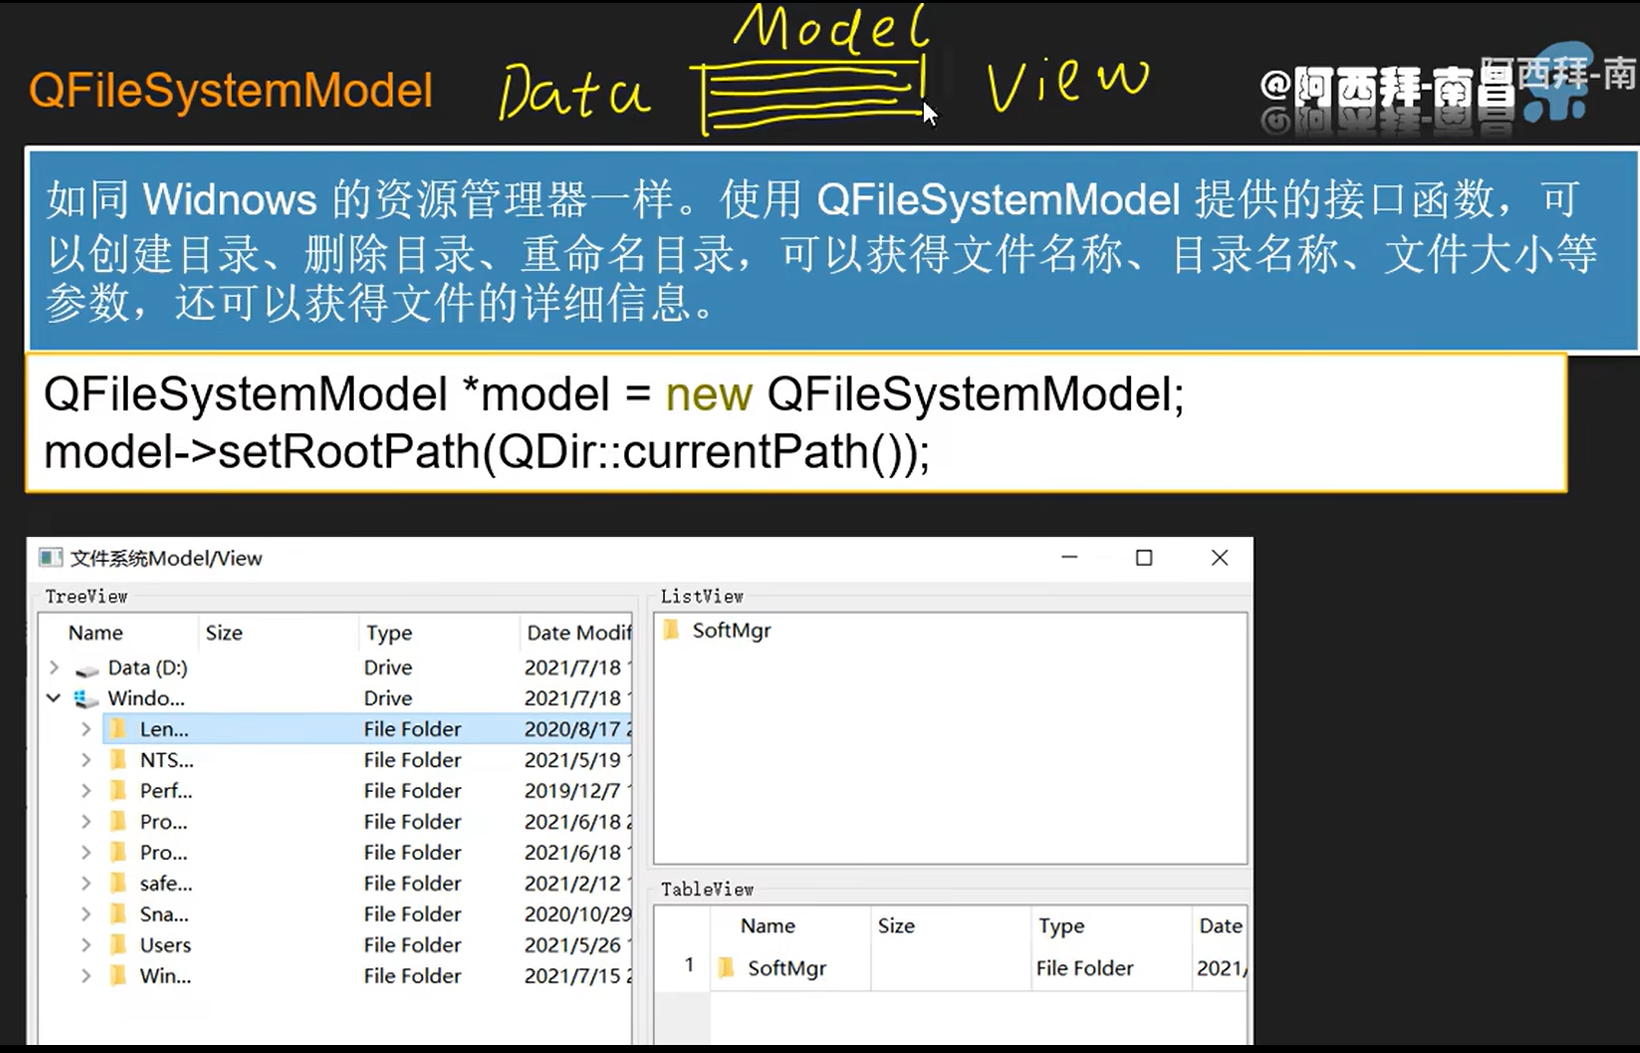
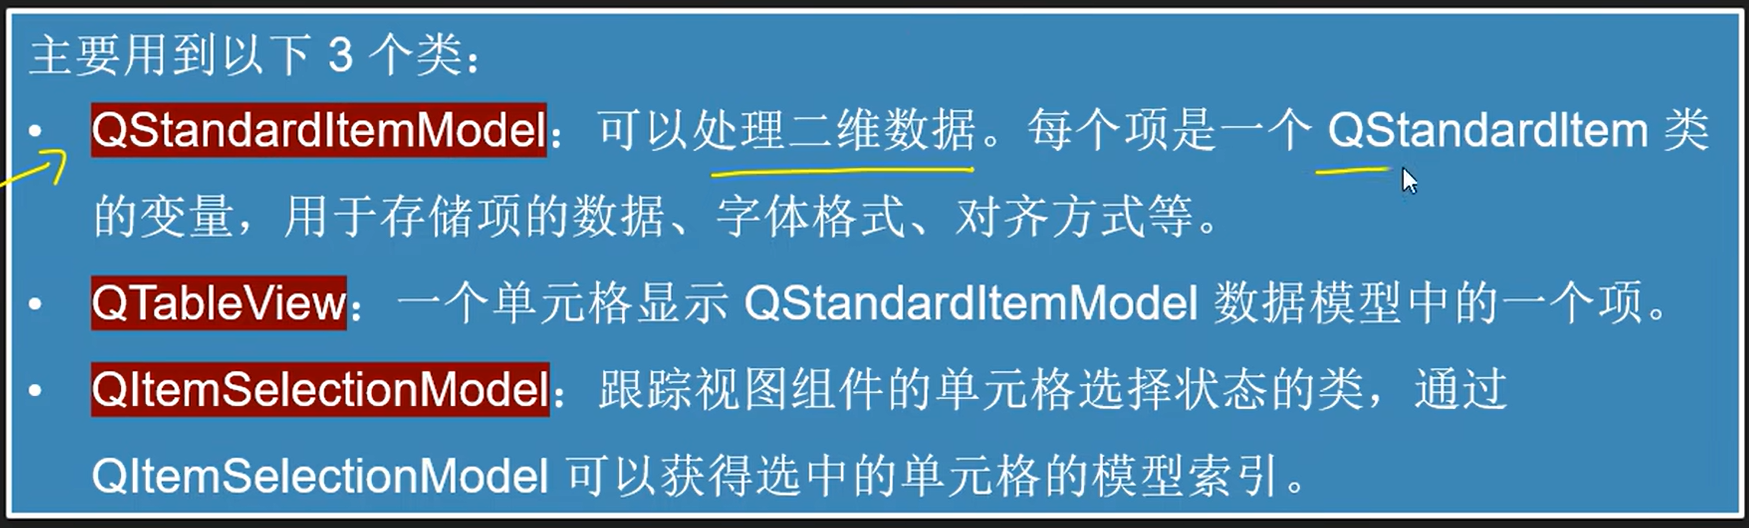
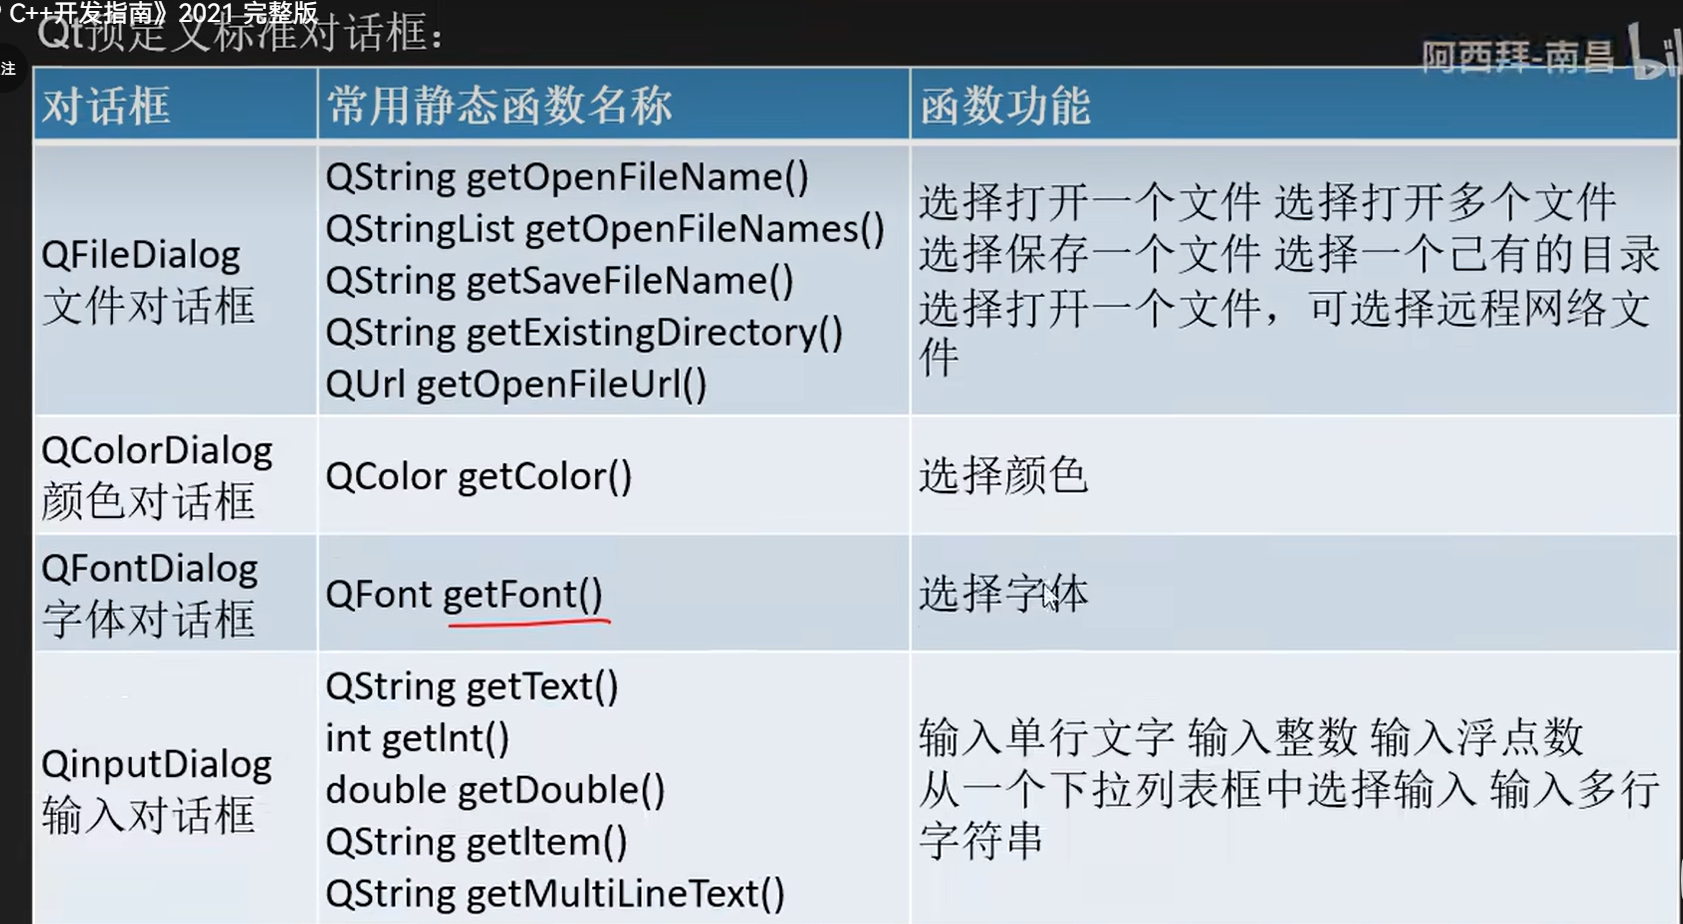

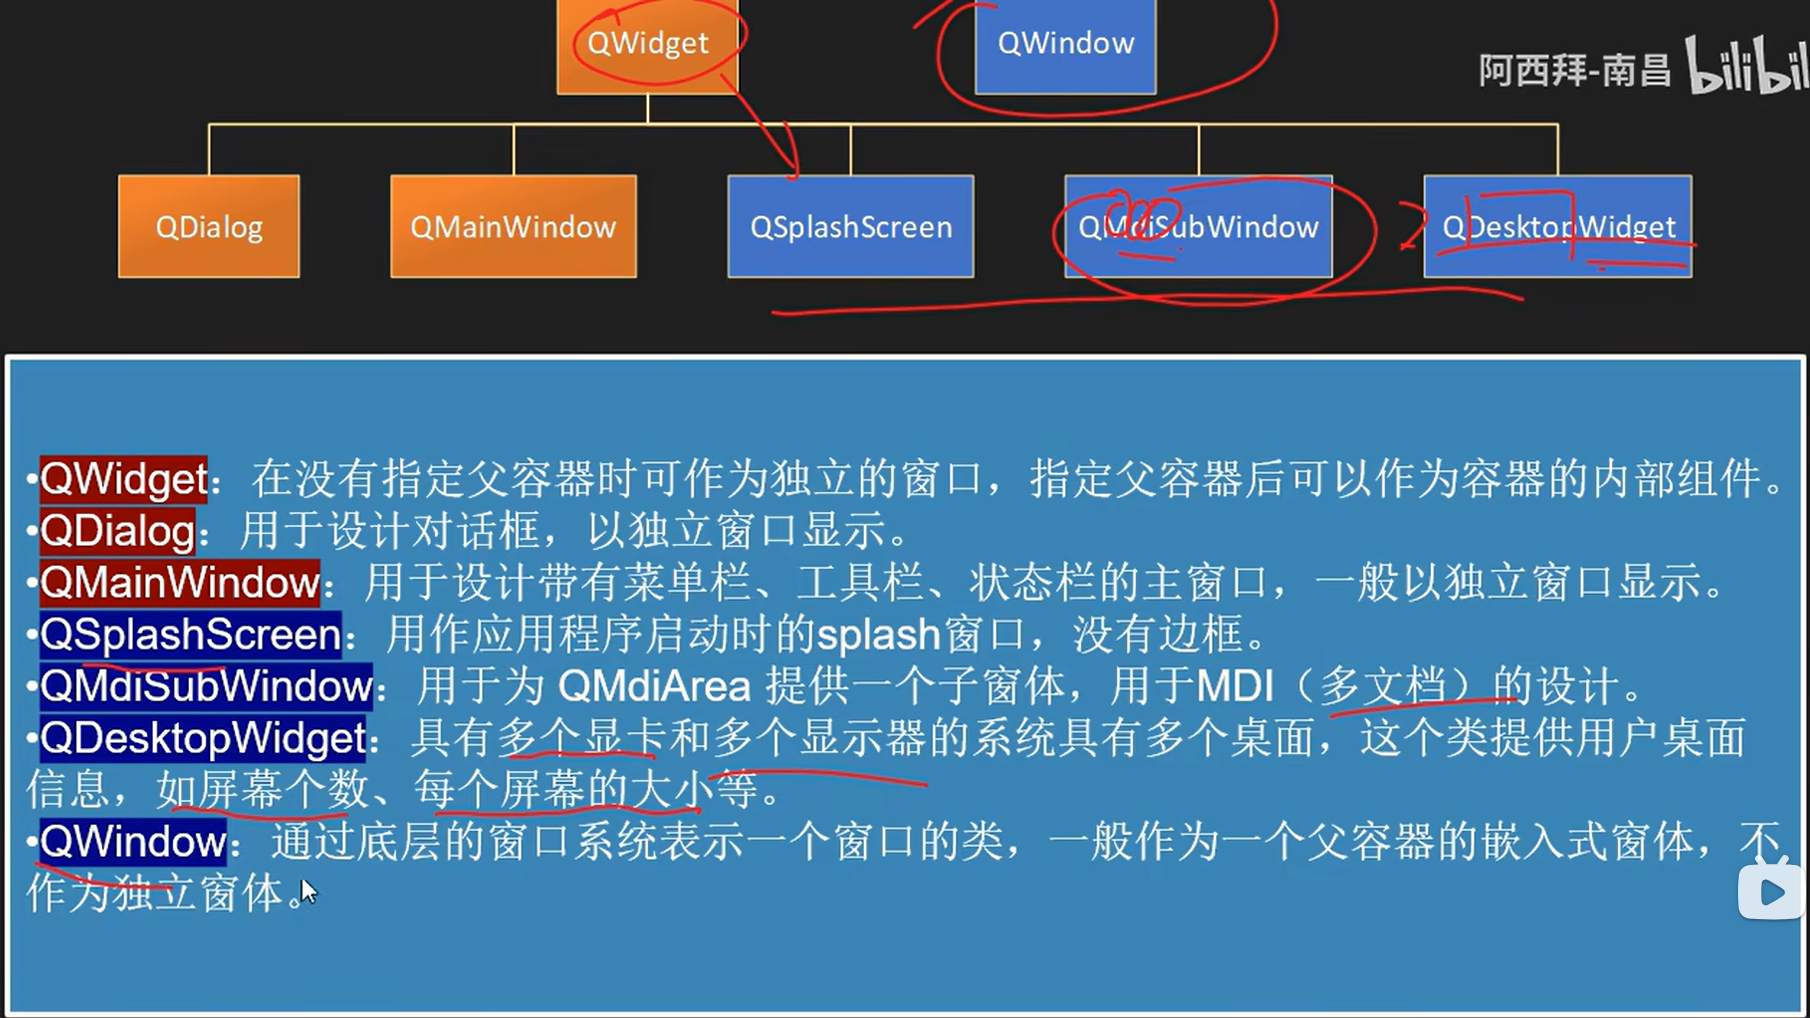
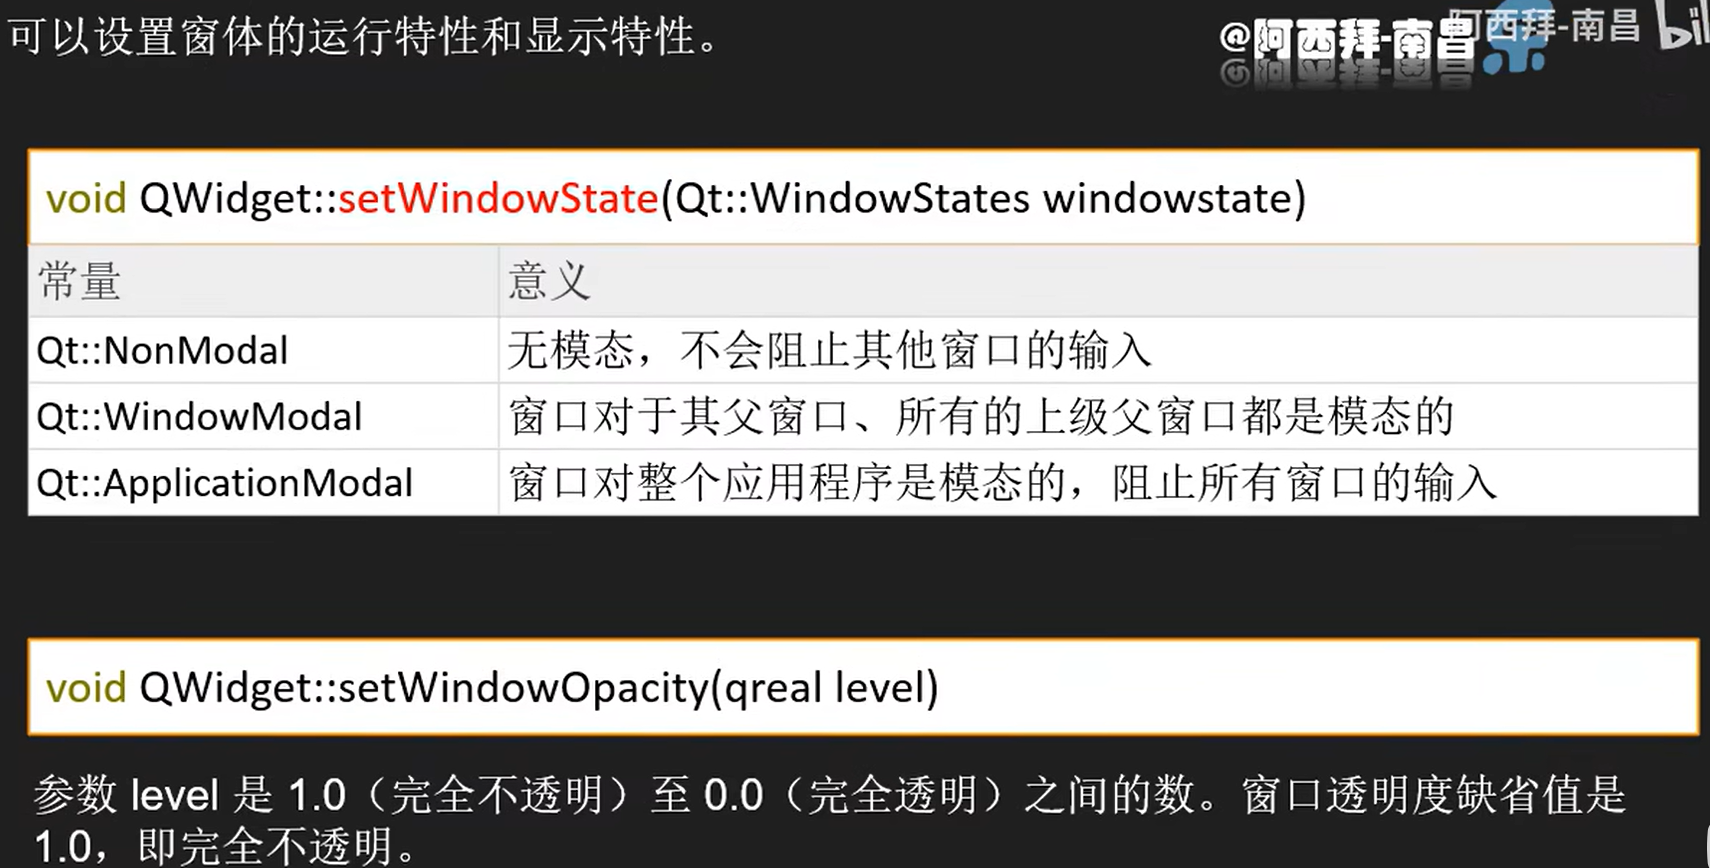
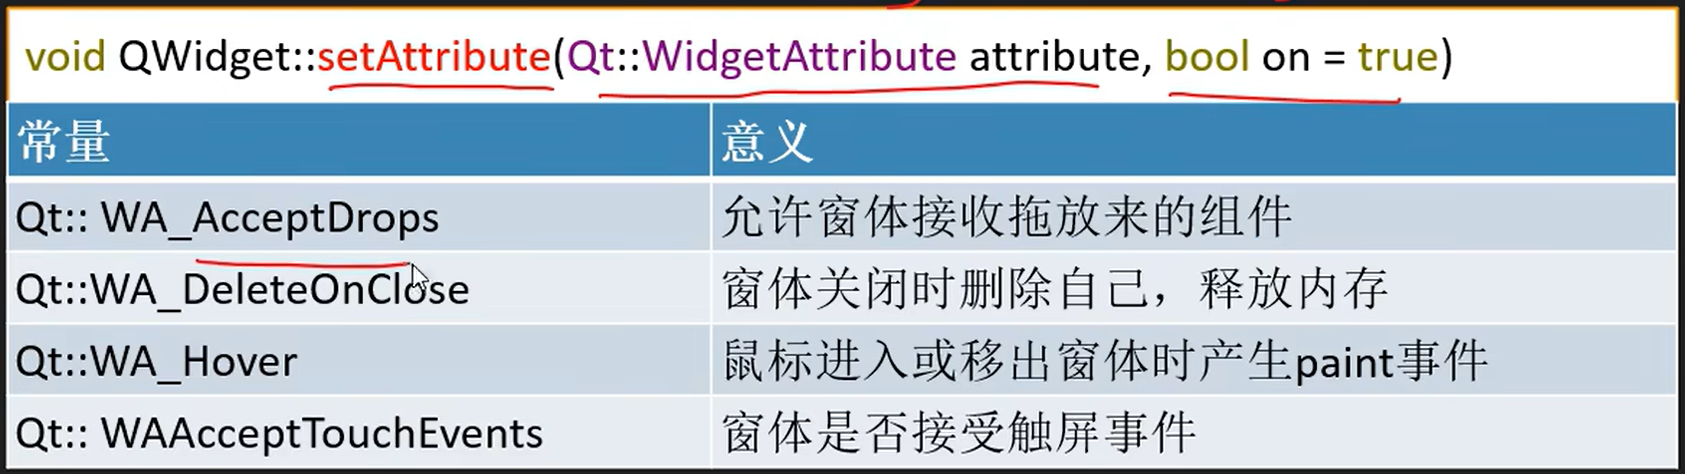
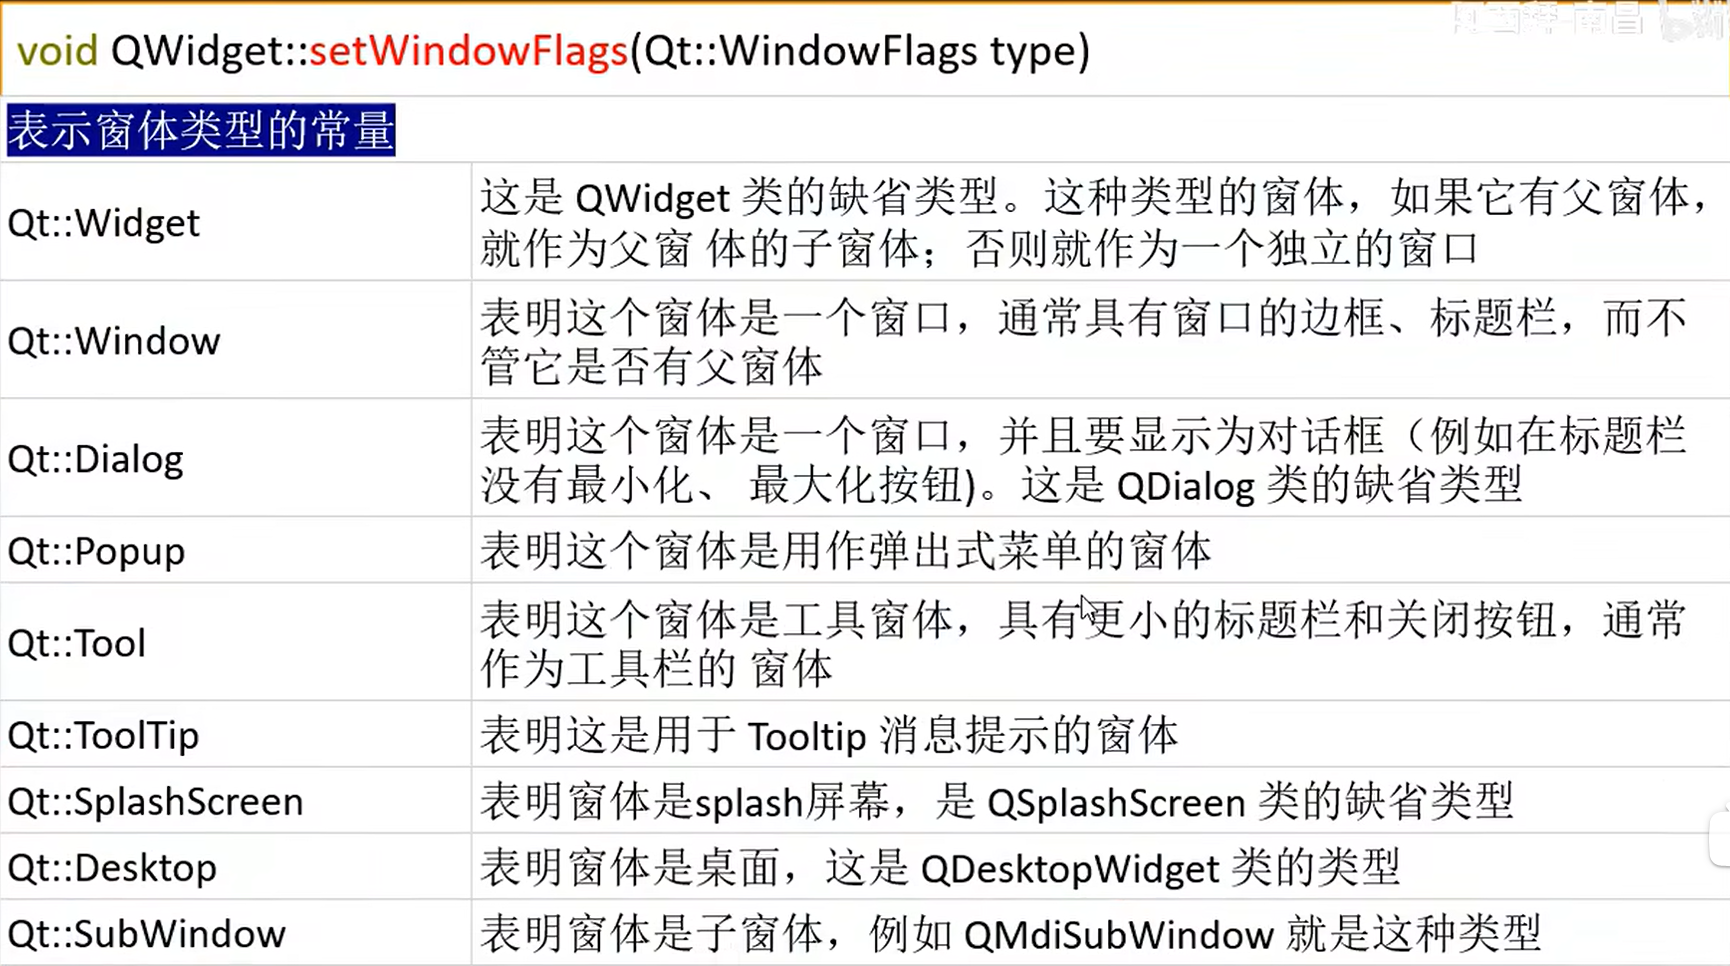

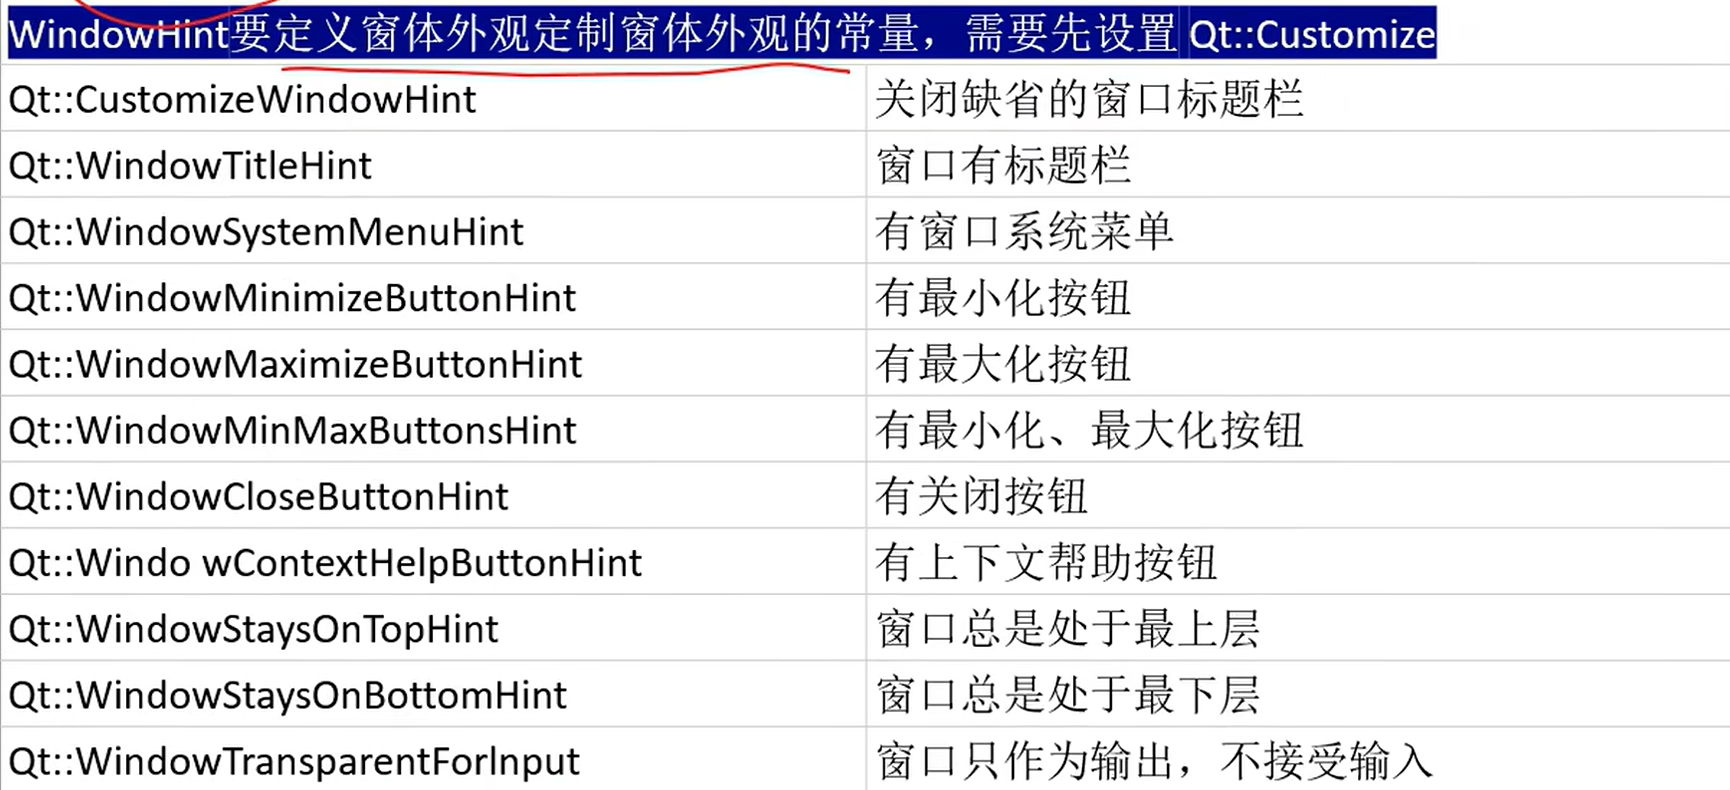
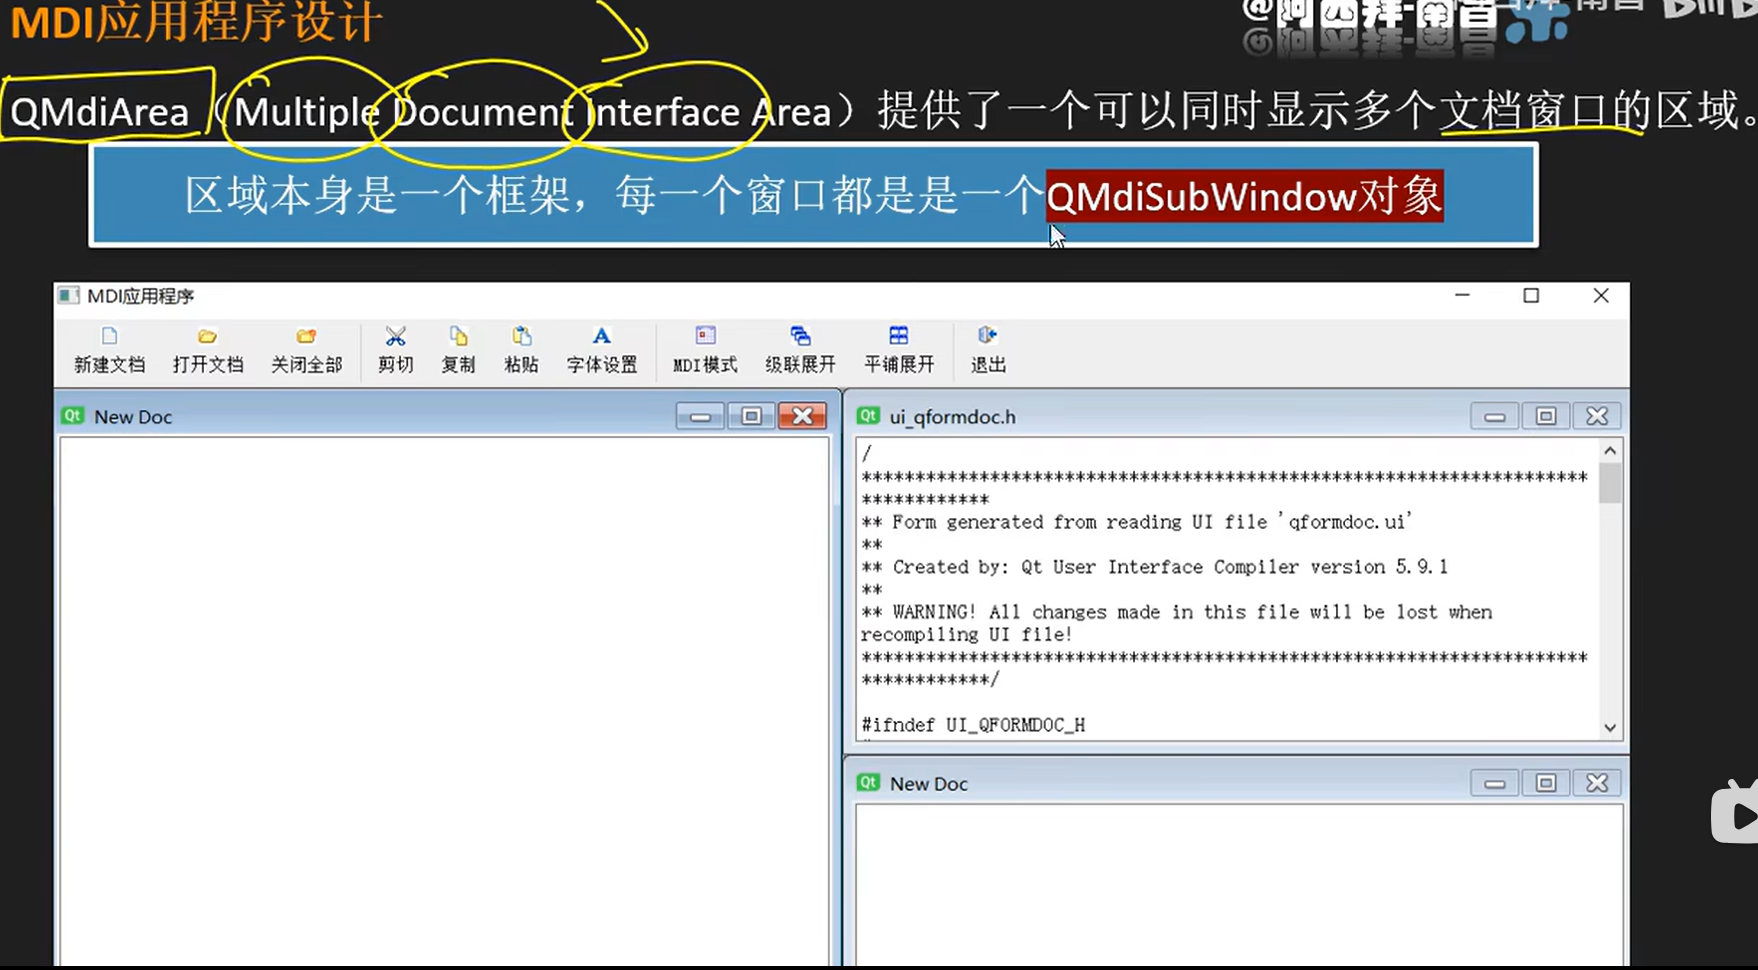
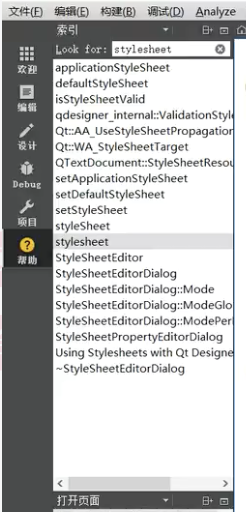 ,查找stylesheet类似于HTML的CSS。
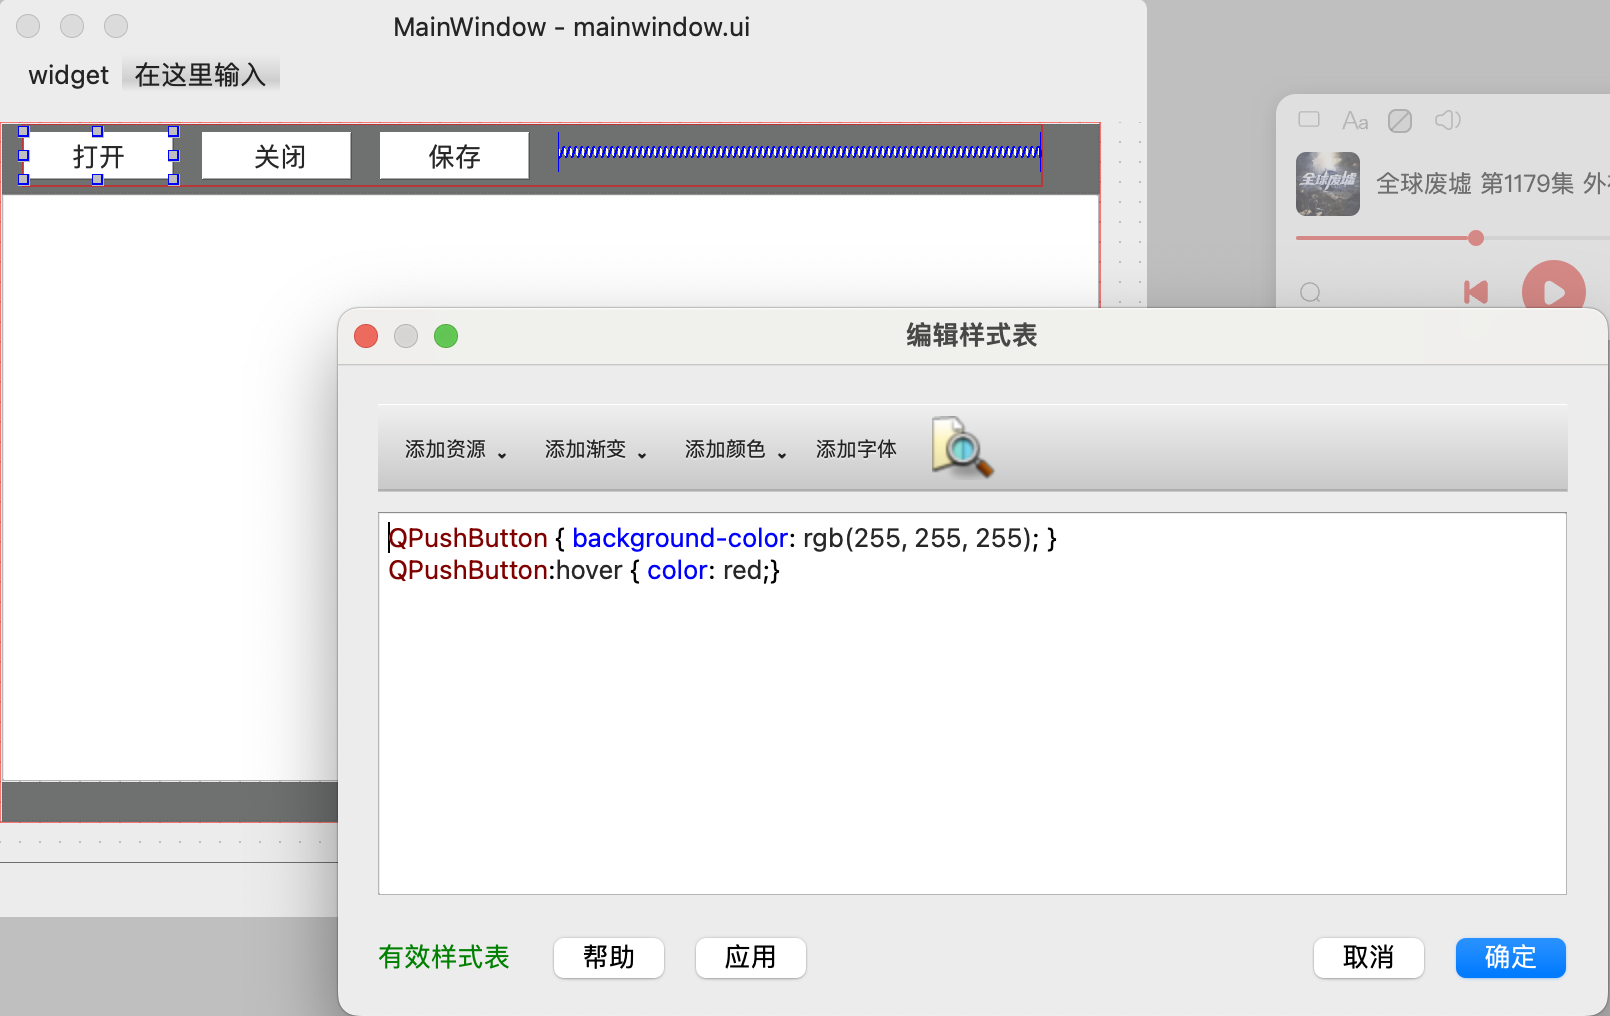
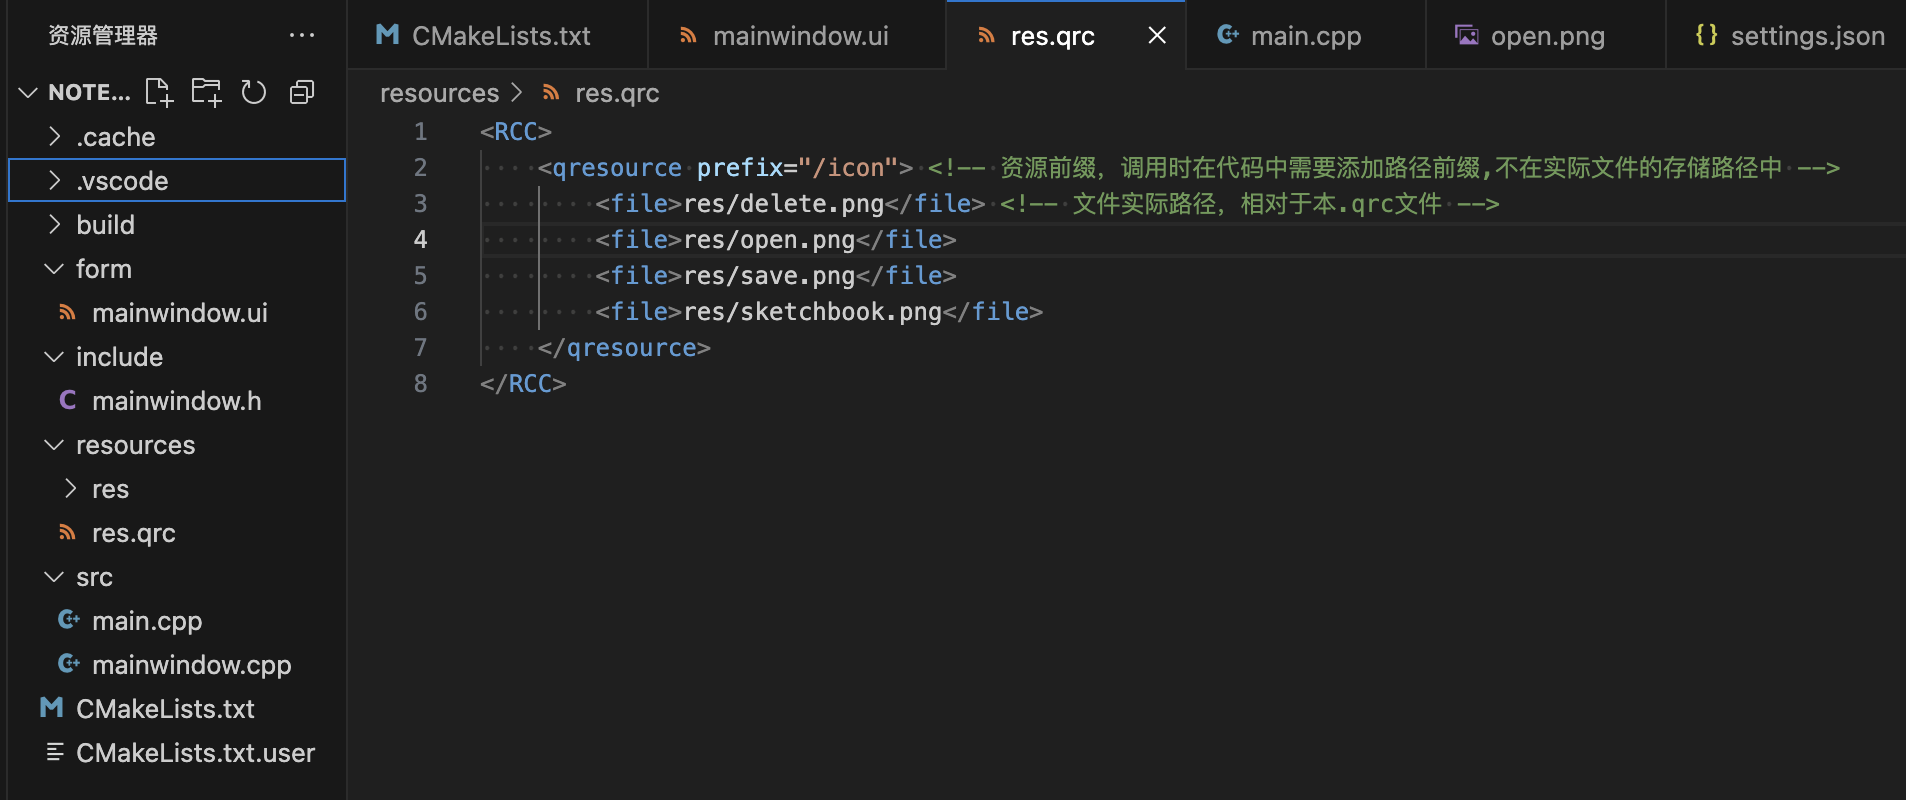
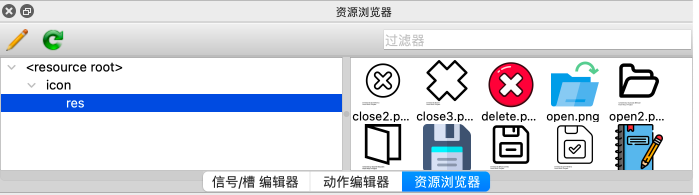
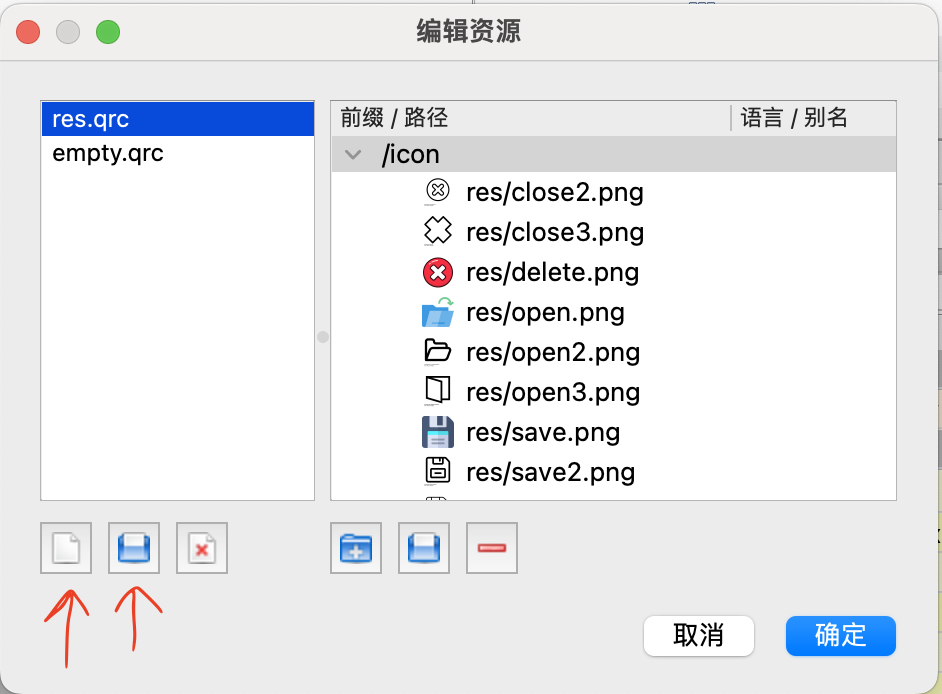
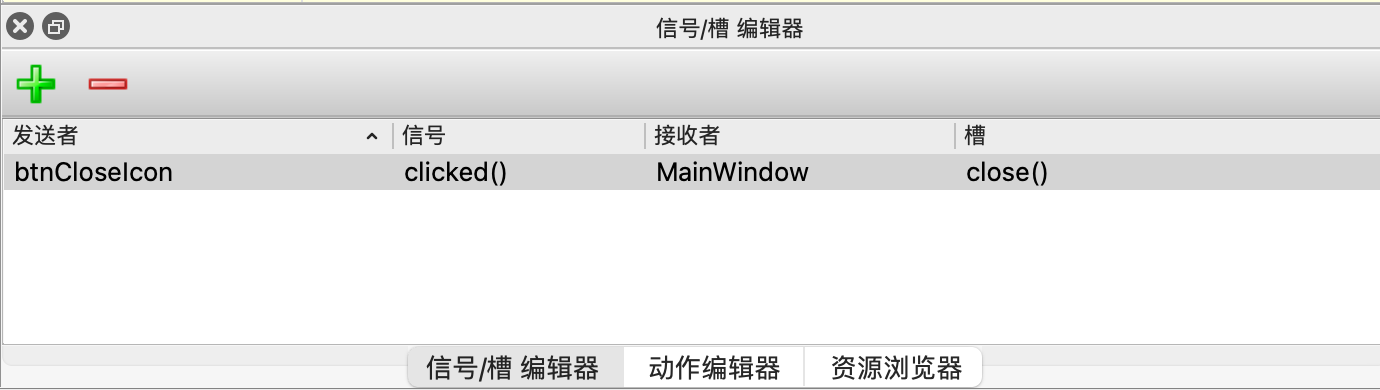
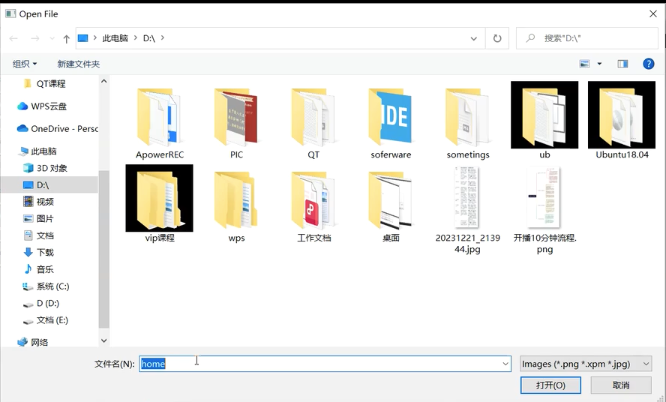
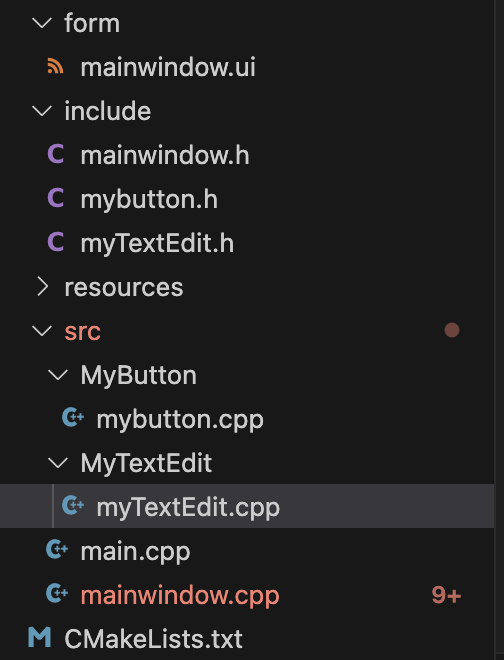
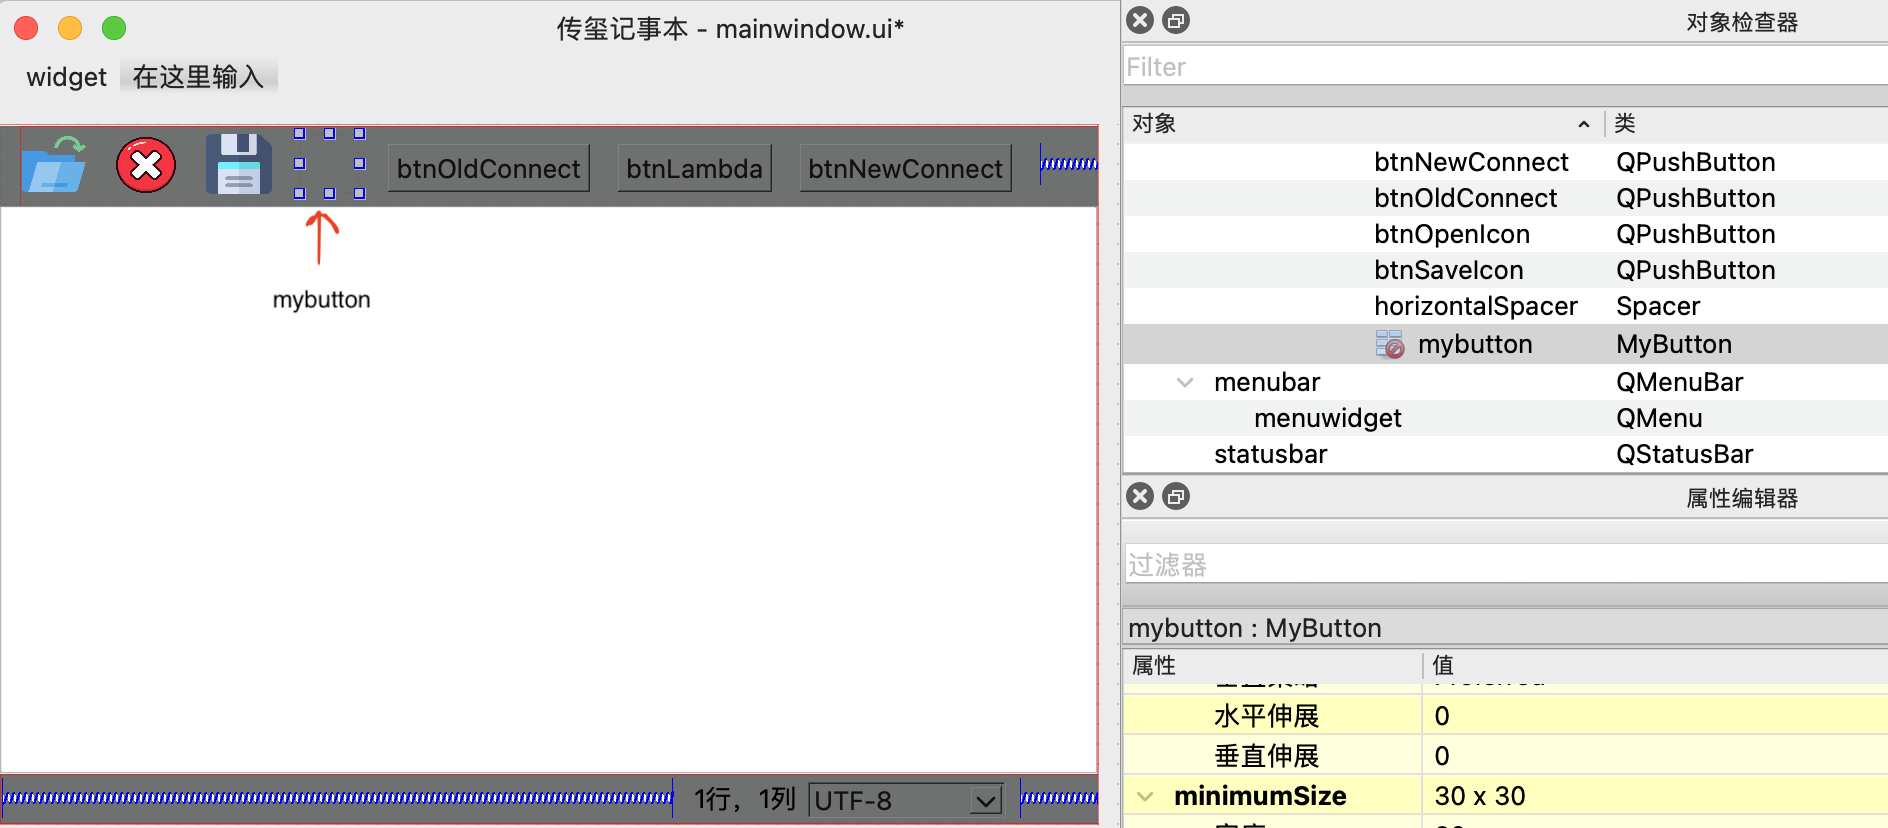
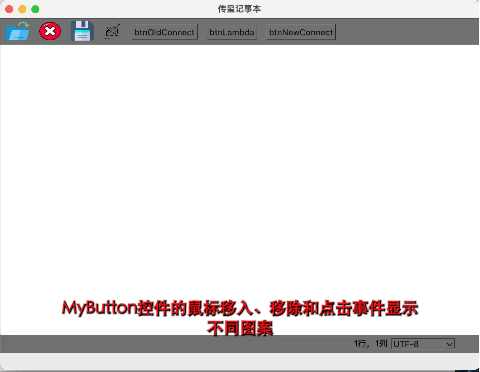
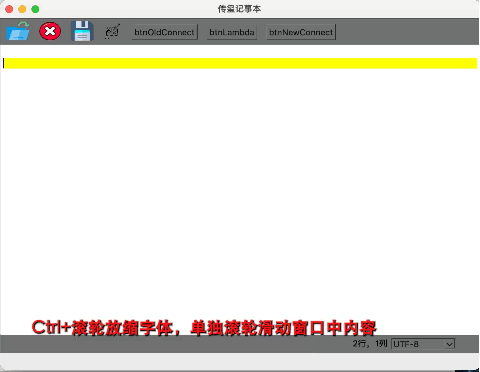
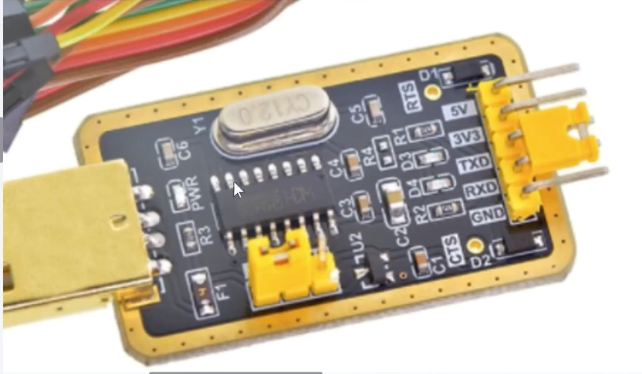
 ,信号与槽重使用带
 在Designer中隐藏历史/面板pushbutton中选择checkable。